


Today I will tell you How To Create A PostgreSQL Cluster With Patroni. I will be using Centos 7 as the operating system.
First of all, we will need 4 virtual servers with Centos 7 installed. You can access Centos 7 installation from the link below.
|
1 |
https://dbtut.com/index.php/2022/02/13/centos-7-installation/ |
|
1 2 3 4 5 |
HOSTNAME IP ADDRESS pg_node1 192.168.1.18 Patroni ve PostgreSQL pg_node2 192.168.1.19 Patroni ve PostgreSQL etcd 192.168.1.20 ETCD Server haproxy 192.168.1.21 HA Proxy |
2. We install the epel repo on all our servers.
|
1 2 3 |
$ sudo yum -y install epel-release $ sudo yum -y install centos-release-scl-rh $ sudo yum -y update |
3. Then we restart our servers.
|
1 |
$ sudo shutdown -r now |
4. Install PostgreSQL 12 on pg_node1 and pg_node2.
|
1 2 |
$ sudo yum -y install https://download.postgresql.org/pub/repos/yum/reporpms/EL-7-x86_64/pgdg-redhat-repo-latest.noarch.rpm $ sudo yum -y install postgresql12-server postgresql12 postgresql12-devel |
5. We install Patroni on pg_node1 and pg_node2.
|
1 |
$ sudo yum -y install https://github.com/cybertec-postgresql/patroni-packaging/releases/download/1.6.5-1/patroni-1.6.5-1.rhel7.x86_64.rpm |
6. We create a config file for Patroni on pg_node1 and pg_node2.
|
1 |
$ sudo cp -p /opt/app/patroni/etc/postgresql.yml.sample /opt/app/patroni/etc/postgresql.yml |
We enter the configuration file with vi and edit it as follows.
|
1 |
$ sudo vi /opt/app/patroni/etc/postgresql.yml |
For pg_node1 :
|
1 2 3 4 5 6 7 8 9 10 11 12 13 14 15 16 17 18 19 20 21 22 23 24 25 26 27 28 29 30 31 32 33 34 35 36 37 38 39 40 41 42 43 44 45 46 47 48 49 |
scope: postgres namespace: /pg_cluster/ name: pg_node1 restapi: listen: 192.168.1.18:8008 connect_address: 192.168.1.18:8008 etcd: host: 192.168.1.20:2379 bootstrap: dcs: ttl: 30 loop_wait: 10 retry_timeout: 10 maximum_lag_on_failover: 1048576 postgresql: use_pg_rewind: true use_slots: true initdb: - encoding: UTF8 - data-checksums pg_hba: - host replication replicator 127.0.0.1/32 md5 - host replication replicator 192.168.1.18/0 md5 - host replication replicator 192.168.1.19/0 md5 - host all all 0.0.0.0/0 md5 users: admin: password: admin options: - createrole - createdb postgresql: listen: 192.168.1.18:5432 connect_address: 192.168.1.18:5432 data_dir: /var/lib/pgsql/12/data bin_dir: /usr/pgsql-12/bin pgpass: /tmp/pgpass authentication: replication: username: replicator password: replicator superuser: username: postgres password: postgres tags: nofailover: false noloadbalance: false clonefrom: false nosync: false |
For pg_node2:
|
1 2 3 4 5 6 7 8 9 10 11 12 13 14 15 16 17 18 19 20 21 22 23 24 25 26 27 28 29 30 31 32 33 34 35 36 37 38 39 40 41 42 43 44 45 46 47 48 49 |
scope: postgres namespace: /pg_cluster/ name: pg_node2 restapi: listen: 192.168.1.19:8008 connect_address: 192.168.1.19:8008 etcd: host: 192.168.1.20:2379 bootstrap: dcs: ttl: 30 loop_wait: 10 retry_timeout: 10 maximum_lag_on_failover: 1048576 postgresql: use_pg_rewind: true use_slots: true initdb: - encoding: UTF8 - data-checksums pg_hba: - host replication replicator 127.0.0.1/32 md5 - host replication replicator 192.168.1.18/0 md5 - host replication replicator 192.168.1.19/0 md5 - host all all 0.0.0.0/0 md5 users: admin: password: admin options: - createrole - createdb postgresql: listen: 192.168.1.19:5432 connect_address: 192.168.1.19:5432 data_dir: /var/lib/pgsql/12/data bin_dir: /usr/pgsql-12/bin pgpass: /tmp/pgpass authentication: replication: username: replicator password: replicator superuser: username: postgres password: postgres tags: nofailover: false noloadbalance: false clonefrom: false nosync: false |
7. We install etcd on the etcd server.
|
1 |
$ sudo yum -y install etcd |
8. After the installation is finished, we make the following changes in the configuration file.
|
1 2 3 4 5 6 7 8 9 10 11 |
$ sudo vi /etc/etcd/etcd.conf [Member] ETCD_LISTEN_PEER_URLS="http://192.168.1.20:2380,http://localhost:2380" ETCD_LISTEN_CLIENT_URLS="http://192.168.1.20:2379,http://localhost:2379" [Clustering] ETCD_INITIAL_ADVERTISE_PEER_URLS="http://192.168.1.20:2380" ETCD_ADVERTISE_CLIENT_URLS="http://192.168.1.20:2379" ETCD_INITIAL_CLUSTER="default=http://192.168.1.20:2380" ETCD_INITIAL_CLUSTER_TOKEN="etcd-cluster" ETCD_INITIAL_CLUSTER_STATE="new" |
9. We start the etcd service.
|
1 2 3 |
$ sudo systemctl enable etcd $ sudo systemctl start etcd $ sudo systemctl status etcd |


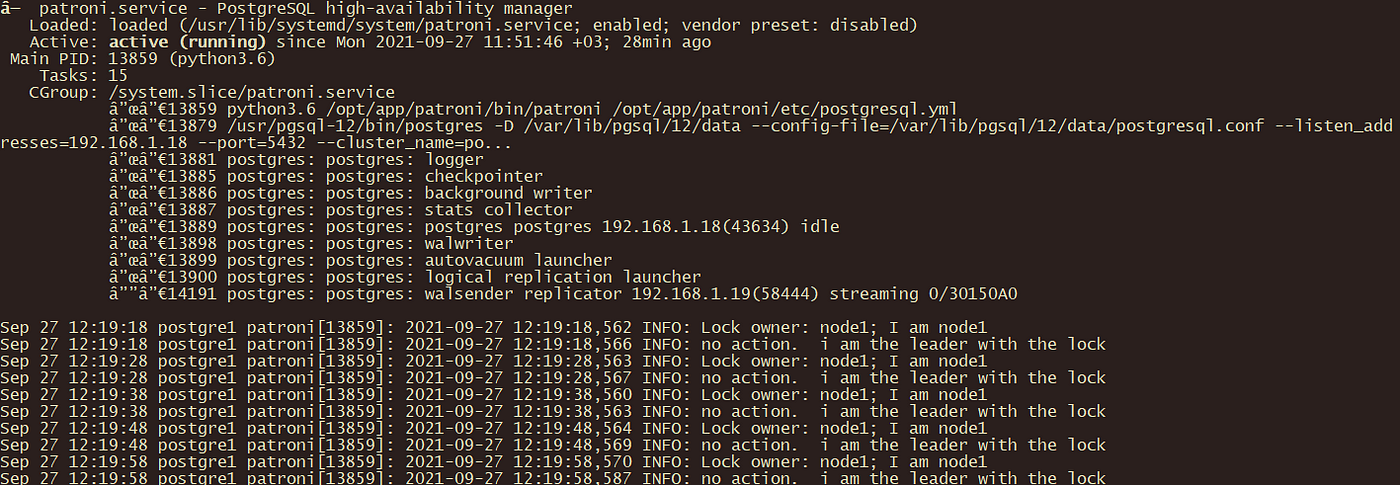
10. After starting the etcd service, we start the Patroni service in pg_node1 and pg_node2.
|
1 2 3 |
$ sudo systemctl enable patroni $ sudo systemctl start patroni $ sudo systemctl status patroni |
pg_node1 :


11. We install HAProxy on the haproxy server.
|
1 |
$ sudo yum -y install haproxy |
12. After the installation is finished, the configuration file is backed up and arranged as follows.
|
1 2 3 4 5 6 7 8 9 10 11 12 13 14 15 16 17 18 19 20 21 22 23 24 25 26 27 28 29 30 31 32 33 34 35 36 37 38 39 40 |
$ sudo cp -p /etc/haproxy/haproxy.cfg /etc/haproxy/haproxy.cfg_old $ sudo vi /etc/haproxy/haproxy.cfg global log 127.0.0.1 local2 chroot /var/lib/haproxy pidfile /var/run/haproxy.pid maxconn 4000 user haproxy group haproxy daemon stats socket /var/lib/haproxy/stats defaults mode tcp log global option httplog option dontlognull option http-server-close option forwardfor except 127.0.0.0/8 option redispatch retries 3 timeout http-request 10s timeout queue 1m timeout connect 4s timeout client 30m timeout server 30m timeout http-keep-alive 10s timeout check 5s maxconn 3000 listen stats mode http bind *:7000 stats enable stats uri / listen postgres bind *:5000 option httpchk http-check expect status 200 default-server inter 3s fall 3 rise 2 on-marked-down shutdown-sessions server pg_node1 192.168.1.18:5432 maxconn 1000 check port 8008 server pg_node2 192.168.1.19:5432 maxconn 1000 check port 8008 |
13. We start the HAProxy service.
|
1 2 3 |
$ sudo systemctl start haproxy $ sudo systemctl enable haproxy $ sudo systemctl status haproxy |


If the HAProxy service cannot be started, we can check the errors in the configuration file with the following command.
|
1 |
$ sudo haproxy -c -V -f /etc/haproxy/haproxy.cfg |
When we open the address http://192.168.1.21:7000 in the browser, we will see a haproxy panel like the one below. As can be seen here, pg_node1 is the master and pg_node2 is the slave.


We can also check the cluster status, role and members with the following command.
|
1 |
$ sudo patronictl -c /opt/app/patroni/etc/postgresql.yml list |


We have completed the cluster setup with Patroni. See you in my other articles.
![]()
