


We will configure linux for oracle database in this article.
We will edit the host file. We will do this in both nodes. (with root user)
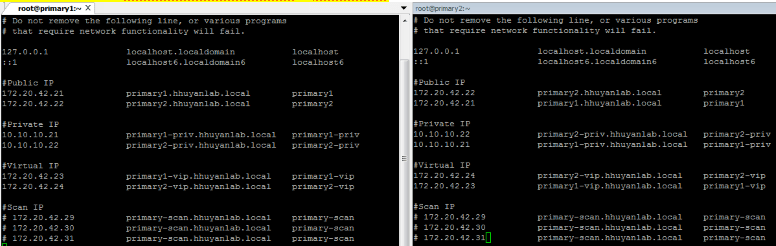
Configure /etc/hosts for Oracle
The /etc/hosts file is opened in edit mode with the following command and the following lines are added. We do this in both nodes.
|
1 |
vi /etc/hosts |
|
1 2 3 4 5 6 7 8 9 10 11 12 13 14 15 16 17 18 |
#Public IP 172.20.42.21 primary1.hhuyanlab.local primary1 172.20.42.22 primary2.hhuyanlab.local primary2 #Private IP 10.10.10.21 primary1-priv.hhuyanlab.local primary1-priv 10.10.10.22 primary2-priv.hhuyanlab.local primary2-priv #Virtual IP 172.20.42.23 primary1-vip.hhuyanlab.local primary1-vip 172.20.42.24 primary2-vip.hhuyanlab.local primary2-vip #Scan IP # 172.20.42.29 primary-scan.hhuyanlab.local primary-scan # 172.20.42.30 primary-scan.hhuyanlab.local primary-scan # 172.20.42.31 primary-scan.hhuyanlab.local primary-scan |

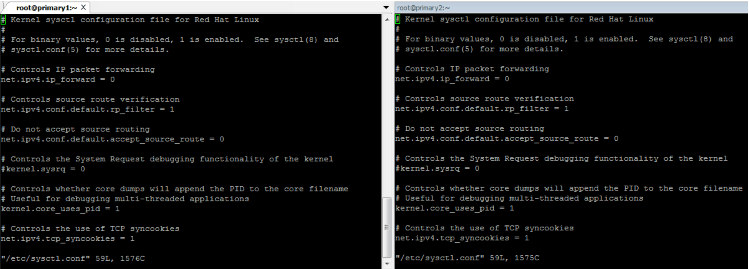
Set Kernel Parameters for Oracle
We set the kernel parameters. We do this in both nodes. (with root user)
We edit the file with the command below. We delete all the content and write the values below.
|
1 2 3 4 5 6 7 8 9 10 11 12 13 14 15 16 17 18 19 20 21 22 23 24 25 26 27 28 29 30 31 32 33 34 35 36 37 38 39 40 41 42 43 44 45 46 47 48 49 50 51 52 53 54 55 56 57 58 59 60 61 62 63 64 65 66 67 68 69 70 71 72 73 74 75 76 77 78 79 80 81 82 83 84 85 86 87 88 89 90 91 92 93 94 95 96 97 98 99 100 101 102 103 104 105 106 107 108 109 110 111 112 113 114 115 116 117 118 119 120 121 122 123 124 125 126 127 128 129 |
# Kernel sysctl configuration file for Red Hat Linux # # For binary values, 0 is disabled, 1 is enabled. See sysctl(8) and # sysctl.conf(5) for more details. # Controls IP packet forwarding net.ipv4.ip_forward = 0 # Controls source route verification net.ipv4.conf.default.rp_filter = 1 # Do not accept source routing net.ipv4.conf.default.accept_source_route = 0 # Controls the System Request debugging functionality of the kernel #kernel.sysrq = 0 # Controls whether core dumps will append the PID to the core filename # Useful for debugging multi-threaded applications kernel.core_uses_pid = 1 # Controls the use of TCP syncookies net.ipv4.tcp_syncookies = 1 # Controls the maximum size of a message, in bytes kernel.msgmnb = 65536 # Controls the default maxmimum size of a mesage queue kernel.msgmax = 65536 # Controls the maximum shared segment size, in bytes kernel.shmmax = 68719476736 # (64G) 12G #kernel.shmmax = 85899345920 # (80G) 182G # Controls the maximum number of shared memory segments, in pages #kernel.shmall = 4294967296 #KDUMP KERNEL PARAMETERS# kernel.sysrq = 1 kernel.panic = 10 kernel.panic_on_oops = 1 kernel.panic_on_unrecovered_nmi = 1 kernel.unknown_nmi_panic = 1 ############################## kernel.shmmni = 4096 #kernel.sem = 250 32000 100 128 kernel.sem = 250 32000 100 256 fs.file-max = 6815744 net.ipv4.ip_local_port_range = 9000 65500 net.core.rmem_default = 262144 net.core.wmem_default = 262144 net.core.rmem_max = 4194304 net.core.wmem_max = 1048576 fs.aio-max-nr = 1048576 ############################# vm.swappiness = 100 vm.min_free_kbytes = 650820 #vm.nr_hugepages=37506 # You can set huge page with script. |

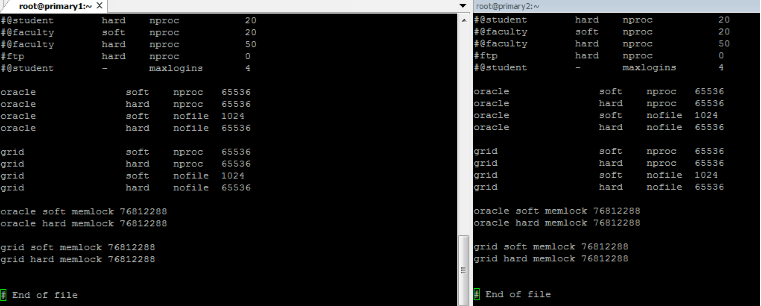
Configure /etc/security/limits.conf for Security
We write the parameters for the security settings. We do this in both nodes. (with root user)
We edit the /etc/security/limits.conf file with the command below and add the following lines at the end of the file.
|
1 |
vi /etc/security/limits.conf |
|
1 2 3 4 5 6 7 8 9 10 11 12 13 14 15 |
oracle soft nproc 65536 oracle hard nproc 65536 oracle soft nofile 1024 oracle hard nofile 65536 grid soft nproc 65536 grid hard nproc 65536 grid soft nofile 1024 grid hard nofile 65536 oracle soft memlock 76812288 oracle hard memlock 76812288 grid soft memlock 76812288 grid hard memlock 76812288 |

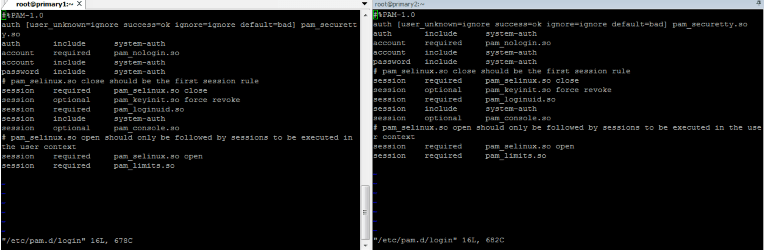
We edit the /etc/pam.d/login file with the command below and add the following line at the end of the file. We do this in both nodes. (with root user).
|
1 |
vi /etc/pam.d/login |
|
1 |
session required pam_limits.so |

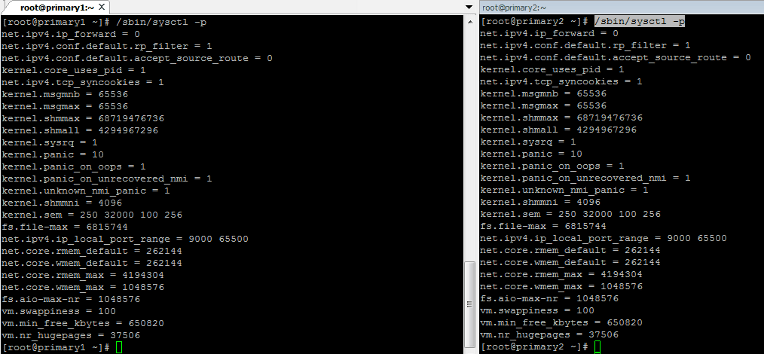
By running the command below, we ensure that the parameters are valid. We do this in both nodes. (with root user).
|
1 |
# /sbin/sysctl -p |

Now let’s check the RPM required for installations. We do this in both nodes. (with root user).
|
1 2 3 4 5 6 7 8 9 10 11 12 13 14 15 16 17 18 19 20 21 22 23 24 25 26 27 28 29 30 31 32 33 34 35 36 37 38 39 40 |
rpm -q setarch rng-utils libXtst xorg-x11 binutils compat-db compat-libstdc++-33 libgcc glibc glibc-devel glibc-headers gcc gcc-c++ libgcc libstdc++ cpp make libaio ksh elfutils-libelf make sysstat libaio libaio-devel setarch libXp --qf "%{NAME}-%{VERSION}-%{RELEASE} (%{ARCH})\n"|sort binutils-2.17.50.0.6-20.el5_8.3 (x86_64) compat-db-4.2.52-5.1 (i386) compat-db-4.2.52-5.1 (x86_64) compat-libstdc++-33-3.2.3-61 (i386) compat-libstdc++-33-3.2.3-61 (x86_64) cpp-4.1.2-54.el5 (x86_64) elfutils-libelf-0.137-3.el5 (i386) elfutils-libelf-0.137-3.el5 (x86_64) gcc-4.1.2-54.el5 (x86_64) gcc-c++-4.1.2-54.el5 (x86_64) glibc-2.5-107 (i686) glibc-2.5-107 (x86_64) glibc-devel-2.5-107 (i386) glibc-devel-2.5-107 (x86_64) glibc-headers-2.5-107 (x86_64) ksh-20100621-12.el5 (x86_64) libaio-0.3.106-5 (i386) libaio-0.3.106-5 (i386) libaio-0.3.106-5 (x86_64) libaio-0.3.106-5 (x86_64) libgcc-4.1.2-54.el5 (i386) libgcc-4.1.2-54.el5 (i386) libgcc-4.1.2-54.el5 (x86_64) libgcc-4.1.2-54.el5 (x86_64) libstdc++-4.1.2-54.el5 (i386) libstdc++-4.1.2-54.el5 (x86_64) libXp-1.0.0-8.1.el5 (i386) libXp-1.0.0-8.1.el5 (x86_64) libXtst-1.0.1-3.1 (i386) libXtst-1.0.1-3.1 (x86_64) make-3.81-3.el5 (x86_64) make-3.81-3.el5 (x86_64) package libaio-devel is not installed package xorg-x11 is not installed rng-utils-2.0-5.el5 (x86_64) setarch-2.0-1.1 (x86_64) setarch-2.0-1.1 (x86_64) sysstat-7.0.2-12.el5 (x86_64) |
Install the missing RPMs. We do this in both nodes. (with root user).
|
1 2 3 4 5 6 7 8 9 10 11 12 13 14 15 16 17 18 19 |
[root@primary1 ~]# cd /media/RHEL_5.9\ x86_64\ DVD/Server/ [root@primary1 Server]# rpm -ivh libaio-devel-0.3.106-5.x86_64.rpm warning: libaio-devel-0.3.106-5.x86_64.rpm: Header V3 DSA signature: NOKEY, key ID 37017186 Preparing... ########################################### [100 %] 1:libaio-devel ########################################### [100 %] [root@primary1 Server]# rpm -ivh xorg-x11-* warning: xorg-x11-apps-7.1-4.0.1.el5.x86_64.rpm: Header V3 DSA signature: NOKEY, key ID 37017186 Preparing... ########################################### [100%] ---------------------------------- [root@primary2 ~]# cd /media/RHEL_5.9\ x86_64\ DVD/Server/ [root@primary2 Server]# rpm -ivh libaio-devel-0.3.106-5.x86_64.rpm warning: libaio-devel-0.3.106-5.x86_64.rpm: Header V3 DSA signature: NOKEY, key ID 37017186 Preparing... ########################################### [100%] 1:libaio-devel ########################################### [100%] [root@primary2 Server]# rpm -ivh xorg-x11-* warning: xorg-x11-apps-7.1-4.0.1.el5.x86_64.rpm: Header V3 DSA signature: NOKEY, key ID 37017186 Preparing... ########################################### [100%] |
We create users and groups. We do this in both nodes. (with root user)
|
1 2 3 4 5 6 7 8 9 10 |
/usr/sbin/groupadd -g 501 oinstall /usr/sbin/groupadd -g 502 dba /usr/sbin/groupadd -g 503 oper /usr/sbin/groupadd -g 504 asmadmin /usr/sbin/groupadd -g 506 asmdba /usr/sbin/groupadd -g 507 asmoper /usr/sbin/useradd -u 501 -c "Oracle Grid Infrastructure Owner" -g oinstall -G asmadmin,asmdba,asmoper grid /usr/sbin/useradd -u 502 -c "Oracle RDBMS Owner" -g oinstall -G dba,oper,asmdba oracle |
We set the user passwords. We do this in both nodes. (with root user).
|
1 2 3 |
passwd grid passwd oracle |
We create the folders and grant the necessary privileges to the users. We do this in both nodes. (with root user).
|
1 2 3 4 5 6 7 8 9 10 11 12 13 14 15 16 |
mkdir -p /u01/app/oraInventory chown -R grid:oinstall /u01/app/oraInventory chmod -R 775 /u01/app/oraInventory mkdir -p /u01/11.2.0/grid chown -R grid:oinstall /u01/11.2.0/grid chmod -R 775 /u01/11.2.0/grid mkdir -p /u01/app/oracle mkdir /u01/app/oracle/cfgtoollogs #needed to ensure that dbca is able to run after the rdbms installation. chown -R oracle:oinstall /u01/app/oracle chmod -R 775 /u01/app/oracle mkdir -p /u01/app/oracle/product/11.2.0/db_1 chown -R oracle:oinstall /u01/app/oracle/product/11.2.0/db_1 chmod -R 775 /u01/app/oracle/product/11.2.0/db_1 |
We update the /etc/profile file as follows. We do this in both nodes. (with root user).
|
1 2 3 4 5 6 7 8 9 10 11 12 13 |
# vi /etc/profile unset pathmunge # sayfa sonuna gidip bu satırdan sonra aşağıdakileri yazıyoruz. if [ $USER = "oracle" ] || [ $USER = "grid" ]; then if [ $SHELL = "/bin/ksh" ]; then ulimit -p 65536 ulimit -n 65536 else ulimit -u 65536 -n 65536 fi umask 022 fi |
Configure bash_profile Oracle
We login with Oracle user and edit the file bash_profile. We do this in both nodes. (with oracle user)
|
1 2 3 4 5 6 7 8 9 10 11 12 13 14 15 16 17 18 19 20 21 22 23 24 25 26 27 28 29 30 31 32 33 34 35 36 37 |
# su - oracle $ vi .bash_profile # .bash_profile # Get the aliases and functions if [ -f ~/.bashrc ]; then . ~/.bashrc fi # User specific environment and startup programs PATH=$PATH:$HOME/bin export PATH TMP=/tmp; export TMP TMPDIR=$TMP; export TMPDIR ORACLE_UNQNAME=primary; export ORACLE_UNQNAME ORACLE_BASE=/u01/app/oracle; export ORACLE_BASE GRID_HOME=/u01/11.2.0/grid; export GRID_HOME DB_HOME=$ORACLE_BASE/product/11.2.0/db_1; export DB_HOME ORACLE_HOME=$DB_HOME; export ORACLE_HOME ORACLE_SID=primary1; export ORACLE_SID ORACLE_TERM=xterm; export ORACLE_TERM BASE_PATH=/usr/sbin:$PATH; export BASE_PATH PATH=$ORACLE_HOME/bin:$GRID_HOME/bin:$BASE_PATH; export PATH LD_LIBRARY_PATH=$ORACLE_HOME/lib:/lib:/usr/lib; export LD_LIBRARY_PATH CLASSPATH=$ORACLE_HOME/JRE:$ORACLE_HOME/jlib:$ORACLE_HOME/rdbms/jlib; export CLASSPATH ulimit -u 65536 ulimit -n 65536 alias log='cd /u01/app/oracle/diag/rdbms/primary/primary1/trace; pwd' alias oh='cd $ORACLE_HOME; pwd' |
We ensure that the profile settings are valid. We do this in both nodes. (with oracle user)
|
1 |
$ . .bash_profile |
We login with the grid user and edit the bash_profile file. We do this in both nodes. (with grid user)
|
1 2 3 4 5 6 7 8 9 10 11 12 13 14 15 16 17 18 19 20 21 22 23 24 25 26 27 28 29 30 31 32 33 34 35 36 |
[root@primary2 ~]# su - grid [grid@primary2 ~]$ vi .bash_profile # .bash_profile # Get the aliases and functions if [ -f ~/.bashrc ]; then . ~/.bashrc fi # User specific environment and startup programs PATH=$PATH:$HOME/bin export PATH TMP=/tmp; export TMP TMPDIR=$TMP; export TMPDIR ORACLE_UNQNAME=primary; export ORACLE_UNQNAME ORACLE_BASE=/u01/app/oracle; export ORACLE_BASE ORACLE_HOME=/u01/11.2.0/grid; export ORACLE_HOME GRID_HOME=/u01/11.2.0/grid; export GRID_HOME ORACLE_SID=+ASM1; export ORACLE_SID ORACLE_TERM=xterm; export ORACLE_TERM BASE_PATH=/usr/sbin:$PATH; export BASE_PATH PATH=$ORACLE_HOME/bin:$GRID_HOME/bin:$BASE_PATH; export PATH LD_LIBRARY_PATH=$ORACLE_HOME/lib:/lib:/usr/lib; export LD_LIBRARY_PATH CLASSPATH=$ORACLE_HOME/JRE:$ORACLE_HOME/jlib:$ORACLE_HOME/rdbms/jlib; export CLASSPATH ulimit -u 65536 ulimit -n 65536 alias log='cd /u01/11.2.0/grid/log/primary01; pwd' alias oh='cd $ORACLE_HOME; pwd' |
We ensure that the profile settings are valid. We do this in both nodes. (with grid user)
|
1 |
$ . .bash_profile |
We check the DNS definition of Scan IPs.
|
1 2 3 4 5 6 7 8 9 10 11 12 13 14 15 16 17 18 19 20 21 22 23 |
[oracle@primary1 ~]$ nslookup primary-scan Server: 172.20.31.11 Address: 172.20.31.11#53 Name: primary-scan.hhuyanlab.local Address: 172.20.42.31 Name: primary-scan.hhuyanlab.local Address: 172.20.42.30 Name: primary-scan.hhuyanlab.local Address: 172.20.42.29 --------------------------------------------------------------- [oracle@primary2 ~]$ nslookup primary-scan Server: 172.20.31.11 Address: 172.20.31.11#53 Name: primary-scan.hhuyanlab.local Address: 172.20.42.30 Name: primary-scan.hhuyanlab.local Address: 172.20.42.29 Name: primary-scan.hhuyanlab.local Address: 172.20.42.31 |
We make changes to the “/etc/nsswitch.conf” file as follows. We do this in both nodes. (with root user)
|
1 2 3 4 5 6 7 8 |
[root@primary1 ~]# vi /etc/nsswitch.conf passwd: files shadow: files group: files #hosts: db files nisplus nis dns hosts: dns files |
We install the RPMs required for ASM library driver software installation. We copy the downloaded files to the “setup” folder with the Oracle user. We do this in both nodes. (with root user)
|
1 2 3 4 5 6 7 8 9 10 |
mkdir -p /setup chown -R oracle:oinstall /setup/ chmod -R 775 /setup/ # cd /setup/ # rpm -ivh oracleasm* warning: oracleasm-2.6.18-348.el5-2.0.5-1.el5.x86_64.rpm: Header V3 DSA signature: NOKEY, key ID 1e5e0159 Preparing... ########################################### [100%] 1:oracleasm-support ########################################### [ 33%] 2:oracleasm-2.6.18-348.el########################################### [ 67%] 3:oracleasmlib ########################################### [100%] |
Configure ASM Disks
We configure ASM disks. We do this only on one node. (with root user)
We list our disks with the # fdisk -l command. We see that the disks are listed and no partition is created on them. Since these disks will be shared with the second node, we must make sure that these disks are listed in the second node as well.
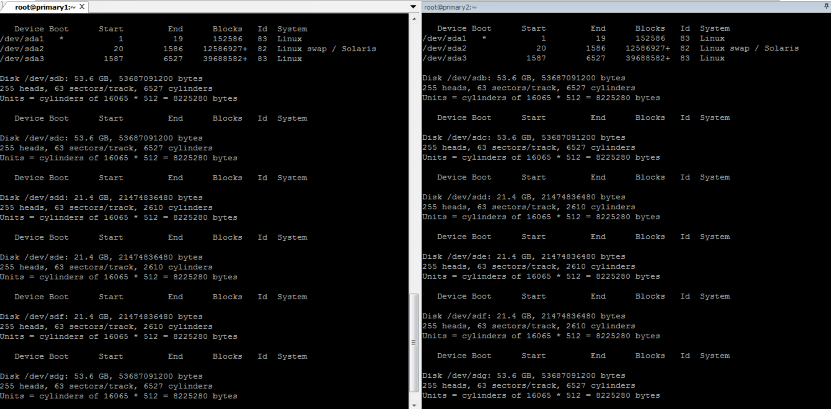

We create partition on disks. We do this for all disks.
|
1 2 3 4 5 6 7 8 9 10 11 12 13 14 15 16 17 18 19 20 21 22 23 24 25 26 27 28 29 30 31 32 33 34 35 36 37 38 39 40 41 42 43 44 45 46 47 48 49 50 51 52 53 54 55 56 57 58 59 60 61 62 63 64 65 66 67 68 69 70 71 72 73 74 75 76 77 78 79 80 |
[root@primary1 ~]# fdisk /dev/sdb The number of cylinders for this disk is set to 6527. There is nothing wrong with that, but this is larger than 1024, and could in certain setups cause problems with: 1) software that runs at boot time (e.g., old versions of LILO) 2) booting and partitioning software from other OSs (e.g., DOS FDISK, OS/2 FDISK) Command (m for help): n Command action e extended p primary partition (1-4) p Partition number (1-4): 1 First cylinder (1-6527, default 1): 2 # Bu değer cylinder olduğu zaman "2" sector olduğu zaman "2048" yapıyoruz Last cylinder or +size or +sizeM or +sizeK (2-6527, default 6527): [ENTER] Using default value 6527 Command (m for help): w The partition table has been altered! Calling ioctl() to re-read partition table. Syncing disks. ** Status of disks after partition # fdisk -l Disk /dev/sda: 53.6 GB, 53687091200 bytes 255 heads, 63 sectors/track, 6527 cylinders Units = cylinders of 16065 * 512 = 8225280 bytes Device Boot Start End Blocks Id System /dev/sda1 * 1 19 152586 83 Linux /dev/sda2 20 1586 12586927+ 82 Linux swap / Solaris /dev/sda3 1587 6527 39688582+ 83 Linux Disk /dev/sdb: 53.6 GB, 53687091200 bytes 255 heads, 63 sectors/track, 6527 cylinders Units = cylinders of 16065 * 512 = 8225280 bytes Device Boot Start End Blocks Id System /dev/sdb1 2 6527 52420095 83 Linux Disk /dev/sdc: 53.6 GB, 53687091200 bytes 255 heads, 63 sectors/track, 6527 cylinders Units = cylinders of 16065 * 512 = 8225280 bytes Device Boot Start End Blocks Id System /dev/sdc1 2 6527 52420095 83 Linux Disk /dev/sdd: 21.4 GB, 21474836480 bytes 255 heads, 63 sectors/track, 2610 cylinders Units = cylinders of 16065 * 512 = 8225280 bytes Device Boot Start End Blocks Id System /dev/sdd1 2 2610 20956792+ 83 Linux Disk /dev/sde: 21.4 GB, 21474836480 bytes 255 heads, 63 sectors/track, 2610 cylinders Units = cylinders of 16065 * 512 = 8225280 bytes Device Boot Start End Blocks Id System /dev/sde1 2 2610 20956792+ 83 Linux Disk /dev/sdf: 21.4 GB, 21474836480 bytes 255 heads, 63 sectors/track, 2610 cylinders Units = cylinders of 16065 * 512 = 8225280 bytes Device Boot Start End Blocks Id System /dev/sdf1 2 2610 20956792+ 83 Linux Disk /dev/sdg: 53.6 GB, 53687091200 bytes 255 heads, 63 sectors/track, 6527 cylinders Units = cylinders of 16065 * 512 = 8225280 bytes Device Boot Start End Blocks Id System /dev/sdg1 2 6527 52420095 83 Linux |
Configure oracleasm service
We configure the “oracleasm” service. We do this in both nodes. (with root user)
After running the “service oracleasm configure” command, let’s answer the questions as below.
|
1 2 3 4 5 6 7 8 9 10 11 12 13 14 15 16 17 18 19 20 21 22 23 24 25 26 27 28 29 30 31 32 33 34 35 |
[root@primary1 ~]# service oracleasm configure Configuring the Oracle ASM library driver. This will configure the on-boot properties of the Oracle ASM library driver. The following questions will determine whether the driver is loaded on boot and what permissions it will have. The current values will be shown in brackets ('[]'). Hitting <ENTER> without typing an answer will keep that current value. Ctrl-C will abort. Default user to own the driver interface []: grid Default group to own the driver interface []: asmdba Start Oracle ASM library driver on boot (y/n) [n]: y Scan for Oracle ASM disks on boot (y/n) [y]: y Writing Oracle ASM library driver configuration: done Initializing the Oracle ASMLib driver: [ OK ] Scanning the system for Oracle ASMLib disks: [ OK ] --------------------------------------------------------------------------------- [root@primary2 ~]# service oracleasm configure Configuring the Oracle ASM library driver. This will configure the on-boot properties of the Oracle ASM library driver. The following questions will determine whether the driver is loaded on boot and what permissions it will have. The current values will be shown in brackets ('[]'). Hitting <ENTER> without typing an answer will keep that current value. Ctrl-C will abort. Default user to own the driver interface []: grid Default group to own the driver interface []: asmdba Start Oracle ASM library driver on boot (y/n) [n]: y Scan for Oracle ASM disks on boot (y/n) [y]: y Writing Oracle ASM library driver configuration: done Initializing the Oracle ASMLib driver: [ OK ] Scanning the system for Oracle ASMLib disks: [ OK ] |
Create ASM Disks
We create ASM disks. We do this on only one node. (with root user)
|
1 2 3 4 5 6 7 8 9 10 11 12 |
[root@primary1 ~]# service oracleasm createdisk OCR_VOTE01 /dev/sdd1 Marking disk "OCR_VOTE01" as an ASM disk: [ OK ] [root@primary1 ~]# service oracleasm createdisk OCR_VOTE02 /dev/sde1 Marking disk "OCR_VOTE02" as an ASM disk: [ OK ] [root@primary1 ~]# service oracleasm createdisk OCR_VOTE03 /dev/sdf1 Marking disk "OCR_VOTE03" as an ASM disk: [ OK ] [root@primary1 ~]# service oracleasm createdisk DATA01 /dev/sdb1 Marking disk "DATA01" as an ASM disk: [ OK ] [root@primary1 ~]# service oracleasm createdisk DATA02 /dev/sdc1 Marking disk "DATA02" as an ASM disk: [ OK ] [root@primary1 ~]# service oracleasm createdisk FRA01 /dev/sdg1 Marking disk "FRA02" as an ASM disk: [ OK ] |
We check ASM Disks.
|
1 2 3 4 5 6 7 8 9 10 11 12 13 14 15 16 17 18 19 20 21 22 |
[root@primary1 ~]# service oracleasm listdisks DATA01 DATA02 FRA02 OCR_VOTE01 OCR_VOTE02 OCR_VOTE03 ----------------------------------------------------------------- [root@primary2 ~]# service oracleasm scandisks Scanning the system for Oracle ASMLib disks: [ OK ] ---------------------------------------------------------------- [root@primary2 ~]# service oracleasm listdisks DATA01 DATA02 FRA02 OCR_VOTE01 OCR_VOTE02 OCR_VOTE03 |
![]()
