In today’s article, we will be talking about how to install Oracle GoldenGate 12.2.0.0.0.
Before starting the GoldenGate installation, GRID, RDBMS and Database are installed on both SOURCE and TARGET servers.
In addition, there are Schemas, Tables and data in them on the SOURCE database.
After this, the steps for the GOLDENGATE installation are as follows.
1. A user is created for GoldenGate on the operating system side (Source1-2, Target1-2).
1 2 3 4 5 | /usr/sbin/useradd -u 503 -c "Oracle RDBMS Owner" -g oinstall -G dba,oper,asmdba goldengate passwd goldengate Passw0rd4 |
2. Goldengate users’ BASH_PROFILE files are set as follows (Source1-2, Target1-2).
1 2 3 4 5 6 7 8 9 10 11 12 13 14 15 16 17 18 19 20 21 22 23 24 25 26 27 28 29 30 31 32 33 34 35 36 37 38 39 40 41 42 43 44 45 46 47 48 49 50 51 52 53 54 55 56 57 58 59 60 61 62 63 64 65 66 67 68 69 70 71 72 73 74 75 76 77 78 79 80 81 82 83 84 85 86 87 88 89 90 91 | su - goldengate vi .bash_profile -- SOURCE1 --------------------------------------------------------------------------------------------------------------------------------------------------- # .bash_profile # Get the aliases and functions if [ -f ~/.bashrc ]; then . ~/.bashrc fi # User specific environment and startup programs ORACLE_HOME=/u01/app/oracle/product/11.2.0/db_1; export ORACLE_HOME ORACLE_BASE=/u01/app/oracle; export ORACLE_BASE ORACLE_SID=primary1; export ORACLE_SID CRS_HOME=/u01/11.2.0/grid; export CRS_HOME OGG_HOME=/dbpmp/goldengate_source; export OGG_HOME LD_LIBRARY_PATH=/u01/app/oracle/product/11.2.0/db_1/lib:/lib:/usr/lib; export LD_LIBRARY_PATH PATH=$ORACLE_HOME/bin:/u01/app/oracle/product/11.2.0/db_1/lib:$ORACLE_HOME/bin:$CRS_HOME/bin:$PATH:$HOME/bin; export PATH JAVA_HOME=/usr/java/jre1.6.0_45; export JAVA_HOME -- SOURCE2 --------------------------------------------------------------------------------------------------------------------------------------------------- # .bash_profile # Get the aliases and functions if [ -f ~/.bashrc ]; then . ~/.bashrc fi # User specific environment and startup programs ORACLE_HOME=/u01/app/oracle/product/11.2.0/db_1; export ORACLE_HOME ORACLE_BASE=/u01/app/oracle; export ORACLE_BASE ORACLE_SID=primary2; export ORACLE_SID CRS_HOME=/u01/11.2.0/grid; export CRS_HOME OGG_HOME=/dbpmp/goldengate_source; export OGG_HOME LD_LIBRARY_PATH=/u01/app/oracle/product/11.2.0/db_1/lib:/lib:/usr/lib; export LD_LIBRARY_PATH PATH=$ORACLE_HOME/bin:/u01/app/oracle/product/11.2.0/db_1/lib:$ORACLE_HOME/bin:$CRS_HOME/bin:$PATH:$HOME/bin; export PATH JAVA_HOME=/usr/java/jre1.6.0_45; export JAVA_HOME -- TARGET1 --------------------------------------------------------------------------------------------------------------------------------------------------- # .bash_profile # Get the aliases and functions if [ -f ~/.bashrc ]; then . ~/.bashrc fi # User specific environment and startup programs ORACLE_HOME=/u01/app/oracle/product/11.2.0/db_1; export ORACLE_HOME ORACLE_BASE=/u01/app/oracle; export ORACLE_BASE ORACLE_SID=standby1; export ORACLE_SID CRS_HOME=/u01/11.2.0/grid; export CRS_HOME OGG_HOME=/dbpmp/goldengate_target; export OGG_HOME LD_LIBRARY_PATH=/u01/app/oracle/product/11.2.0/db_1/lib:/lib:/usr/lib; export LD_LIBRARY_PATH PATH=$ORACLE_HOME/bin:/u01/app/oracle/product/11.2.0/db_1/lib:$ORACLE_HOME/bin:$CRS_HOME/bin:$PATH:$HOME/bin; export PATH JAVA_HOME=/usr/java/jre1.6.0_45; export JAVA_HOME -- TARGET2 --------------------------------------------------------------------------------------------------------------------------------------------------- # .bash_profile # Get the aliases and functions if [ -f ~/.bashrc ]; then . ~/.bashrc fi # User specific environment and startup programs ORACLE_HOME=/u01/app/oracle/product/11.2.0/db_1; export ORACLE_HOME ORACLE_BASE=/u01/app/oracle; export ORACLE_BASE ORACLE_SID=standby2; export ORACLE_SID CRS_HOME=/u01/11.2.0/grid; export CRS_HOME OGG_HOME=/dbpmp/goldengate_target; export OGG_HOME LD_LIBRARY_PATH=/u01/app/oracle/product/11.2.0/db_1/lib:/lib:/usr/lib; export LD_LIBRARY_PATH PATH=$ORACLE_HOME/bin:/u01/app/oracle/product/11.2.0/db_1/lib:$ORACLE_HOME/bin:$CRS_HOME/bin:$PATH:$HOME/bin; export PATH JAVA_HOME=/usr/java/jre1.6.0_45; export JAVA_HOME $ . .bash_profile |
3. GoldenGate software needs to be installed in a SHARED area in RAC systems.
Therefore, Shared areas should be MOUNTED to all servers. Shared area should be NFS. (Source1-2, Target1-2).
1 2 | # mkdir /dbpmp # mount 172.20.31.245:DB_test /dbpmp |
4. The OGG_HOME folder is created on the SOURCE side (Source1-2).
1 2 3 | # mkdir -p /dbpmp/goldengate_source # chown -R goldengate:oinstall /dbpmp/goldengate_source/ # chmod -R 775 /dbpmp/goldengate_source |
5. The OGG_HOME folder is created on the TARGET side (Target1-2).
1 2 3 | # mkdir -p /dbpmp/goldengate_target # chown -R goldengate:oinstall /dbpmp/goldengate_target/ # chmod -R 775 /dbpmp/goldengate_target |
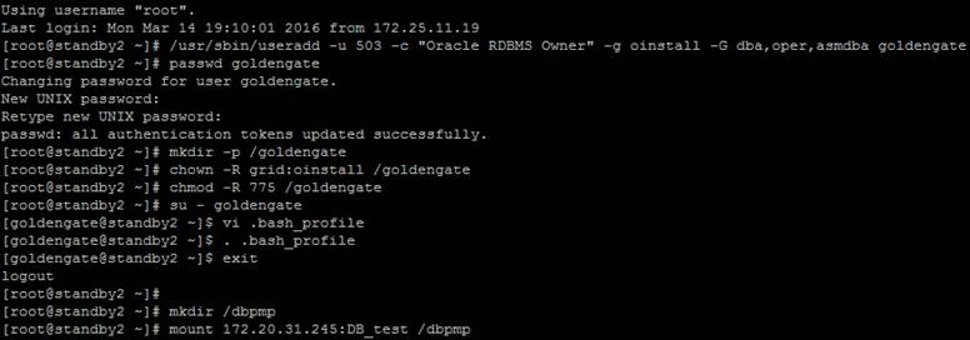
6. The ZIP file we downloaded is opened in the Shared area (Source1, Target1).
1 2 3 4 5 6 7 8 9 10 11 12 13 14 15 16 17 18 19 20 21 22 23 24 25 26 27 28 29 30 31 32 33 34 | # su - goldengate $ cd /dbpmp/goldengate_source/ $ ls fbo_ggs_Linux_x64_shiphome.zip $ unzip fbo_ggs_Linux_x64_shiphome.zip Archive: fbo_ggs_Linux_x64_shiphome.zip creating: fbo_ggs_Linux_x64_shiphome/ creating: fbo_ggs_Linux_x64_shiphome/Disk1/ inflating: fbo_ggs_Linux_x64_shiphome/Disk1/runInstaller inflating: fbo_ggs_Linux_x64_shiphome/Disk1/response/oggcore.rsp inflating: OGG-12.2.0.1-README.txt inflating: OGG-12.2.0.1.1-ReleaseNotes.pdf # su - goldengate $ cd /dbpmp/goldengate_target/ $ ls fbo_ggs_Linux_x64_shiphome.zip $ unzip fbo_ggs_Linux_x64_shiphome.zip Archive: fbo_ggs_Linux_x64_shiphome.zip creating: fbo_ggs_Linux_x64_shiphome/ creating: fbo_ggs_Linux_x64_shiphome/Disk1/ inflating: fbo_ggs_Linux_x64_shiphome/Disk1/runInstaller inflating: fbo_ggs_Linux_x64_shiphome/Disk1/response/oggcore.rsp inflating: OGG-12.2.0.1-README.txt inflating: OGG-12.2.0.1.1-ReleaseNotes.pdf |
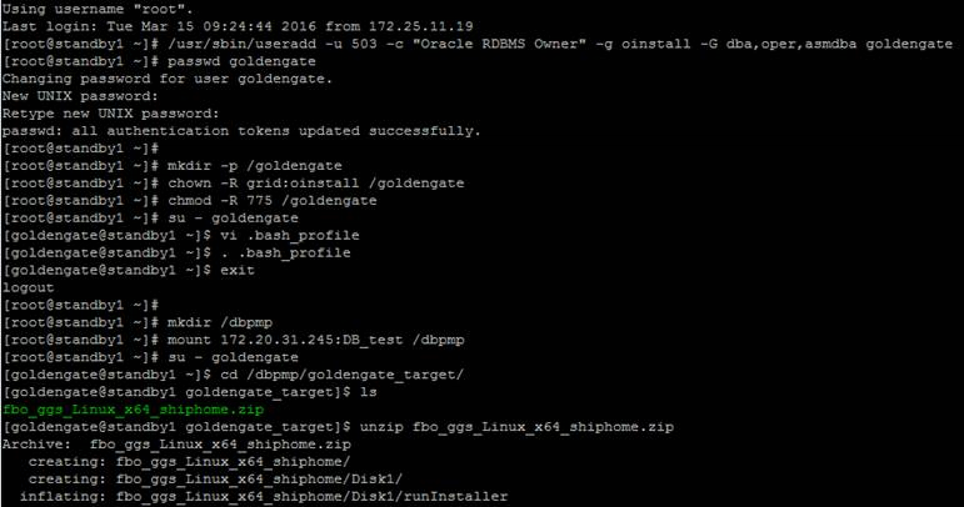
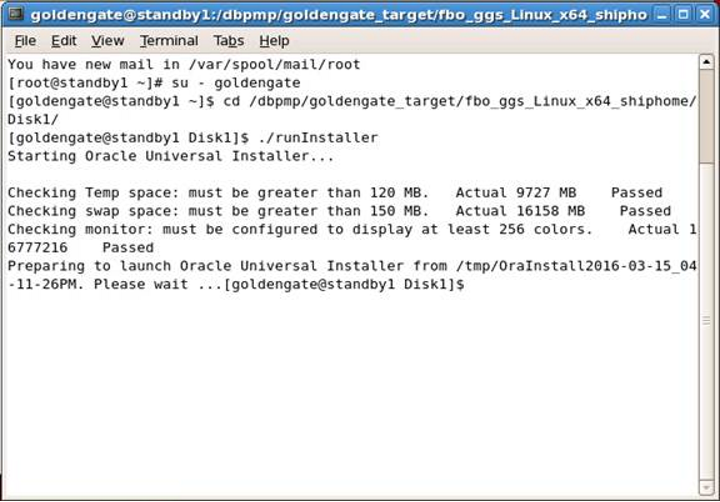
7. Now we can install GoldenGate on both SOURCE and TARGET sides (Source1 , Target1).
1 2 3 4 | # xhost + # su - goldengate $ cd /dbpmp/goldengate_source/fbo_ggs_Linux_x64_shiphome/Disk1 $ ./runInstaller |
a. We perform the installation process on only 1 node on both the source and target sides.
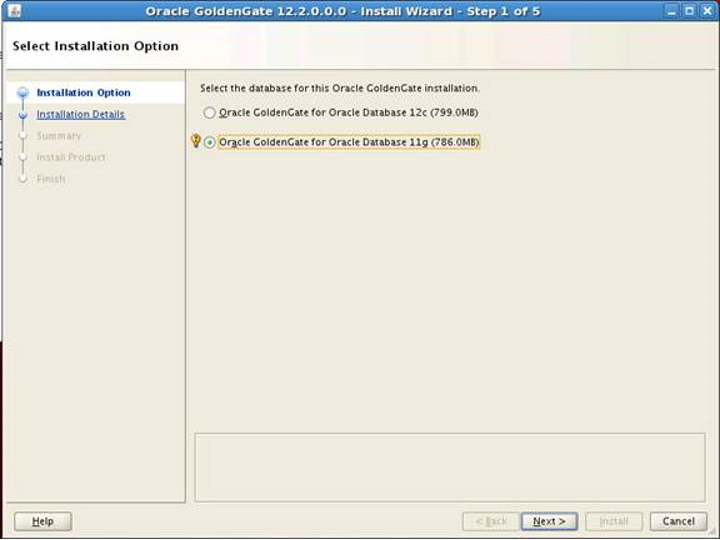
b. The database we are installing is Oracle 11g R2, I choose the second option below.
c. We determine the Software location where the GoldenGate application will be installed.
This location must be a SHARED area in RAC systems and must be accessible from both server sides.
These locations are as follows for me;
1 2 | /dbpmp/goldengate_source - SOURCE taraf için /dbpmp/goldengate_target - TARGET taraf için |
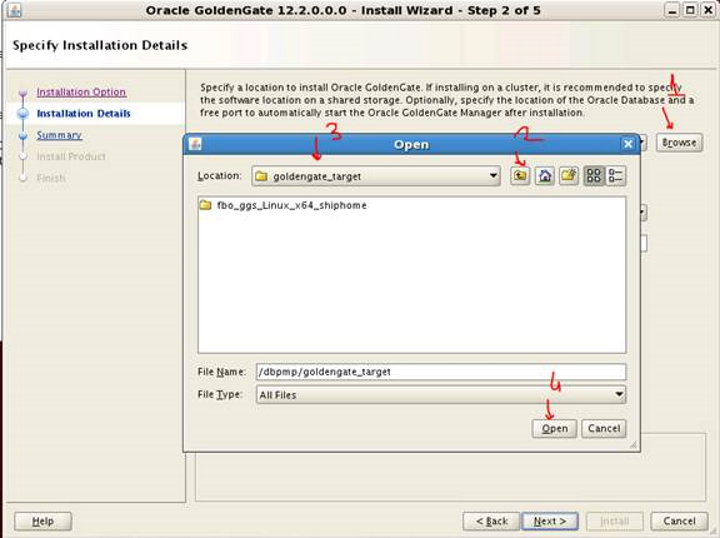
After determining the location where the software will be installed, the MANAGER PORT needs to be specified.
I specified 7809 for source and 7810 for target.
Before giving these ports, it is necessary to check if the ports below are used.
1 2 | $ netstat -na | grep 7809 (SOURCE side control) $ netstat -na | grep 7810 (TARGET side control) |
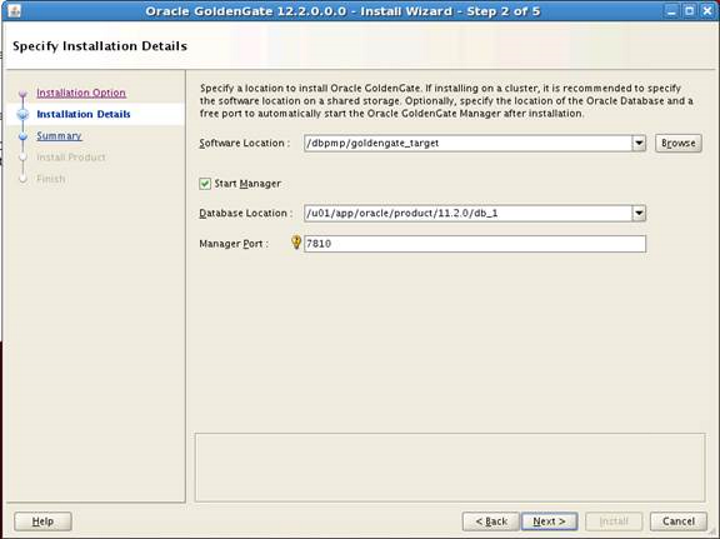
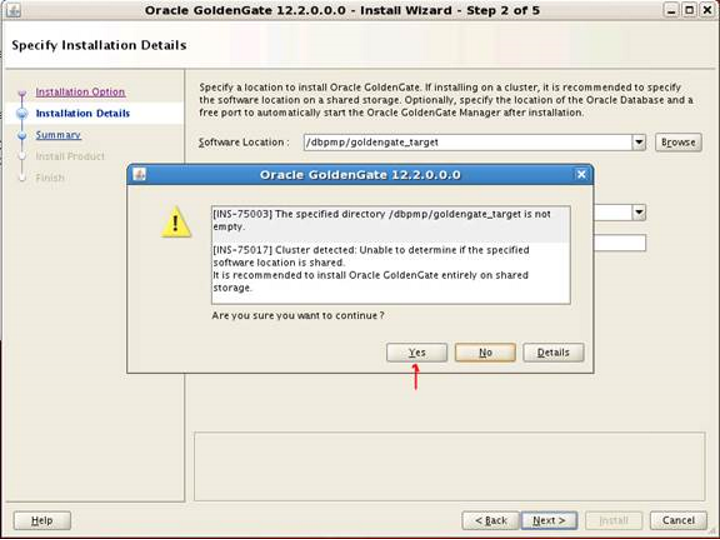
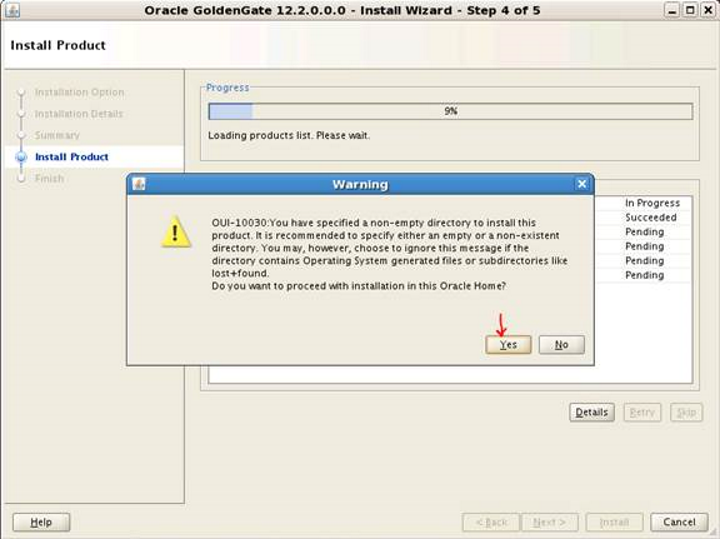
f. After completing the above operations, when we pass with “NEXT”, it may give a warning as below. We can pass this with “YES”.
g. When we click the Install button, the installation will start.
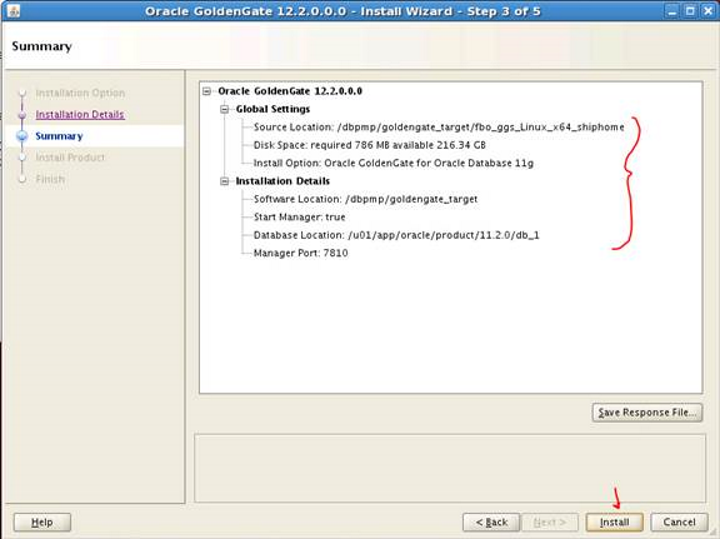
h. Let’s pass with “YES”.
8. After the installation is completed on both sides, we check whether the MANAGER Ports are in use.
1 2 3 4 5 6 7 | (SOURCE) [goldengate@primary1 goldengate_target]$ netstat -na | grep 7809 tcp 0 0 0.0.0.0:7809 0.0.0.0:* LISTEN (TARGET) [goldengate@standby1 goldengate_target]$ netstat -na | grep 7810 tcp 0 0 0.0.0.0:7810 0.0.0.0:* LISTEN |
9. We can control goldengate usage with GGSCI.
1 2 3 4 5 6 7 8 9 10 11 12 13 14 15 16 17 18 19 20 21 22 23 24 25 26 27 28 29 30 31 32 33 34 35 36 37 38 39 40 41 42 43 44 45 46 47 48 49 50 51 52 53 54 55 56 57 | (SOURCE) Using username "root". Last login: Tue Mar 15 15:38:46 2016 from 172.25.20.17 [root@primary1 ~]# su - goldengate [goldengate@primary1 ~]$ /dbpmp/goldengate_source/ggsci Oracle GoldenGate Command Interpreter for Oracle Version 12.2.0.1.1 OGGCORE_12.2.0.1.0_PLATFORMS_151211.1401_FBO Linux, x64, 64bit (optimized), Oracle 11g on Dec 12 2015 00:54:38 Operating system character set identified as UTF-8. Copyright (C) 1995, 2015, Oracle and/or its affiliates. All rights reserved. GGSCI (primary1.hhuyanlab.local) 1> info all Program Status Group Lag at Chkpt Time Since Chkpt MANAGER RUNNING GGSCI (primary1.hhuyanlab.local) 2> help add extract ADD EXTRACT Use ADD EXTRACT to create an Extract group. Unless a SOURCEISTABLE task or an alias Extract is specified, ADD EXTRACT creates an online group that uses checkpoints so that processing continuity is maintained from run to run. (TARGET) Using username "root". Last login: Tue Mar 15 13:48:33 2016 from 172.25.11.19 [root@standby1 ~]# su - goldengate [goldengate@standby1 ~]$ /dbpmp/goldengate_target/ggsci Oracle GoldenGate Command Interpreter for Oracle Version 12.2.0.1.1 OGGCORE_12.2.0.1.0_PLATFORMS_151211.1401_FBO Linux, x64, 64bit (optimized), Oracle 11g on Dec 12 2015 00:54:38 Operating system character set identified as UTF-8. Copyright (C) 1995, 2015, Oracle and/or its affiliates. All rights reserved. GGSCI (standby1.hhuyanlab.local) 1> info all Program Status Group Lag at Chkpt Time Since Chkpt MANAGER RUNNING GGSCI (standby1.hhuyanlab.local) 2> info mgr Manager is running (IP port standby1.hhuyanlab.local.7810, Process ID 26479). |
10. We create a tablespace and user for GG in the Source database. Then we give DBA permission to this user (SOURCE1).
1 2 3 4 5 6 7 8 9 10 11 12 13 14 | [root@primary1 ~]# su - oracle [oracle@primary1 ~]$ sqlplus / as sysdba SQL> create tablespace gg_tbs datafile '+DATA' size 1024M autoextend on next 100M maxsize unlimited; Tablespace created. SQL> create user gguser identified by "Passw0rd4" default tablespace gg_tbs; User created. SQL> grant dba to gguser; Grant succeeded. |
11. We do the same operations as above for the Target side (TARGET1).
1 2 3 4 5 6 7 8 9 10 11 12 13 14 15 16 17 18 19 20 21 22 23 24 | [root@standby1 ~]# su - oracle [oracle@standby1 ~]$ sqlplus / as sysdba SQL*Plus: Release 11.2.0.4.0 Production on Wed Mar 16 10:12:30 2016 Copyright (c) 1982, 2013, Oracle. All rights reserved. Connected to: Oracle Database 11g Enterprise Edition Release 11.2.0.4.0 - 64bit Production With the Partitioning, Real Application Clusters, Automatic Storage Management, OLAP, Data Mining and Real Application Testing options SQL> create tablespace gg_tbs datafile '+DATA' size 1024M autoextend on next 100M maxsize unlimited; Tablespace created. SQL> create user gguser identified by "Passw0rd4" default tablespace gg_tbs; User created. SQL> grant dba to gguser; Grant succeeded. |
12. Putting the database in archive mode will be good for GoldenGate replication. This can be done as follows (SOURCE1).
1 2 3 4 5 6 7 8 9 10 11 12 13 14 15 16 17 18 19 20 21 22 23 24 25 26 27 28 29 30 31 32 33 34 35 36 37 38 39 40 41 42 43 44 45 | SQL> select name, total_mb, free_mb from v$asm_diskgroup; NAME TOTAL_MB FREE_MB ------------------------------ ---------- ---------- OCR_VOTE 61419 60493 DATA 204796 91888 FRA 51199 51104 SQL> alter system set db_recovery_file_dest_size=45G sid='*' scope=both; System altered. SQL> alter system set db_recovery_file_dest='+FRA' sid='*' scope=both; System altered. SQL> shutdown immediate; Database closed. Database dismounted. ORACLE instance shut down. SQL> startup mount; ORACLE instance started. Total System Global Area 7265497088 bytes Fixed Size 2267264 bytes Variable Size 1342179200 bytes Database Buffers 5905580032 bytes Redo Buffers 15470592 bytes Database mounted. SQL> alter database archivelog; Database altered. SQL> alter database open; Database altered. SQL> select log_mode from v$database; LOG_MODE ------------ ARCHIVELOG |
13. We perform SUPPLEMENTAL LOGGING and FORCE LOGGING operations in the source database (SOURCE1).
1 2 3 4 5 6 7 8 9 10 11 12 13 14 15 16 17 | SQL> alter database add supplemental log data; Database altered. SQL> alter database force logging; Database altered. SQL> alter system switch logfile; System altered. SQL> select supplemental_log_data_min, force_logging from v$database; SUPPLEME FOR -------- --- YES YES |
14. We do the same operations as above in the Target database (TARGET1).
1 2 3 4 5 6 7 8 9 10 11 12 13 14 15 16 17 | SQL> alter database add supplemental log data; Database altered. SQL> alter database force logging; Database altered. SQL> alter system switch logfile; System altered. SQL> select supplemental_log_data_min, force_logging from v$database; SUPPLEME FOR -------- --- YES YES |
15. On the source side, I set the TNS file as follows (SOURCE1-2).
1 2 3 4 5 6 7 8 9 10 11 12 13 14 15 16 17 18 19 20 21 22 23 24 25 26 27 28 29 30 31 32 33 34 35 36 37 38 39 40 41 42 43 44 45 46 47 48 49 50 51 52 53 54 55 56 57 58 59 60 61 62 63 64 65 | (SOURCE1) $ vi /u01/app/oracle/product/11.2.0/db_1/network/admin/tnsnames.ora ASM = (DESCRIPTION = (ADDRESS = (PROTOCOL = BEQ) (PROGRAM = /u01/11.2.0/grid/bin/oracle) (ARGV0 = oracle+ASM1) (ARGS = '(DESCRIPTION=(LOCAL=YES)(ADDRESS=(PROTOCOL=BEQ)))') (ENVS = 'ORACLE_HOME=/u01/11.2.0/grid,ORACLE_SID=+ASM1') ) (CONNECT_DATA = (SERVICE_NAME = +ASM) (INSTANCE_NAME = +ASM1) ) ) [oracle@primary1 ~]$ tnsping ASM TNS Ping Utility for Linux: Version 11.2.0.4.0 - Production on 16-MAR-2016 14:46:45 Copyright (c) 1997, 2013, Oracle. All rights reserved. Used parameter files: Used TNSNAMES adapter to resolve the alias Attempting to contact (DESCRIPTION = (ADDRESS = (PROTOCOL = BEQ) (PROGRAM = /u01/11.2.0/grid/bin/oracle) (ARGV0 = oracle+ASM1) (ARGS = '(DESCRIPTION=(LOCAL=YES)(ADDRESS=(PROTOCOL=BEQ)))') (ENVS = 'ORACLE_HOME=/u01/11.2.0/grid,ORACLE_SID=+ASM1')) (CONNECT_DATA = (SERVICE_NAME = +ASM) (INSTANCE_NAME = +ASM1))) OK (60 msec) (SOURCE2) $ vi /u01/app/oracle/product/11.2.0/db_1/network/admin/tnsnames.ora ASM = (DESCRIPTION = (ADDRESS = (PROTOCOL = BEQ) (PROGRAM = /u01/11.2.0/grid/bin/oracle) (ARGV0 = oracle+ASM1) (ARGS = '(DESCRIPTION=(LOCAL=YES)(ADDRESS=(PROTOCOL=BEQ)))') (ENVS = 'ORACLE_HOME=/u01/11.2.0/grid,ORACLE_SID=+ASM2') ) (CONNECT_DATA = (SERVICE_NAME = +ASM) (INSTANCE_NAME = +ASM2) ) ) [oracle@primary1 ~]$ tnsping ASM TNS Ping Utility for Linux: Version 11.2.0.4.0 - Production on 16-MAR-2016 14:46:45 Copyright (c) 1997, 2013, Oracle. All rights reserved. Used parameter files: Used TNSNAMES adapter to resolve the alias Attempting to contact (DESCRIPTION = (ADDRESS = (PROTOCOL = BEQ) (PROGRAM = /u01/11.2.0/grid/bin/oracle) (ARGV0 = oracle+ASM1) (ARGS = '(DESCRIPTION=(LOCAL=YES)(ADDRESS=(PROTOCOL=BEQ)))') (ENVS = 'ORACLE_HOME=/u01/11.2.0/grid,ORACLE_SID=+ASM1')) (CONNECT_DATA = (SERVICE_NAME = +ASM) (INSTANCE_NAME = +ASM1))) OK (60 msec) |
16. On the target side, the TNS file was edited as above (TARGET1-2).
1 2 3 4 5 6 7 8 9 10 11 12 13 14 15 16 17 18 19 20 21 22 23 24 25 26 27 28 29 30 31 32 33 34 35 36 37 38 39 40 41 42 43 44 45 46 47 48 49 50 51 52 53 54 55 56 57 58 59 60 61 62 63 64 65 | (TARGET1) $ vi /u01/app/oracle/product/11.2.0/db_1/network/admin/tnsnames.ora ASM = (DESCRIPTION = (ADDRESS = (PROTOCOL = BEQ) (PROGRAM = /u01/11.2.0/grid/bin/oracle) (ARGV0 = oracle+ASM1) (ARGS = '(DESCRIPTION=(LOCAL=YES)(ADDRESS=(PROTOCOL=BEQ)))') (ENVS = 'ORACLE_HOME=/u01/11.2.0/grid,ORACLE_SID=+ASM1') ) (CONNECT_DATA = (SERVICE_NAME = +ASM) (INSTANCE_NAME = +ASM1) ) ) [oracle@primary1 ~]$ tnsping ASM TNS Ping Utility for Linux: Version 11.2.0.4.0 - Production on 16-MAR-2016 14:46:45 Copyright (c) 1997, 2013, Oracle. All rights reserved. Used parameter files: Used TNSNAMES adapter to resolve the alias Attempting to contact (DESCRIPTION = (ADDRESS = (PROTOCOL = BEQ) (PROGRAM = /u01/11.2.0/grid/bin/oracle) (ARGV0 = oracle+ASM1) (ARGS = '(DESCRIPTION=(LOCAL=YES)(ADDRESS=(PROTOCOL=BEQ)))') (ENVS = 'ORACLE_HOME=/u01/11.2.0/grid,ORACLE_SID=+ASM1')) (CONNECT_DATA = (SERVICE_NAME = +ASM) (INSTANCE_NAME = +ASM1))) OK (60 msec) (TARGET2) $ vi /u01/app/oracle/product/11.2.0/db_1/network/admin/tnsnames.ora ASM = (DESCRIPTION = (ADDRESS = (PROTOCOL = BEQ) (PROGRAM = /u01/11.2.0/grid/bin/oracle) (ARGV0 = oracle+ASM1) (ARGS = '(DESCRIPTION=(LOCAL=YES)(ADDRESS=(PROTOCOL=BEQ)))') (ENVS = 'ORACLE_HOME=/u01/11.2.0/grid,ORACLE_SID=+ASM2') ) (CONNECT_DATA = (SERVICE_NAME = +ASM) (INSTANCE_NAME = +ASM2) ) ) [oracle@primary1 ~]$ tnsping ASM TNS Ping Utility for Linux: Version 11.2.0.4.0 - Production on 16-MAR-2016 14:46:45 Copyright (c) 1997, 2013, Oracle. All rights reserved. Used parameter files: Used TNSNAMES adapter to resolve the alias Attempting to contact (DESCRIPTION = (ADDRESS = (PROTOCOL = BEQ) (PROGRAM = /u01/11.2.0/grid/bin/oracle) (ARGV0 = oracle+ASM1) (ARGS = '(DESCRIPTION=(LOCAL=YES)(ADDRESS=(PROTOCOL=BEQ)))') (ENVS = 'ORACLE_HOME=/u01/11.2.0/grid,ORACLE_SID=+ASM1')) (CONNECT_DATA = (SERVICE_NAME = +ASM) (INSTANCE_NAME = +ASM1))) OK (60 msec) |
17. The “enable_goldengate_replication” parameter in the database must be set to TRUE as shown below. Otherwise, the following error will be received (SOURCE1).
1 2 3 4 5 6 7 8 9 10 11 12 13 14 15 16 17 18 19 20 21 22 23 | [root@primary1 ~]# su - oracle [oracle@primary1 ~]$ sqlplus / as sysdba SQL*Plus: Release 11.2.0.4.0 Production on Wed Mar 16 11:08:14 2016 Copyright (c) 1982, 2013, Oracle. All rights reserved. Connected to: Oracle Database 11g Enterprise Edition Release 11.2.0.4.0 - 64bit Production With the Partitioning, Real Application Clusters, Automatic Storage Management, OLAP, Data Mining and Real Application Testing options SQL> show parameter goldengate NAME TYPE VALUE ------------------------------------ ----------- ------------------------------ enable_goldengate_replication boolean FALSE SQL> alter system set enable_goldengate_replication=TRUE sid='*' scope=both; System altered. |
Error:
1 2 | 2016-03-16 11:06:29 ERROR OGG-02091 Operation not supported because enable_goldengate_replication is not set to true. |
18. The value of the “enable_goldengate_replication” parameter must also be set to TRUE on the Target side. Otherwise, when REPLICAT is started, it will receive an error as above (TARGET1).
1 2 3 4 5 6 7 8 9 10 11 12 13 14 15 16 17 18 19 20 21 22 23 24 25 26 27 28 | [root@standby1 ~]# su - oracle [oracle@standby1 ~]$ sqlplus / as sysdba SQL*Plus: Release 11.2.0.4.0 Production on Wed Mar 16 15:58:06 2016 Copyright (c) 1982, 2013, Oracle. All rights reserved. Connected to: Oracle Database 11g Enterprise Edition Release 11.2.0.4.0 - 64bit Production With the Partitioning, Real Application Clusters, Automatic Storage Management, OLAP, Data Mining and Real Application Testing options SQL> show parameter goldengate NAME TYPE VALUE ------------------------------------ ----------- ------------------------------ enable_goldengate_replication boolean FALSE SQL> alter system set enable_goldengate_replication=TRUE sid='*' scope=both; System altered. SQL> show parameter goldengate NAME TYPE VALUE ------------------------------------ ----------- ------------------------------ enable_goldengate_replication boolean TRUE |
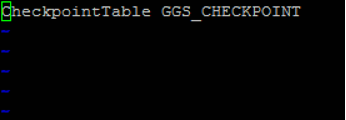
19. We create a GLOBAL parameter file in the target database with the following operations. We specify the checkpoint table in this parameter file for later use (TARGET1).
1 2 3 4 5 6 7 | [oracle@standby1 ~]$ cd /dbpmp/goldengate_target/ [oracle@standby1 goldengate_target]$ vi GLOBALS CheckpointTable gguser.GGS_CHECKPOINT ~ ~ |
20. On the source side, we perform the TRANDATA operation as follows (SOURCE1).
1 2 3 4 5 6 7 8 9 10 11 12 13 14 15 16 17 18 19 20 21 22 23 24 25 26 27 28 29 30 31 32 33 34 35 36 37 38 39 40 41 42 43 44 45 46 47 48 | [oracle@primary1 ~]$ cd $OGG_HOME [oracle@primary1 goldengate_source]$ ./ggsci Oracle GoldenGate Command Interpreter for Oracle Version 12.2.0.1.1 OGGCORE_12.2.0.1.0_PLATFORMS_151211.1401_FBO Linux, x64, 64bit (optimized), Oracle 11g on Dec 12 2015 00:54:38 Operating system character set identified as UTF-8. Copyright (C) 1995, 2015, Oracle and/or its affiliates. All rights reserved. GGSCI (primary1.hhuyanlab.local) 1> info all Program Status Group Lag at Chkpt Time Since Chkpt MANAGER RUNNING GGSCI (primary1.hhuyanlab.local) 3> dblogin userid gguser@primary, password Passw0rd4 Successfully logged into database. GGSCI (primary1.hhuyanlab.local as gguser@primary2) 4> add trandata SCOTT.BONUS 2016-03-16 10:36:23 WARNING OGG-06439 No unique key is defined for table BONUS. All viable columns will be used to represent the key, but may not guarantee uniqueness. KEYCOLS may be used to define the key. Logging of supplemental redo data enabled for table SCOTT.BONUS. TRANDATA for scheduling columns has been added on table 'SCOTT.BONUS'. TRANDATA for instantiation CSN has been added on table 'SCOTT.BONUS'. GGSCI (primary1.hhuyanlab.local as gguser@primary2) 5> add trandata SCOTT.* 2016-03-16 10:37:05 WARNING OGG-06439 No unique key is defined for table BONUS. All viable columns will be used to represent the key, but may not guarantee uniqueness. KEYCOLS may be used to define the key. Logging of supplemental redo log data is already enabled for table SCOTT.BONUS. TRANDATA for instantiation CSN has been added on table 'SCOTT.BONUS'. Logging of supplemental redo data enabled for table SCOTT.DEPT. TRANDATA for scheduling columns has been added on table 'SCOTT.DEPT'. TRANDATA for instantiation CSN has been added on table 'SCOTT.DEPT'. Logging of supplemental redo data enabled for table SCOTT.EMP. TRANDATA for scheduling columns has been added on table 'SCOTT.EMP'. TRANDATA for instantiation CSN has been added on table 'SCOTT.EMP'. 2016-03-16 10:37:06 WARNING OGG-06439 No unique key is defined for table SALGRADE. All viable columns will be used to represent the key, but may not guarantee uniqueness. KEYCOLS may be used to define the key. Logging of supplemental redo data enabled for table SCOTT.SALGRADE. TRANDATA for scheduling columns has been added on table 'SCOTT.SALGRADE'. TRANDATA for instantiation CSN has been added on table 'SCOTT.SALGRADE'. |
21. We check the tables added to the TRANDATA transaction (SOURCE1).
1 2 3 4 5 6 7 8 9 10 11 12 13 14 15 16 17 | GGSCI (primary1.hhuyanlab.local as gguser@primary2) 6> info trandata SCOTT.* Logging of supplemental redo log data is enabled for table SCOTT.BONUS. Columns supplementally logged for table SCOTT.BONUS: COMM, ENAME, JOB, SAL. Prepared CSN for table SCOTT.BONUS: 2242785 Logging of supplemental redo log data is enabled for table SCOTT.DEPT. Columns supplementally logged for table SCOTT.DEPT: DEPTNO. Prepared CSN for table SCOTT.DEPT: 2242830 Logging of supplemental redo log data is enabled for table SCOTT.EMP. Columns supplementally logged for table SCOTT.EMP: EMPNO. Prepared CSN for table SCOTT.EMP: 2242874 Logging of supplemental redo log data is enabled for table SCOTT.SALGRADE. Columns supplementally logged for table SCOTT.SALGRADE: GRADE, HISAL, LOSAL. Prepared CSN for table SCOTT.SALGRADE: 2242911 |
22. We added the SCOTT schema that we will replicate above with the TRANDATA Option. Now we create an EXTRACT for this schema (SOURCE1).
1 2 3 4 5 6 7 8 9 10 11 12 13 14 15 16 | GGSCI (primary1.hhuyanlab.local as gguser@primary2) 7> edit params ESCOTT Extract ESCOTT USERID gguser, PASSWORD Passw0rd4 --TRANLOGOPTIONS DBLOGREADER TRANLOGOPTIONS ASMUSER SYS@ASM, ASMPASSWORD Passw0rd4 ExtTrail ./dirdat/ew Table SCOTT.*; GGSCI (primary1.hhuyanlab.local as gguser@primary2) 8> add extract ESCOTT, tranlog, threads 2, begin now EXTRACT added. GGSCI (primary1.hhuyanlab.local as gguser@primary2) 9> add exttrail ./dirdat/ew, extract ESCOTT EXTTRAIL added. |
23. The EXTRACT that performs the PUMP operation is created (SOURCE1).
1 2 3 4 5 6 7 8 9 10 11 12 13 14 15 16 17 18 19 20 21 22 23 | GGSCI (primary1.hhuyanlab.local as gguser@primary2) 11> edit params psource Extract psource RmtHost 172.20.42.25, MgrPort 7810 (172.20.42.25 -> Target IP, 7810 -> Target MGR Port) RmtTrail ./dirdat/pe Passthru Table SCOTT.*; ~ GGSCI (primary1.hhuyanlab.local as gguser@primary2) 12> add extract psource, ExtTrailSource ./dirdat/ew EXTRACT added. GGSCI (primary1.hhuyanlab.local as gguser@primary2) 13> add RmtTrail ./dirdat/pe, extract psource RMTTRAIL added. GGSCI (primary1.hhuyanlab.local as gguser@primary2) 14> info all Program Status Group Lag at Chkpt Time Since Chkpt MANAGER RUNNING EXTRACT STOPPED ESCOTT 00:00:00 00:11:24 EXTRACT STOPPED PSOURCE 00:00:00 00:01:07 |
24. Now we can start our EXTRACT Processes (SOURCE1).
1 2 3 4 5 6 7 8 9 10 11 12 13 14 15 16 17 18 19 20 21 22 23 24 25 26 27 28 29 30 31 32 33 34 35 36 37 38 39 40 41 42 43 44 45 46 47 48 49 50 51 52 53 54 55 56 57 58 59 60 61 62 63 64 65 66 67 68 69 70 71 72 73 74 75 76 77 78 79 80 81 82 83 84 85 86 87 88 89 90 91 92 93 94 95 96 97 98 99 100 101 102 103 104 105 106 107 108 109 110 111 112 113 114 115 116 117 118 119 120 121 122 123 124 125 126 127 | GGSCI (primary1.hhuyanlab.local as gguser@primary2) 17> start escott Sending START request to MANAGER ... EXTRACT ESCOTT starting GGSCI (primary1.hhuyanlab.local as gguser@primary2) 22> start psource Sending START request to MANAGER ... EXTRACT PSOURCE starting GGSCI (primary1.hhuyanlab.local as gguser@primary2) 29> info all Program Status Group Lag at Chkpt Time Since Chkpt MANAGER RUNNING EXTRACT RUNNING ESCOTT 00:00:00 00:00:04 EXTRACT RUNNING PSOURCE 00:00:00 00:00:07 GGSCI (primary1.hhuyanlab.local as gguser@primary2) 30> view report escott *********************************************************************** Oracle GoldenGate Capture for Oracle Version 12.2.0.1.1 OGGCORE_12.2.0.1.0_PLATFORMS_151211.1401_FBO Linux, x64, 64bit (optimized), Oracle 11g on Dec 12 2015 01:10:08 Copyright (C) 1995, 2015, Oracle and/or its affiliates. All rights reserved. Starting at 2016-03-16 14:55:15 *********************************************************************** Operating System Version: Linux Version #1 SMP Wed Nov 28 21:22:00 EST 2012, Release 2.6.18-348.el5 Node: primary1.hhuyanlab.local Machine: x86_64 soft limit hard limit Address Space Size : unlimited unlimited Heap Size : unlimited unlimited File Size : unlimited unlimited CPU Time : unlimited unlimited Process id: 31057 Description: *********************************************************************** ** Running with the following parameters ** *********************************************************************** 2016-03-16 14:55:15 INFO OGG-03059 Operating system character set identified as UTF-8. 2016-03-16 14:55:15 INFO OGG-02695 ANSI SQL parameter syntax is used for parameter parsing. Extract ESCOTT USERID gguser, PASSWORD *** 2016-03-16 14:55:17 INFO OGG-03522 Setting session time zone to source database time zone 'GMT'. TRANLOGOPTIONS ASMUSER SYS@ASM, ASMPASSWORD *** ExtTrail ./dirdat/ew Table SCOTT.*; 2016-03-16 14:55:17 INFO OGG-01635 BOUNDED RECOVERY: reset to initial or altered checkpoint. 2016-03-16 14:55:17 INFO OGG-01815 Virtual Memory Facilities for: BR anon alloc: mmap(MAP_ANON) anon free: munmap file alloc: mmap(MAP_SHARED) file free: munmap target directories: /dbpmp/goldengate_source/BR/ESCOTT. Bounded Recovery Parameter: BRINTERVAL = 4HOURS BRDIR = /dbpmp/goldengate_source 2016-03-16 14:55:17 INFO OGG-01851 filecaching started: thread ID: 46986504534336. 2016-03-16 14:55:17 INFO OGG-01815 Virtual Memory Facilities for: COM anon alloc: mmap(MAP_ANON) anon free: munmap file alloc: mmap(MAP_SHARED) file free: munmap target directories: /dbpmp/goldengate_source/dirtmp. CACHEMGR virtual memory values (may have been adjusted) CACHEPAGEOUTSIZE (default): 8M PROCESS VM AVAIL FROM OS (min): 128G CACHESIZEMAX (strict force to disk): 96G Database Version: Oracle Database 11g Enterprise Edition Release 11.2.0.4.0 - 64bit Production PL/SQL Release 11.2.0.4.0 - Production CORE 11.2.0.4.0 Production TNS for Linux: Version 11.2.0.4.0 - Production NLSRTL Version 11.2.0.4.0 - Production Database Language and Character Set: NLS_LANGUAGE = "AMERICAN" NLS_TERRITORY = "AMERICA" NLS_CHARACTERSET = "AL32UTF8" Maximum supported ASM read buffer size is 28 KB Maximum supported ASM read buffer size is 28 KB 2016-03-16 14:55:19 INFO OGG-02089 Source redo compatibility version is: 11.2.0.4.0. 2016-03-16 14:55:19 INFO OGG-00546 Default thread stack size: 10485760. 2016-03-16 14:55:19 INFO OGG-01515 Positioning to begin time Mar 16, 2016 2:54:10 PM. 2016-03-16 14:55:20 INFO OGG-01516 Positioned to (Thread 1) Sequence 29, RBA 1175552, SCN 0.0 (0), Mar 16, 2016 2:54:10 PM. 2016-03-16 14:55:20 INFO OGG-01515 Positioning to begin time Mar 16, 2016 2:54:10 PM. 2016-03-16 14:55:22 INFO OGG-01516 Positioned to (Thread 2) Sequence 16, RBA 31788032, SCN 0.0 (0), Mar 16, 2016 2:54:10 PM. 2016-03-16 14:55:22 INFO OGG-01517 Position of first record processed for Thread 2, Sequence 16, RBA 31788048, SCN 0.2324041 (2324041), Mar 16, 2016 2:54:11 PM. 2016-03-16 14:55:22 INFO OGG-01517 Position of first record processed for Thread 1, Sequence 29, RBA 1175568, SCN 0.2324039 (2324039), Mar 16, 2016 2:54:10 PM. 2016-03-16 14:55:22 INFO OGG-01052 No recovery is required for target file ./dirdat/ew000000000, at RBA 0 (file not opened). 2016-03-16 14:55:22 INFO OGG-01478 Output file ./dirdat/ew is using format RELEASE 12.2. *********************************************************************** ** Run Time Messages ** *********************************************************************** |
25. Using the GLOBAL parameter file we created earlier, the CHECKPOINT table can be created in the Target database as follows (TARGET1).
1 2 3 4 5 6 7 8 9 10 11 12 13 14 15 16 17 18 19 20 21 22 23 24 25 26 27 28 29 30 31 32 33 34 35 36 37 38 | [root@standby1 ~]# su - goldengate [goldengate@standby1 ~]$ /dbpmp/goldengate_target/ggsci Oracle GoldenGate Command Interpreter for Oracle Version 12.2.0.1.1 OGGCORE_12.2.0.1.0_PLATFORMS_151211.1401_FBO Linux, x64, 64bit (optimized), Oracle 11g on Dec 12 2015 00:54:38 Operating system character set identified as UTF-8. Copyright (C) 1995, 2015, Oracle and/or its affiliates. All rights reserved. GGSCI (standby1.hhuyanlab.local) 1> info all Program Status Group Lag at Chkpt Time Since Chkpt MANAGER RUNNING GGSCI (standby1.hhuyanlab.local) 3> dblogin userid gguser@standby, password Passw0rd4 Successfully logged into database. GGSCI (standby1.hhuyanlab.local as gguser@standby2) 4> Add CheckpointTable No checkpoint table specified. Using GLOBALS specification (gguser.GGS_CHECKPOINT)... Successfully created checkpoint table gguser.GGS_CHECKPOINT. GGSCI (standby1.hhuyanlab.local as gguser@standby2) 5> info CheckpointTable No checkpoint table specified. Using GLOBALS specification (gguser.GGS_CHECKPOINT)... Checkpoint table gguser.GGS_CHECKPOINT created 2016-03-16 15:24:28. GGSCI (standby1.hhuyanlab.local as gguser@standby2) 7> list tables gguser.gg* GGUSER.GGS_CHECKPOINT GGUSER.GGS_CHECKPOINT_LOX Found 2 tables matching list criteria. |
26. The REPLICAT that will replicate the tables of the SCOTT schema is created as follows (TARGET1).
1 2 3 4 5 6 7 8 9 10 11 12 13 14 15 16 17 | GGSCI (standby1.hhuyanlab.local as gguser@standby2) 8> edit params RSCOTT Replicat RSCOTT USERID gguser, PASSWORD Passw0rd4 AssumeTargetDefs DiscardFile ./dirrpt/rscott.dsc, Purge --HandleCollisions --End Runtime MAP SCOTT.DEPT, TARGET SCOTT.DEPT; MAP SCOTT.EMP, TARGET SCOTT.EMP; MAP SCOTT.SALGRADE, TARGET SCOTT.SALGRADE; MAP SCOTT.BONUS, TARGET SCOTT.BONUS; ~ ~ GGSCI (standby1.hhuyanlab.local as gguser@standby2) 10> add replicat RSCOTT, ExtTrail ./dirdat/pe REPLICAT added. |
27. The tables to be replicated must be created on the Target side in advance, for this the INITIAL LOAD process will be performed.
The process steps are as follows.
a. The export of the schema is taken according to the SCN number (SOURCE1).
1 2 3 4 5 6 7 8 9 10 11 12 13 14 15 16 17 18 19 20 21 22 23 24 25 26 27 28 29 30 31 32 33 34 35 36 37 38 39 40 41 42 43 | [root@primary1 ~]# su - oracle [oracle@primary1 ~]$ sqlplus / as sysdba SQL> select to_char(current_scn) from v$database; TO_CHAR(CURRENT_SCN) ---------------------------------------- 2341046 [oracle@primary1 ~]$ expdp "'/ as sysdba'" directory=ggexp schemas=SCOTT dumpfile=scott.dmp logfile=scott.log flashback_scn=2341046 EXCLUDE=TRIGGER,GRANTS,POLICY,RLS_POLICY,REF_CONSTRAINT,SYNONYM,JOB,SEQUENCE,CONSTRAINT Export: Release 11.2.0.4.0 - Production on Wed Mar 16 16:05:48 2016 Copyright (c) 1982, 2011, Oracle and/or its affiliates. All rights reserved. Connected to: Oracle Database 11g Enterprise Edition Release 11.2.0.4.0 - 64bit Production With the Partitioning, Real Application Clusters, Automatic Storage Management, OLAP, Data Mining and Real Application Testing options FLASHBACK automatically enabled to preserve database integrity. Starting "SYS"."SYS_EXPORT_SCHEMA_01": "/******** AS SYSDBA" directory=ggexp schemas=SCOTT dumpfile=scott.dmp logfile=scott.log flashback_scn=2341046 EXCLUDE=TRIGGER,GRANTS,POLICY,RLS_POLICY,REF_CONSTRAINT,SYNONYM,JOB,SEQUENCE,CONSTRAINT Estimate in progress using BLOCKS method... Processing object type SCHEMA_EXPORT/TABLE/TABLE_DATA Total estimation using BLOCKS method: 192 KB Processing object type SCHEMA_EXPORT/USER Processing object type SCHEMA_EXPORT/SYSTEM_GRANT Processing object type SCHEMA_EXPORT/ROLE_GRANT Processing object type SCHEMA_EXPORT/DEFAULT_ROLE Processing object type SCHEMA_EXPORT/PRE_SCHEMA/PROCACT_SCHEMA Processing object type SCHEMA_EXPORT/TABLE/PROCACT_INSTANCE Processing object type SCHEMA_EXPORT/TABLE/TABLE Processing object type SCHEMA_EXPORT/TABLE/INDEX/INDEX Processing object type SCHEMA_EXPORT/TABLE/INDEX/STATISTICS/INDEX_STATISTICS Processing object type SCHEMA_EXPORT/TABLE/STATISTICS/TABLE_STATISTICS . . exported "SCOTT"."DEPT" 5.929 KB 4 rows . . exported "SCOTT"."EMP" 8.562 KB 14 rows . . exported "SCOTT"."SALGRADE" 5.859 KB 5 rows . . exported "SCOTT"."BONUS" 0 KB 0 rows Master table "SYS"."SYS_EXPORT_SCHEMA_01" successfully loaded/unloaded ****************************************************************************** Dump file set for SYS.SYS_EXPORT_SCHEMA_01 is: /dbpmp/scott.dmp Job "SYS"."SYS_EXPORT_SCHEMA_01" successfully completed at Wed Mar 16 16:06:35 2016 elapsed 0 00:00:39 |
b. The received export target is imported into the database (TARGET1).
1 2 3 4 5 6 7 8 9 10 11 12 13 14 15 16 17 18 19 20 21 22 23 24 25 26 27 28 | [oracle@standby1 ~]$ impdp "'/ as sysdba'" directory=ggexp dumpfile=scott.dmp Import: Release 11.2.0.4.0 - Production on Wed Mar 16 16:37:21 2016 Copyright (c) 1982, 2011, Oracle and/or its affiliates. All rights reserved. Connected to: Oracle Database 11g Enterprise Edition Release 11.2.0.4.0 - 64bit Production With the Partitioning, Real Application Clusters, Automatic Storage Management, OLAP, Data Mining and Real Application Testing options Master table "SYS"."SYS_IMPORT_FULL_01" successfully loaded/unloaded Starting "SYS"."SYS_IMPORT_FULL_01": "/******** AS SYSDBA" directory=ggexp dumpfile=scott.dmp Processing object type SCHEMA_EXPORT/USER ORA-31684: Object type USER:"SCOTT" already exists Processing object type SCHEMA_EXPORT/SYSTEM_GRANT Processing object type SCHEMA_EXPORT/ROLE_GRANT Processing object type SCHEMA_EXPORT/DEFAULT_ROLE Processing object type SCHEMA_EXPORT/PRE_SCHEMA/PROCACT_SCHEMA Processing object type SCHEMA_EXPORT/TABLE/PROCACT_INSTANCE Processing object type SCHEMA_EXPORT/TABLE/TABLE Processing object type SCHEMA_EXPORT/TABLE/TABLE_DATA . . imported "SCOTT"."DEPT" 5.929 KB 4 rows . . imported "SCOTT"."EMP" 8.562 KB 14 rows . . imported "SCOTT"."SALGRADE" 5.859 KB 5 rows . . imported "SCOTT"."BONUS" 0 KB 0 rows Processing object type SCHEMA_EXPORT/TABLE/INDEX/INDEX Processing object type SCHEMA_EXPORT/TABLE/INDEX/STATISTICS/INDEX_STATISTICS Processing object type SCHEMA_EXPORT/TABLE/STATISTICS/TABLE_STATISTICS Job "SYS"."SYS_IMPORT_FULL_01" completed with 1 error(s) at Wed Mar 16 16:38:45 2016 elapsed 0 00:01:01 |
c. RELICAT export is started from the received SCN number (TARGET1).
1 2 3 4 | GGSCI (standby1.hhuyanlab.local as gguser@standby2) 22> start replicat RSCOTT, aftercsn 2341046 Sending START request to MANAGER ... REPLICAT RSCOTT starting |
e. The status of REPLICAT is checked (TARGET1).
1 2 3 4 5 6 7 8 9 10 11 12 13 14 15 16 17 18 19 20 21 22 23 24 25 26 27 28 29 30 31 32 33 34 35 36 37 38 39 40 41 42 43 44 45 46 47 48 49 50 51 52 53 54 55 56 57 58 59 60 61 62 63 64 65 66 67 68 69 70 71 72 73 74 75 76 77 78 79 80 81 82 83 84 85 86 87 88 89 90 91 92 93 94 95 96 97 98 99 100 101 102 103 104 | GGSCI (standby1.hhuyanlab.local as gguser@standby2) 23> info all Program Status Group Lag at Chkpt Time Since Chkpt MANAGER RUNNING REPLICAT STARTING RSCOTT 00:00:00 00:48:12 GGSCI (standby1.hhuyanlab.local as gguser@standby2) 36> info RSCOTT REPLICAT RSCOTT Last Started 2016-03-16 16:42 Status RUNNING Checkpoint Lag 00:00:00 (updated 00:00:03 ago) Process ID 27380 Log Read Checkpoint File ./dirdat/pe000000000 First Record RBA 0 GGSCI (standby1.hhuyanlab.local as gguser@standby2) 37> info all Program Status Group Lag at Chkpt Time Since Chkpt MANAGER RUNNING REPLICAT RUNNING RSCOTT 00:00:00 00:00:07 GGSCI (standby1.hhuyanlab.local as gguser@standby2) 40> view report RSCOTT *********************************************************************** Oracle GoldenGate Delivery for Oracle Version 12.2.0.1.1 OGGCORE_12.2.0.1.0_PLATFORMS_151211.1401_FBO Linux, x64, 64bit (optimized), Oracle 11g on Dec 12 2015 01:27:04 Copyright (C) 1995, 2015, Oracle and/or its affiliates. All rights reserved. Starting at 2016-03-16 16:42:13 *********************************************************************** Operating System Version: Linux Version #1 SMP Wed Nov 28 21:22:00 EST 2012, Release 2.6.18-348.el5 Node: standby1.hhuyanlab.local Machine: x86_64 soft limit hard limit Address Space Size : unlimited unlimited Heap Size : unlimited unlimited File Size : unlimited unlimited CPU Time : unlimited unlimited Process id: 27380 Description: 2016-03-16 16:42:14 WARNING OGG-02904 Replication of PARTIAL XML containing NCHAR/NVARCHAR/NCLOB data may cause divergence. *********************************************************************** ** Running with the following parameters ** *********************************************************************** 2016-03-16 16:42:14 INFO OGG-03059 Operating system character set identified as US-ASCII. 2016-03-16 16:42:14 INFO OGG-02695 ANSI SQL parameter syntax is used for parameter parsing. Replicat RSCOTT USERID gguser, PASSWORD *** AssumeTargetDefs DiscardFile ./dirrpt/rscott.dsc, Purge MAP SCOTT.DEPT, TARGET SCOTT.DEPT; MAP SCOTT.EMP, TARGET SCOTT.EMP; MAP SCOTT.SALGRADE, TARGET SCOTT.SALGRADE; MAP SCOTT.BONUS, TARGET SCOTT.BONUS; 2016-03-16 16:42:31 INFO OGG-06451 Triggers will be suppressed by default. 2016-03-16 16:42:31 INFO OGG-01815 Virtual Memory Facilities for: COM anon alloc: mmap(MAP_ANON) anon free: munmap file alloc: mmap(MAP_SHARED) file free: munmap target directories: /dbpmp/goldengate_target/dirtmp. CACHEMGR virtual memory values (may have been adjusted) CACHEPAGEOUTSIZE (default): 4M PROCESS VM AVAIL FROM OS (min): 4G CACHESIZEMAX (strict force to disk): 3.41G Database Version: Oracle Database 11g Enterprise Edition Release 11.2.0.4.0 - 64bit Production PL/SQL Release 11.2.0.4.0 - Production CORE 11.2.0.4.0 Production TNS for Linux: Version 11.2.0.4.0 - Production NLSRTL Version 11.2.0.4.0 - Production Database Language and Character Set: NLS_LANGUAGE = "AMERICAN" NLS_TERRITORY = "AMERICA" NLS_CHARACTERSET = "AL32UTF8" *********************************************************************** ** Run Time Messages ** *********************************************************************** 2016-03-16 16:42:34 INFO OGG-02243 Opened trail file ./dirdat/pe000000000 at 2016-03-16 16:42:34.800300. |
28. Finally, let’s check whether the data has been transferred to the other party.
a. First, data is added to the replicated table on the Source side (SOURCE1).
1 2 3 4 5 6 7 8 9 10 11 12 13 14 15 16 17 18 19 20 21 22 23 24 25 26 | [root@primary1 ~]# su - oracle [oracle@primary1 ~]$ sqlplus / as sysdba SQL> select * from SCOTT.DEPT; DEPTNO DNAME LOC ---------- -------------- ------------- 10 ACCOUNTING NEW YORK 20 RESEARCH DALLAS 30 SALES CHICAGO 40 OPERATIONS BOSTON 4 rows selected. SQL> insert into SCOTT.DEPT values (50,'SS','ISTANBUL'); 1 row created. SQL> insert into SCOTT.DEPT values (60,'XX','ISTANBUL'); 1 row created. SQL> commit; Commit complete. |
b. RBA values can be recorded before and after the INSERT operation for control purposes (TARGET1).
1 2 3 4 5 6 7 8 9 10 11 12 13 14 15 16 17 | GGSCI (standby1.hhuyanlab.local as gguser@standby2) 39> info RSCOTT REPLICAT RSCOTT Last Started 2016-03-16 16:42 Status RUNNING Checkpoint Lag 00:00:00 (updated 00:00:05 ago) Process ID 27380 Log Read Checkpoint File ./dirdat/pe000000000 First Record RBA 0 GGSCI (standby1.hhuyanlab.local as gguser@standby2) 43> info RSCOTT REPLICAT RSCOTT Last Started 2016-03-16 16:42 Status RUNNING Checkpoint Lag 00:00:00 (updated 00:00:19 ago) Process ID 27380 Log Read Checkpoint File ./dirdat/pe000000000 First Record RBA 1955 |
c. The table is checked on the target side.
1 2 3 4 5 6 7 8 9 10 11 12 13 14 15 16 17 18 19 20 21 22 23 24 25 | [root@standby1 ~]# su - oracle [oracle@standby1 ~]$ sqlplus / as sysdba SQL*Plus: Release 11.2.0.4.0 Production on Wed Mar 16 16:50:54 2016 Copyright (c) 1982, 2013, Oracle. All rights reserved. Connected to: Oracle Database 11g Enterprise Edition Release 11.2.0.4.0 - 64bit Production With the Partitioning, Real Application Clusters, Automatic Storage Management, OLAP, Data Mining and Real Application Testing options SQL> select * from SCOTT.DEPT; DEPTNO DNAME LOC ---------- -------------- ------------- 10 ACCOUNTING NEW YORK 20 RESEARCH DALLAS 30 SALES CHICAGO 40 OPERATIONS BOSTON 50 SS ISTANBUL 60 XX ISTANBUL 6 rows selected. |
![]()
 Database Tutorials MSSQL, Oracle, PostgreSQL, MySQL, MariaDB, DB2, Sybase, Teradata, Big Data, NOSQL, MongoDB, Couchbase, Cassandra, Windows, Linux