 Database Tutorials MSSQL, Oracle, PostgreSQL, MySQL, MariaDB, DB2, Sybase, Teradata, Big Data, NOSQL, MongoDB, Couchbase, Cassandra, Windows, Linux
1:- Enable oplog using –master option while starting mongod service [Version 3.2]. And later version (3.2 +) need to put replSetName=rs0 into the mongo.conf file in replication section.
Note :- Version 3.2+ after enabling oplog by putting replica set name into the conf file, Need to take login in mongo and run command rs.intiate() and fire enter button for 2-3 times it will show like
Primary>

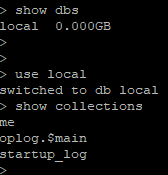
2:- Take a login into the mongo and check oplog is generated or not.
Note :- Version 3.2 +, When you will run show dbs command it will show 2 databases admin and local. Use local and check collections by below commands.
3:- Create your own database and collection by entering below commands.
Note:- When you insert documents into the collection by any collection name it will create that name of collection by its own.


You can use below command to insert bulk data into the collection for testing purpose.
for (var i=0; i <= 10;i++){db.mycol1.insert({"count":i,"username":"user"+i,"password":(Math.random()+1).toString(36).substring(7),createdOn:new Date(),score:0})}

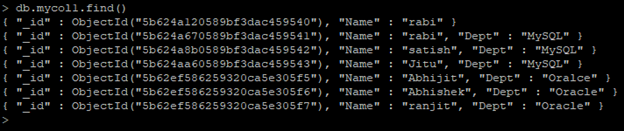
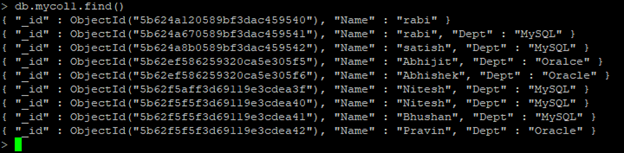
4:- Check you documents which you inserted through below command.
db.collection_name.find()
5:- Take backup of mongo server thorough below commands.
Mongodump --user user_name -- pass password --port port_number --authenticationDatabase admin

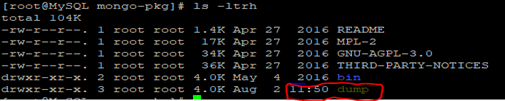
6:- If you did not specify the location of the dump file it will create backup into the present working directory by the name of dump.
7:- Now We have deleted some records from below command.
Db.collection_name.remove()


8:- Now check how many records are present in the collection after deletion of records from above.

9:- Again we have inserted some more records in to the same collections through below command.
Db.collection_name.insert([ ])

10:- Check records available or count of the records from below command.
Db.collection_name.find()
Db.collection_name.count()
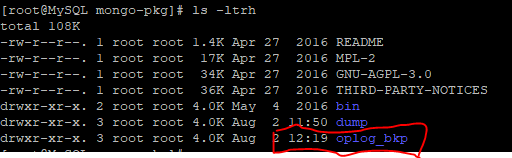
11:- Now we are taking whole oplog backup though below command.
Mongodump --user user_name -- pass password --port port_number - d local -c ‘oplog.$main’ --out desination
Note:- Version 3.2+ oplog collection name was oplog.rs instead of ‘oplog.$main’

12:- It will generate below directory.

13:- For point in time recovery you must need to know the timestamp of the records deleted.
d=db.getSiblingDB("local")
d.oplog.rs.find({"ns":"test.mycol1","op":"d"}).sort({$natural:1}).limit(5)
Note:- From above command we checking first deleted records time stamp. In your case might be much more records were deleted so check the latest deleted timestamp with lowest second value like below.
Timestamp(1533210442, 1)

14:- Here we are checking last deleted records timestamp through below command.
d=db.getSiblingDB("local")
d.oplog.rs.find({"ns":"test.mycol1","op":"d"}).sort({$natural:-1}).limit(5)

15:- Here We are capturing last inserted records timestamp with the help of below command.
d=db.getSiblingDB("local")
d.oplog.rs.find({"ns":"test.mycol1","op":"i"}).sort({$natural:-1}).limit(5)

Note:- Oplog timestamp is in epoch format to get the correct timestamp values you need to convert it into the human readable format.
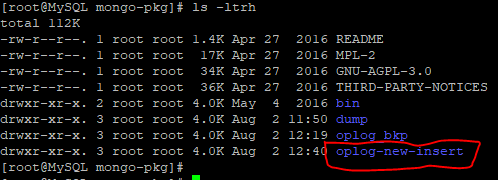
16:- Now we are taking backup of oplog between the last deleted records to last inserted records. To recover the data till the last point of data.
mongodump -d local -c oplog.rs --query "{"ts":{\$gte: Timestamp(1533211865, 1),\$lte: Timestamp(1533212149, 3)}}" --out destination_path
Here you need to put timestamp with were captured from 13 and 14 step,


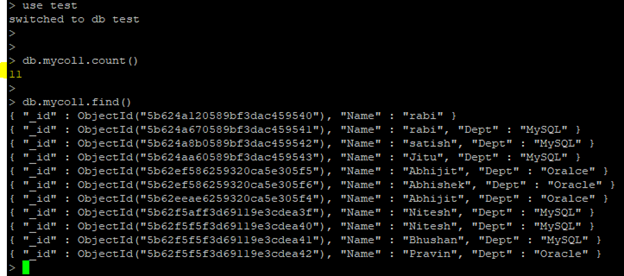
17:- As of now we have 9 records into the collection and we have deleted 2 records earlier, so total should be 11 records.
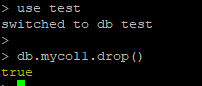
18:- Now drop the collection from below command.
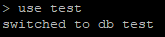
Use test
Db.collection_name.drop()
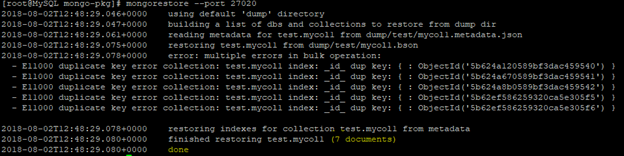
19:- Now we are restoring full backup which we are taken into the step 5.
Go to the backup path directory and run below command.
Mongorestore -- user user_name -- pass password -- port port_number
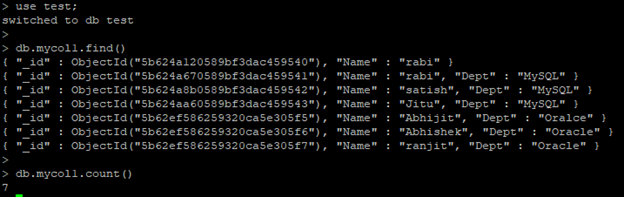
20:- Check the restored records with the below command , shown in screenshot.
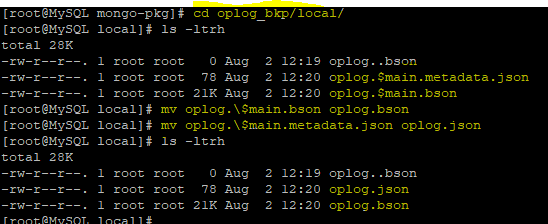
21:- Before restoring the oplog backup which we are taken in step 11, that should be rename because restore command will not take it.
22:- Now we are restoring oplog bakup which we are taken in step 11 from below command.
mongorestore --oplogReplay --oplogLimit 1533210442:1 ./

23:- Check the restored value up to the deleted records.

24:- Follow the steps 21 and restore the oplog backup which were taken in step 16.
mongorestore --oplogReplay --oplogLimit 1533212149:4 ./
Note:- put timestamp which we were captured in step 15 with second value increased.

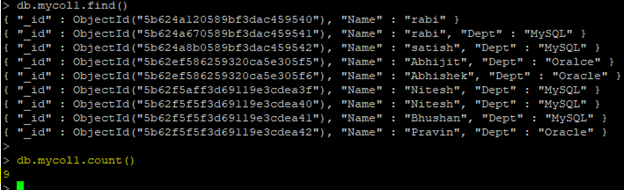
25:- Now check the recovered records.
![]()