 Database Tutorials MSSQL, Oracle, PostgreSQL, MySQL, MariaDB, DB2, Sybase, Teradata, Big Data, NOSQL, MongoDB, Couchbase, Cassandra, Windows, Linux
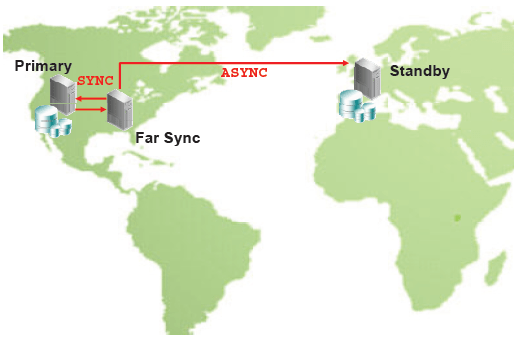
Far SYNC is a feature introduced with 12c.
It is the dummy instance that sends the Redos from the Primary Database to other Standby Databases in the Data Guard configuration.
It has only standby control file, password file, standby redo log and archived logs. Since there are no Datafiles on it, there is no Redo Apply process.
By sending redos to the nearby location as SYNC, it guarantees zero data loss. It also preserves the availability of the Primary Database.
After guaranteeing zero data loss, redos can be sent as SYNC or ASYNC to up to 30 locations via Far SYNC instance.
Its architectural structure is as follows.
As the database will run in Mount mode, you will likely pay license money to Oracle per core.
Redos can be sent to Standby Databases as compressed.
An alternative “Far SYNC” can be used for High Availability.
In Cascade Standby structures in versions prior to 12c, Redos can be sent from Primary to the first Standby as SYNC. However, Redos could not be sent to other Standby Databases as SYNC.
In Cascade structures in 12c, Redos can be sent as SYNC to Far SYNC instances and Physical Standbys.
With this feature, you can have multiple SYNC Standby Databases.
How To Create Far SYNC Instance?
Step1:
Create PFILE from SPFILE in the primary database.
1 2 3 | [Primary] SQL> create pfile='/tmp/initprmyFS.ora' from spfile; File created. |
Step2:
Create Control File for Far SYNC instance.
1 2 3 | [Primary] SQL> alter database create far sync instance controlfile as '/tmp/prmyFS.ctl'; Database altered. |
Step3:
Move Control File, PFILE and Password File to Far SYNC instance.
1 2 3 4 5 6 7 8 9 | [oracle@primary tmp]$ scp initprmyFS.ora prmyFS:/u01/app/oracle/product/12.1.0/db_1/dbs oracle@prmyfs's password: initprmyFS.ora 100% 1383 1.4KB/s 00:00 [oracle@primary tmp]$ scp prmyFS.ctl prmyFS:/u01/app/oracle/product/12.1.0/db_1/dbs oracle@prmyfs's password: prmyFS.ctl 100% 9808KB 9.6MB/s 00:00 [oracle@primary tmp]$ scp /u01/app/oracle/product/12.1.0/db_1/dbs/orapwprimary prmyFS:/u01/app/oracle/product/12.1.0/db_1/dbs/orapwprmyFS oracle@prmyfs's password: orapwprimary 100% 7680 7.5KB/s 00:00 |
Step4:
Check if the files go to Far SYNC instance.
1 2 3 4 | [root@prmyFS ~]# su - oracle [oracle@prmyFS ~]$ cd $ORACLE_HOME/dbs [oracle@prmyFS dbs]$ ls init.ora initprmyFS.ora orapwprmyFS prmyFS.ctl |
Step5:
Create the necessary directories in the Far SYNC instance.
1 2 3 | [oracle@prmyFS dbs]$ mkdir -p /u01/app/oracle/admin/prmyFS/adump [oracle@prmyFS dbs]$ mkdir -p /u01/app/oracle/oradata/prmyFS [oracle@prmyFS dbs]$ mkdir -p /u01/app/oracle/recovery_area/prmyFS |
Step6:
Edit the PFILE file according to the behavior of the Far SYNC instance.
1 | [oracle@prmyFS dbs]$ vi initprmyFS.ora |
Update the PFILE parameter file by running :%s/primary/prmyFS/g command as follows.
1 2 3 4 5 6 7 8 9 10 11 12 13 14 15 16 17 18 19 20 21 22 23 24 25 26 27 28 29 30 31 32 | prmyFS.__data_transfer_cache_size=0 prmyFS.__db_cache_size=2583691264 prmyFS.__java_pool_size=16777216 prmyFS.__large_pool_size=33554432 prmyFS.__oracle_base='/u01/app/oracle'#ORACLE_BASE set from environment prmyFS.__pga_aggregate_target=1157627904 prmyFS.__sga_target=3472883712 prmyFS.__shared_io_pool_size=167772160 prmyFS.__shared_pool_size=654311424 prmyFS.__streams_pool_size=0 *.audit_file_dest='/u01/app/oracle/admin/prmyFS/adump' *.audit_trail='db' *.compatible='12.1.0.2.0' *.control_files='/u01/app/oracle/oradata/prmyFS/control01.ctl','/u01/app/oracle/recovery_area/prmyFS/control02.ctl' *.db_block_size=8192 *.db_domain='' *.db_name='prmyFS' *.db_recovery_file_dest='/u01/app/oracle/recovery_area' *.db_recovery_file_dest_size=10737418240 *.diagnostic_dest='/u01/app/oracle' *.dispatchers='(PROTOCOL=TCP) (SERVICE=prmyFSXDB)' *.log_archive_config='dg_config=(prmyFS,prmyFS,physical,physclFS,logical)' *.log_archive_dest_1='location=USE_DB_RECOVERY_FILE_DEST valid_for=(ALL_LOGFILES,ALL_ROLES) db_unique_name=prmyFS' *.log_archive_dest_2='SERVICE=physical ASYNC REOPEN=15 valid_for=(ONLINE_LOGFILES,PRIMARY_ROLE) db_unique_name=physical' *.log_archive_max_processes=8 *.open_cursors=300 *.pga_aggregate_target=1100m *.processes=300 *.remote_login_passwordfile='EXCLUSIVE' *.sga_target=3302m *.standby_file_management='auto' *.undo_tablespace='UNDOTBS1' |
After the necessary arrangements in the PFILE parameter file, the final version of the current PFILE file is as follows.
1 2 3 4 5 6 7 8 9 10 11 12 13 14 15 16 17 18 19 20 21 22 23 24 25 26 27 28 29 30 31 32 33 34 35 | prmyFS.__data_transfer_cache_size=0 prmyFS.__db_cache_size=2583691264 prmyFS.__java_pool_size=16777216 prmyFS.__large_pool_size=33554432 prmyFS.__oracle_base='/u01/app/oracle'#ORACLE_BASE set from environment prmyFS.__pga_aggregate_target=1157627904 prmyFS.__sga_target=3472883712 prmyFS.__shared_io_pool_size=167772160 prmyFS.__shared_pool_size=654311424 prmyFS.__streams_pool_size=0 *.audit_file_dest='/u01/app/oracle/admin/prmyFS/adump' *.audit_trail='db' *.compatible='12.1.0.2.0' *.control_files='/u01/app/oracle/oradata/prmyFS/prmyFS01.ctl','/u01/app/oracle/recovery_area/prmyFS/prmyFS02.ctl' *.db_block_size=8192 *.db_domain='' *.db_name='primary' *.db_unique_name=prmyFS *.fal_server=primary *.log_file_name_convert='primary','prmyFS' *.db_recovery_file_dest='/u01/app/oracle/recovery_area' *.db_recovery_file_dest_size=10737418240 *.diagnostic_dest='/u01/app/oracle' *.dispatchers='(PROTOCOL=TCP) (SERVICE=prmyFSXDB)' *.log_archive_config='dg_config=(primary,prmyFS,physical,physclFS,logical)' *.log_archive_dest_1='location=USE_DB_RECOVERY_FILE_DEST valid_for=(ALL_LOGFILES,ALL_ROLES) db_unique_name=prmyFS' *.log_archive_dest_2='SERVICE=physical SYNC REOPEN=15 valid_for=(STANDBY_LOGFILES,STANDBY_ROLE) db_unique_name=physical' *.log_archive_max_processes=8 *.open_cursors=300 *.pga_aggregate_target=1100m *.processes=300 *.remote_login_passwordfile='EXCLUSIVE' *.sga_target=3302m *.standby_file_management='auto' *.undo_tablespace='UNDOTBS1' |
Step7:
Copy the Control File file to the locations specified in the Parameter file.
1 2 3 | [oracle@prmyFS dbs]$ cp prmyFS.ctl /u01/app/oracle/oradata/prmyFS/prmyFS01.ctl [oracle@prmyFS dbs]$ cp prmyFS.ctl /u01/app/oracle/fast_recovery_area/prmyFS/prmyFS02.ctl [oracle@prmyFS dbs]$ rm -rf prmyFS.ctl |
Step8:
Create SPFILE from PFILE on the Far SYNC instance.
1 2 3 4 5 6 7 8 9 10 11 | [oracle@prmyFS dbs]$ sqlplus / as sysdba SQL*Plus: Release 12.1.0.2.0 Production on Wed Feb 8 15:30:46 2017 Copyright (c) 1982, 2014, Oracle. All rights reserved. Connected to an idle instance. [PrimaryFS] SQL> create spfile from pfile='/u01/app/oracle/product/12.1.0/db_1/dbs/initprmyFS.ora'; File created. |
Step9:
Mount the Far SYNC instance.
1 2 3 4 5 6 7 8 9 | [PrimaryFS] SQL> startup mount; ORACLE instance started. Total System Global Area 3472883712 bytes Fixed Size 2930272 bytes Variable Size 822086048 bytes Database Buffers 2634022912 bytes Redo Buffers 13844480 bytes Database mounted. |
1 2 3 4 5 | [PrimaryFS] SQL> select status from v$instance; STATUS ------------ MOUNTED |
Step10:
Check the Database Role.
1 2 3 4 5 | [PrimaryFS] SQL> select database_role, open_mode, protection_mode from v$database; DATABASE_ROLE OPEN_MODE PROTECTION_MODE ---------------- -------------------- -------------------- FAR SYNC MOUNTED MAXIMUM PERFORMANCE |
Step11:
Update the Primary Database’s LOG_ARCHIVE_DEST_2 parameter to send the logs to the Far SYNC instance.
1 2 3 | [Primary] SQL> alter system set log_archive_dest_2='SERVICE=prmyFS SYNC REOPEN=15 valid_for=(ONLINE_LOGFILES,PRIMARY_ROLE) db_unique_name=prmyFS' scope=both; System altered. |
Step12:
Check if Archives go to Far SYNC instance by performing Log Switch operation.
1 2 3 4 5 6 7 8 9 | [Primary] SQL> alter system switch logfile; System altered. [Primary] SQL> SELECT MAX(SEQUENCE#), THREAD# FROM V$ARCHIVED_LOG GROUP BY THREAD#; MAX(SEQUENCE#) THREAD# -------------- ---------- 14 1 |
1 2 3 4 5 | [PrimaryFS] SQL> SELECT MAX(SEQUENCE#), THREAD# FROM V$ARCHIVED_LOG GROUP BY THREAD#; MAX(SEQUENCE#) THREAD# -------------- ---------- 14 1 |
1 2 3 4 5 | [Physical] SQL> SELECT MAX(SEQUENCE#), THREAD# FROM V$ARCHIVED_LOG GROUP BY THREAD#; MAX(SEQUENCE#) THREAD# -------------- ---------- 14 1 |
You can see if Standby Redo Logs are created in Far SYNC instance as below.
1 2 3 4 5 | [oracle@prmyFS dbs]$ ls -la /u01/app/oracle/oradata/prmyFS/stdby* -rw-r----- 1 oracle oinstall 52429312 Feb 8 15:38 /u01/app/oracle/oradata/prmyFS/stdbyredo01.log -rw-r----- 1 oracle oinstall 52429312 Feb 8 15:36 /u01/app/oracle/oradata/prmyFS/stdbyredo02.log -rw-r----- 1 oracle oinstall 52429312 Feb 8 15:36 /u01/app/oracle/oradata/prmyFS/stdbyredo03.log -rw-r----- 1 oracle oinstall 52429312 Feb 8 15:36 /u01/app/oracle/oradata/prmyFS/stdbyredo04.log |
Step13:
Test it. To do this, create a new table in Primary and see if it is transferred to Physical Standby.
1 2 3 4 5 6 | [Primary] SQL> select table_name from dba_tables where owner='TEST'; TABLE_NAME -------------------------------------------------------------------------------- JOBS_YEDEK EMPLOYEES_YEDEK |
1 2 3 4 5 6 | [Physical] SQL> select table_name from dba_tables where owner='TEST'; TABLE_NAME -------------------------------------------------------------------------------- JOBS_YEDEK EMPLOYEES_YEDEK |
1 2 3 4 5 6 7 8 9 10 11 | [Primary] SQL> create table test.regions as select * from hr.regions; Table created. [Primary] SQL> select table_name from dba_tables where owner='TEST'; TABLE_NAME -------------------------------------------------------------------------------- JOBS_YEDEK EMPLOYEES_YEDEK REGIONS |
1 2 3 4 5 6 | [Physical] SQL> select table_name from dba_tables where owner='TEST'; TABLE_NAME -------------------------------------------------------------------------------- JOBS_YEDEK EMPLOYEES_YEDEK |
We saw that the created table was not transferred to Physical Standby. The reason is that the Log Transport attribute in the LOG_ARCHIVE_DEST_2 parameter in the Far SYNC instance is SYNC.
In order for Redos to be transferred in Real-Time, this parameter must be set as ASYNC.
Step14:
Update the LOG_ARCHIVE_DEST_2 parameter in the Far SYNC instance.
1 2 3 | [PrimaryFS] SQL> alter system set log_archive_dest_2='SERVICE=physical ASYNC NOAFFIRM REOPEN=15 valid_for=(STANDBY_LOGFILES,STANDBY_ROLE) db_unique_name=physical' scope=both; System altered. |
Step15:
Check if the created table is transferred to Physical Standby.
1 2 3 4 5 6 | [Physical] SQL> select table_name from dba_tables where owner='TEST'; TABLE_NAME -------------------------------------------------------------------------------- JOBS_YEDEK EMPLOYEES_YEDEK |
Although we updated the LOG_ARCHIVE_DEST_2 parameter, the table was not transferred. This is because the Redo Transport mode will be enabled after the Log Switch operation.
Step16:
Perform Log Switch.
1 2 3 4 5 6 7 8 9 | [Primary] SQL> alter system switch logfile; System altered. [Primary] SQL> SELECT MAX(SEQUENCE#), THREAD# FROM V$ARCHIVED_LOG GROUP BY THREAD#; MAX(SEQUENCE#) THREAD# -------------- ---------- 15 1 |
1 2 3 4 5 | [PrimaryFS] SQL> SELECT MAX(SEQUENCE#), THREAD# FROM V$ARCHIVED_LOG GROUP BY THREAD#; MAX(SEQUENCE#) THREAD# -------------- ---------- 15 1 |
1 2 3 4 5 | [Physical] SQL> SELECT MAX(SEQUENCE#), THREAD# FROM V$ARCHIVED_LOG GROUP BY THREAD#; MAX(SEQUENCE#) THREAD# -------------- ---------- 15 1 |
Step17:
Check if the created table is transferred to Physical Standby.
1 2 3 4 5 6 7 | [Physical] SQL> select table_name from dba_tables where owner='TEST'; TABLE_NAME -------------------------------------------------------------------------------- JOBS_YEDEK EMPLOYEES_YEDEK REGIONS |
Step18:
Test it again.
1 2 3 4 5 6 7 8 9 10 | [Primary] SQL> drop table test.regions; Table dropped. [Primary] SQL> select table_name from dba_tables where owner='TEST'; TABLE_NAME -------------------------------------------------------------------------------- JOBS_YEDEK EMPLOYEES_YEDEK |
1 2 3 4 5 6 | [Physical] SQL> select table_name from dba_tables where owner='TEST'; TABLE_NAME -------------------------------------------------------------------------------- JOBS_YEDEK EMPLOYEES_YEDEK |
1 2 3 4 5 6 7 8 9 10 11 | [Primary] SQL> create table test.locations_yedek as select * from hr.locations; Table created. [Primary] SQL> select table_name from dba_tables where owner='TEST'; TABLE_NAME -------------------------------------------------------------------------------- JOBS_YEDEK EMPLOYEES_YEDEK LOCATIONS_YEDEK |
1 2 3 4 5 6 7 | [Physical] SQL> select table_name from dba_tables where owner='TEST'; TABLE_NAME -------------------------------------------------------------------------------- JOBS_YEDEK EMPLOYEES_YEDEK LOCATIONS_YEDEK |
Determine Alternative Redo Transport Location
In systems where Far SYNC is used, when Far SYNC instance is inaccessible, it is necessary to send Redos directly to Standby Database in order to maintain the availability of Primary Database.
When the access problem resolves, Oracle Data Guard automatically re-synchronizes the Far SYNC instance, arranging the Redo stream to go from Primary to Far SYNC and then to Standby.
You can do alternative Redo Transport as follows.
Step1:
Update the archive destination parameter that sends the logs to Far SYNC.
1 2 3 | [Primary] SQL> alter system set log_archive_dest_2='SERVICE=prmyFS SYNC AFFIRM MAX_FAILURE=1 REOPEN=15 ALTERNATE=LOG_ARCHIVE_DEST_3 valid_for=(ONLINE_LOGFILES,PRIMARY_ROLE) db_unique_name=prmyFS' scope=both; System altered. |
Step2:
Update the dest_state parameter that will send the Redos to the alternate location.
1 2 3 | [Primary] SQL> alter system set LOG_ARCHIVE_DEST_STATE_3='ALTERNATE' scope = both; System altered. |
Step3:
Update the archive destination parameter that will send the Redos to the alternate location.
1 2 3 | [Primary] SQL> alter system set log_archive_dest_3='SERVICE=physical ASYNC NOAFFIRM REOPEN=15 ALTERNATE=LOG_ARCHIVE_DEST_2 valid_for=(ONLINE_LOGFILES,PRIMARY_ROLE) db_unique_name=physical' scope=both; System altered. |
Let’s test the system’s functionality.
Step1:
Check the existing sequences in Primary, Far SYNC and Physical Standby.
1 2 3 4 5 | [Primary] SQL> SELECT MAX(SEQUENCE#), THREAD# FROM V$ARCHIVED_LOG GROUP BY THREAD#; MAX(SEQUENCE#) THREAD# -------------- ---------- 24 1 |
1 2 3 4 5 | [Physical] SQL> SELECT MAX(SEQUENCE#), THREAD# FROM V$ARCHIVED_LOG GROUP BY THREAD#; MAX(SEQUENCE#) THREAD# -------------- ---------- 24 1 |
1 2 3 4 5 | [PrimaryFS] SQL> SELECT MAX(SEQUENCE#), THREAD# FROM V$ARCHIVED_LOG GROUP BY THREAD#; MAX(SEQUENCE#) THREAD# -------------- ---------- 24 1 |
Step2:
Perform Log Switch.
1 2 3 4 5 6 7 8 9 | [Primary] SQL> alter system switch logfile; System altered. [Primary] SQL> SELECT MAX(SEQUENCE#), THREAD# FROM V$ARCHIVED_LOG GROUP BY THREAD#; MAX(SEQUENCE#) THREAD# -------------- ---------- 25 1 |
1 2 3 4 5 | [Physical] SQL> SELECT MAX(SEQUENCE#), THREAD# FROM V$ARCHIVED_LOG GROUP BY THREAD#; MAX(SEQUENCE#) THREAD# -------------- ---------- 25 1 |
1 2 3 4 5 | [PrimaryFS] SQL> SELECT MAX(SEQUENCE#), THREAD# FROM V$ARCHIVED_LOG GROUP BY THREAD#; MAX(SEQUENCE#) THREAD# -------------- ---------- 25 1 |
Step3:
Shut down Far SYNC instance.
1 2 3 4 5 6 | [PrimaryFS] SQL> shu immediate; ORA-01109: database not open Database dismounted. ORACLE instance shut down. |
Step4:
Check the data to see if the changes are transfferred to the Physical Standby.
1 2 3 4 5 6 7 | [Primary] SQL> select table_name from dba_tables where owner='TEST'; TABLE_NAME -------------------------------------------------------------------------------- JOBS_YEDEK EMPLOYEES_YEDEK LOCATIONS_YEDEK |
1 2 3 4 5 6 7 | [Physical] SQL> select table_name from dba_tables where owner='TEST'; TABLE_NAME -------------------------------------------------------------------------------- JOBS_YEDEK EMPLOYEES_YEDEK LOCATIONS_YEDEK |
Step5:
Drop the table.
1 2 3 4 5 6 7 8 9 10 | [Primary] SQL> drop table test.LOCATIONS_YEDEK; Table dropped. [Primary] SQL> select table_name from dba_tables where owner='TEST'; TABLE_NAME -------------------------------------------------------------------------------- JOBS_YEDEK EMPLOYEES_YEDEK |
1 2 3 4 5 6 | [Physical] SQL> select table_name from dba_tables where owner='TEST'; TABLE_NAME -------------------------------------------------------------------------------- JOBS_YEDEK EMPLOYEES_YEDEK |
1 2 3 4 5 6 7 8 9 | [Primary] SQL> alter system switch logfile; System altered. [Primary] SQL> SELECT MAX(SEQUENCE#), THREAD# FROM V$ARCHIVED_LOG GROUP BY THREAD#; MAX(SEQUENCE#) THREAD# -------------- ---------- 27 1 |
1 2 3 4 5 | [Physical] SQL> SELECT MAX(SEQUENCE#), THREAD# FROM V$ARCHIVED_LOG GROUP BY THREAD#; MAX(SEQUENCE#) THREAD# -------------- ---------- 27 1 |
Step6:
Check if the archives are transferred to Standby by performing Log Switch operation.
1 2 3 4 5 6 7 8 9 10 11 12 13 | [Primary] SQL> alter system switch logfile; System altered. [Primary] SQL> alter system switch logfile; System altered. [Primary] SQL> SELECT MAX(SEQUENCE#), THREAD# FROM V$ARCHIVED_LOG GROUP BY THREAD#; MAX(SEQUENCE#) THREAD# -------------- ---------- 29 1 |
1 2 3 4 5 | [Physical] SQL> SELECT MAX(SEQUENCE#), THREAD# FROM V$ARCHIVED_LOG GROUP BY THREAD#; MAX(SEQUENCE#) THREAD# -------------- ---------- 29 1 |
Step7:
Check if the logs have been transferred to the Far SYNC instance.
1 2 3 4 5 6 7 8 9 10 11 12 13 14 15 16 17 18 19 20 21 | [oracle@prmyFS ~]$ cd /u01/app/oracle/recovery_area/prmyFS/ [oracle@prmyFS prmyFS]$ ls prmyFS02.ctl [oracle@prmyFS prmyFS]$ cd .. [oracle@prmyFS recovery_area]$ ls prmyFS PRMYFS [oracle@prmyFS recovery_area]$ cd PRMYFS/ [oracle@prmyFS PRMYFS]$ ls archivelog onlinelog [oracle@prmyFS PRMYFS]$ cd archivelog [oracle@prmyFS archivelog]$ ls 2017_02_08 2017_02_09 [oracle@prmyFS archivelog]$ cd 2017_02_09 [oracle@prmyFS 2017_02_09]$ ls o1_mf_1_21_d9qtbtgn_.arc o1_mf_1_24_d9rjzr6q_.arc o1_mf_1_22_d9r1c9xw_.arc o1_mf_1_25_d9rk7dk1_.arc o1_mf_1_23_d9r1dbvm_.arc [oracle@prmyFS 2017_02_09]$ ls o1_mf_1_21_d9qtbtgn_.arc o1_mf_1_24_d9rjzr6q_.arc o1_mf_1_22_d9r1c9xw_.arc o1_mf_1_25_d9rk7dk1_.arc o1_mf_1_23_d9r1dbvm_.arc |
Step8:
I assume that the access problem in Far SYNC instance has solved. Then I open the instance.
1 2 3 4 5 6 7 8 9 10 11 12 13 14 | [PrimaryFS] SQL> startup mount; ORACLE instance started. Total System Global Area 3472883712 bytes Fixed Size 2930272 bytes Variable Size 822086048 bytes Database Buffers 2634022912 bytes Redo Buffers 13844480 bytes Database mounted. [PrimaryFS] SQL> SELECT MAX(SEQUENCE#), THREAD# FROM V$ARCHIVED_LOG GROUP BY THREAD#; MAX(SEQUENCE#) THREAD# -------------- ---------- 25 1 |
Step9:
Check if the archives are transferred to the Far SYNC instance by performing Log Switch operation.
1 2 3 4 5 6 7 8 9 | [Primary] SQL> alter system switch logfile; System altered. [Primary] SQL> SELECT MAX(SEQUENCE#), THREAD# FROM V$ARCHIVED_LOG GROUP BY THREAD#; MAX(SEQUENCE#) THREAD# -------------- ---------- 31 1 |
1 2 3 4 5 | [PrimaryFS] SQL> SELECT MAX(SEQUENCE#), THREAD# FROM V$ARCHIVED_LOG GROUP BY THREAD#; MAX(SEQUENCE#) THREAD# -------------- ---------- 31 1 |
1 2 3 4 5 | [Physical] SQL> SELECT MAX(SEQUENCE#), THREAD# FROM V$ARCHIVED_LOG GROUP BY THREAD#; MAX(SEQUENCE#) THREAD# -------------- ---------- 31 1 |
Step10:
Check if the missing archives are transferred to the Far SYNC instance.
1 2 3 4 5 6 7 | [oracle@prmyFS 2017_02_09]$ ls o1_mf_1_21_d9qtbtgn_.arc o1_mf_1_27_d9rkpsl6_.arc o1_mf_1_22_d9r1c9xw_.arc o1_mf_1_28_d9rkpskd_.arc o1_mf_1_23_d9r1dbvm_.arc o1_mf_1_29_d9rkpslf_.arc o1_mf_1_24_d9rjzr6q_.arc o1_mf_1_30_d9rkpshr_.arc o1_mf_1_25_d9rk7dk1_.arc o1_mf_1_31_d9rkq54c_.arc o1_mf_1_26_d9rkpsn1_.arc |
Deleting Unnecessary Archives in Far SYNC Instance
Since Far SYNC instance transfers Redos to Standby Databases, archives do not need to be stored in Far SYNC instance after the archives are processed to Standby Databases. For this reason, archives processed in Standby Databases can be deleted from Far SYNC instance.
You can delete arciheve logs from Far SYNC instance as follows.
Step1:
Connect to RMAN from Far SYNC instance.
1 2 3 4 5 6 7 8 9 | [oracle@prmyFS 2017_02_09]$ rman target / Recovery Manager: Release 12.1.0.2.0 - Production on Thu Feb 9 12:48:57 2017 Copyright (c) 1982, 2014, Oracle and/or its affiliates. All rights reserved. connected to target database: PRIMARY (DBID=1772883609, not open) RMAN> |
Step2:
List the archives in the instance.
1 2 3 4 5 6 7 8 9 10 11 12 13 14 15 16 17 18 19 20 21 22 23 24 25 26 27 28 29 30 31 32 33 34 35 36 37 38 39 40 41 42 43 44 45 46 47 48 49 50 51 52 53 54 55 56 57 58 59 60 61 | RMAN> list archivelog all; using target database control file instead of recovery catalog List of Archived Log Copies for database with db_unique_name PRMYFS ===================================================================== Key Thrd Seq S Low Time ------- ---- ------- - --------- 1 1 14 A 08-FEB-17 Name: /u01/app/oracle/recovery_area/PRMYFS/archivelog/2017_02_08/o1_mf_1_14_d9p7p3r1_.arc 2 1 15 A 08-FEB-17 Name: /u01/app/oracle/recovery_area/PRMYFS/archivelog/2017_02_08/o1_mf_1_15_d9p9oz02_.arc 5 1 16 A 08-FEB-17 Name: /u01/app/oracle/recovery_area/PRMYFS/archivelog/2017_02_08/o1_mf_1_16_d9ptoy8r_.arc 7 1 17 A 08-FEB-17 Name: /u01/app/oracle/recovery_area/PRMYFS/archivelog/2017_02_08/o1_mf_1_17_d9py6ov7_.arc 9 1 18 A 08-FEB-17 Name: /u01/app/oracle/recovery_area/PRMYFS/archivelog/2017_02_08/o1_mf_1_18_d9py7kf1_.arc 11 1 19 A 08-FEB-17 Name: /u01/app/oracle/recovery_area/PRMYFS/archivelog/2017_02_08/o1_mf_1_19_d9py9gdx_.arc 13 1 20 A 08-FEB-17 Name: /u01/app/oracle/recovery_area/PRMYFS/archivelog/2017_02_08/o1_mf_1_20_d9q1v3lh_.arc 15 1 21 A 08-FEB-17 Name: /u01/app/oracle/recovery_area/PRMYFS/archivelog/2017_02_09/o1_mf_1_21_d9qtbtgn_.arc 17 1 22 A 09-FEB-17 Name: /u01/app/oracle/recovery_area/PRMYFS/archivelog/2017_02_09/o1_mf_1_22_d9r1c9xw_.arc 19 1 23 A 09-FEB-17 Name: /u01/app/oracle/recovery_area/PRMYFS/archivelog/2017_02_09/o1_mf_1_23_d9r1dbvm_.arc 21 1 24 A 09-FEB-17 Name: /u01/app/oracle/recovery_area/PRMYFS/archivelog/2017_02_09/o1_mf_1_24_d9rjzr6q_.arc 23 1 25 A 09-FEB-17 Name: /u01/app/oracle/recovery_area/PRMYFS/archivelog/2017_02_09/o1_mf_1_25_d9rk7dk1_.arc 28 1 26 A 09-FEB-17 Name: /u01/app/oracle/recovery_area/PRMYFS/archivelog/2017_02_09/o1_mf_1_26_d9rkpsn1_.arc 26 1 27 A 09-FEB-17 Name: /u01/app/oracle/recovery_area/PRMYFS/archivelog/2017_02_09/o1_mf_1_27_d9rkpsl6_.arc 25 1 28 A 09-FEB-17 Name: /u01/app/oracle/recovery_area/PRMYFS/archivelog/2017_02_09/o1_mf_1_28_d9rkpskd_.arc 27 1 29 A 09-FEB-17 Name: /u01/app/oracle/recovery_area/PRMYFS/archivelog/2017_02_09/o1_mf_1_29_d9rkpslf_.arc 24 1 30 A 09-FEB-17 Name: /u01/app/oracle/recovery_area/PRMYFS/archivelog/2017_02_09/o1_mf_1_30_d9rkpshr_.arc 30 1 31 A 09-FEB-17 Name: /u01/app/oracle/recovery_area/PRMYFS/archivelog/2017_02_09/o1_mf_1_31_d9rkq54c_.arc |
Step3:
Check all parameters to make the necessary configuration.
1 2 3 4 5 6 7 8 9 10 11 12 13 14 15 16 17 18 | RMAN> show all; RMAN configuration parameters for database with db_unique_name PRMYFS are: CONFIGURE RETENTION POLICY TO REDUNDANCY 1; # default CONFIGURE BACKUP OPTIMIZATION OFF; # default CONFIGURE DEFAULT DEVICE TYPE TO DISK; # default CONFIGURE CONTROLFILE AUTOBACKUP OFF; # default CONFIGURE CONTROLFILE AUTOBACKUP FORMAT FOR DEVICE TYPE DISK TO '%F'; # default CONFIGURE DEVICE TYPE DISK PARALLELISM 1 BACKUP TYPE TO BACKUPSET; # default CONFIGURE DATAFILE BACKUP COPIES FOR DEVICE TYPE DISK TO 1; # default CONFIGURE ARCHIVELOG BACKUP COPIES FOR DEVICE TYPE DISK TO 1; # default CONFIGURE MAXSETSIZE TO UNLIMITED; # default CONFIGURE ENCRYPTION FOR DATABASE OFF; # default CONFIGURE ENCRYPTION ALGORITHM 'AES128'; # default CONFIGURE COMPRESSION ALGORITHM 'BASIC' AS OF RELEASE 'DEFAULT' OPTIMIZE FOR LOAD TRUE ; # default CONFIGURE RMAN OUTPUT TO KEEP FOR 7 DAYS; # default CONFIGURE ARCHIVELOG DELETION POLICY TO NONE; # default CONFIGURE SNAPSHOT CONTROLFILE NAME TO '/u01/app/oracle/product/12.1.0/db_1/dbs/snapcf_prmyFS.f'; # default |
Step4:
Update the parameter so that archives can be deleted after applied in all Standby’s.
1 2 3 4 5 | RMAN> CONFIGURE ARCHIVELOG DELETION POLICY TO APPLIED ON ALL STANDBY; new RMAN configuration parameters: CONFIGURE ARCHIVELOG DELETION POLICY TO APPLIED ON ALL STANDBY; new RMAN configuration parameters are successfully stored |
Step5:
Check if the parameter has changed.
1 2 3 4 5 6 7 8 9 10 11 12 13 14 15 16 17 18 | RMAN> show all; RMAN configuration parameters for database with db_unique_name PRMYFS are: CONFIGURE RETENTION POLICY TO REDUNDANCY 1; # default CONFIGURE BACKUP OPTIMIZATION OFF; # default CONFIGURE DEFAULT DEVICE TYPE TO DISK; # default CONFIGURE CONTROLFILE AUTOBACKUP OFF; # default CONFIGURE CONTROLFILE AUTOBACKUP FORMAT FOR DEVICE TYPE DISK TO '%F'; # default CONFIGURE DEVICE TYPE DISK PARALLELISM 1 BACKUP TYPE TO BACKUPSET; # default CONFIGURE DATAFILE BACKUP COPIES FOR DEVICE TYPE DISK TO 1; # default CONFIGURE ARCHIVELOG BACKUP COPIES FOR DEVICE TYPE DISK TO 1; # default CONFIGURE MAXSETSIZE TO UNLIMITED; # default CONFIGURE ENCRYPTION FOR DATABASE OFF; # default CONFIGURE ENCRYPTION ALGORITHM 'AES128'; # default CONFIGURE COMPRESSION ALGORITHM 'BASIC' AS OF RELEASE 'DEFAULT' OPTIMIZE FOR LOAD TRUE ; # default CONFIGURE RMAN OUTPUT TO KEEP FOR 7 DAYS; # default CONFIGURE ARCHIVELOG DELETION POLICY TO APPLIED ON ALL STANDBY; CONFIGURE SNAPSHOT CONTROLFILE NAME TO '/u01/app/oracle/product/12.1.0/db_1/dbs/snapcf_prmyFS.f'; # default |
Step6:
Perform the CROSSCHECK.
1 2 3 4 5 6 7 8 9 10 11 12 13 14 15 16 17 18 19 20 21 22 23 24 25 26 27 28 29 30 31 32 33 34 35 36 37 38 39 40 41 42 43 44 45 46 47 48 49 50 51 52 53 54 55 | RMAN> crosscheck archivelog all; Starting implicit crosscheck backup at 09-FEB-17 allocated channel: ORA_DISK_1 channel ORA_DISK_1: SID=366 device type=DISK Finished implicit crosscheck backup at 09-FEB-17 Starting implicit crosscheck copy at 09-FEB-17 using channel ORA_DISK_1 Finished implicit crosscheck copy at 09-FEB-17 searching for all files in the recovery area cataloging files... no files cataloged released channel: ORA_DISK_1 allocated channel: ORA_DISK_1 channel ORA_DISK_1: SID=366 device type=DISK validation succeeded for archived log archived log file name=/u01/app/oracle/recovery_area/PRMYFS/archivelog/2017_02_08/o1_mf_1_14_d9p7p3r1_.arc RECID=1 STAMP=935422563 validation succeeded for archived log archived log file name=/u01/app/oracle/recovery_area/PRMYFS/archivelog/2017_02_08/o1_mf_1_15_d9p9oz02_.arc RECID=2 STAMP=935424607 validation succeeded for archived log archived log file name=/u01/app/oracle/recovery_area/PRMYFS/archivelog/2017_02_08/o1_mf_1_16_d9ptoy8r_.arc RECID=5 STAMP=935442014 validation succeeded for archived log archived log file name=/u01/app/oracle/recovery_area/PRMYFS/archivelog/2017_02_08/o1_mf_1_17_d9py6ov7_.arc RECID=7 STAMP=935445622 validation succeeded for archived log archived log file name=/u01/app/oracle/recovery_area/PRMYFS/archivelog/2017_02_08/o1_mf_1_18_d9py7kf1_.arc RECID=9 STAMP=935445649 validation succeeded for archived log archived log file name=/u01/app/oracle/recovery_area/PRMYFS/archivelog/2017_02_08/o1_mf_1_19_d9py9gdx_.arc RECID=11 STAMP=935445710 validation succeeded for archived log archived log file name=/u01/app/oracle/recovery_area/PRMYFS/archivelog/2017_02_08/o1_mf_1_20_d9q1v3lh_.arc RECID=13 STAMP=935449347 validation succeeded for archived log archived log file name=/u01/app/oracle/recovery_area/PRMYFS/archivelog/2017_02_09/o1_mf_1_21_d9qtbtgn_.arc RECID=15 STAMP=935474427 validation succeeded for archived log archived log file name=/u01/app/oracle/recovery_area/PRMYFS/archivelog/2017_02_09/o1_mf_1_22_d9r1c9xw_.arc RECID=17 STAMP=935481610 validation succeeded for archived log archived log file name=/u01/app/oracle/recovery_area/PRMYFS/archivelog/2017_02_09/o1_mf_1_23_d9r1dbvm_.arc RECID=19 STAMP=935481642 validation succeeded for archived log archived log file name=/u01/app/oracle/recovery_area/PRMYFS/archivelog/2017_02_09/o1_mf_1_24_d9rjzr6q_.arc RECID=21 STAMP=935497624 validation succeeded for archived log archived log file name=/u01/app/oracle/recovery_area/PRMYFS/archivelog/2017_02_09/o1_mf_1_25_d9rk7dk1_.arc RECID=23 STAMP=935497868 validation succeeded for archived log archived log file name=/u01/app/oracle/recovery_area/PRMYFS/archivelog/2017_02_09/o1_mf_1_26_d9rkpsn1_.arc RECID=28 STAMP=935498361 validation succeeded for archived log archived log file name=/u01/app/oracle/recovery_area/PRMYFS/archivelog/2017_02_09/o1_mf_1_27_d9rkpsl6_.arc RECID=26 STAMP=935498361 validation succeeded for archived log archived log file name=/u01/app/oracle/recovery_area/PRMYFS/archivelog/2017_02_09/o1_mf_1_28_d9rkpskd_.arc RECID=25 STAMP=935498361 validation succeeded for archived log archived log file name=/u01/app/oracle/recovery_area/PRMYFS/archivelog/2017_02_09/o1_mf_1_29_d9rkpslf_.arc RECID=27 STAMP=935498361 validation succeeded for archived log archived log file name=/u01/app/oracle/recovery_area/PRMYFS/archivelog/2017_02_09/o1_mf_1_30_d9rkpshr_.arc RECID=24 STAMP=935498361 validation succeeded for archived log archived log file name=/u01/app/oracle/recovery_area/PRMYFS/archivelog/2017_02_09/o1_mf_1_31_d9rkq54c_.arc RECID=30 STAMP=935498373 Crosschecked 18 objects |
Step7:
Delete applied archives on standby’s.
1 2 3 4 5 6 7 8 9 10 11 12 13 14 15 16 17 18 19 20 21 22 23 24 25 26 27 28 29 30 31 32 33 34 35 36 37 38 39 40 41 42 43 44 45 46 47 48 49 50 51 52 53 54 55 56 57 58 59 60 61 62 63 64 65 66 67 68 69 70 71 72 73 74 75 76 77 78 79 80 81 82 83 84 85 | RMAN> delete archivelog all; released channel: ORA_DISK_1 allocated channel: ORA_DISK_1 channel ORA_DISK_1: SID=366 device type=DISK RMAN-08120: WARNING: archived log not deleted, not yet applied by standby archived log file name=/u01/app/oracle/recovery_area/PRMYFS/archivelog/2017_02_09/o1_mf_1_26_d9rkpsn1_.arc thread=1 sequence=26 RMAN-08120: WARNING: archived log not deleted, not yet applied by standby archived log file name=/u01/app/oracle/recovery_area/PRMYFS/archivelog/2017_02_09/o1_mf_1_27_d9rkpsl6_.arc thread=1 sequence=27 RMAN-08120: WARNING: archived log not deleted, not yet applied by standby archived log file name=/u01/app/oracle/recovery_area/PRMYFS/archivelog/2017_02_09/o1_mf_1_28_d9rkpskd_.arc thread=1 sequence=28 RMAN-08120: WARNING: archived log not deleted, not yet applied by standby archived log file name=/u01/app/oracle/recovery_area/PRMYFS/archivelog/2017_02_09/o1_mf_1_29_d9rkpslf_.arc thread=1 sequence=29 RMAN-08120: WARNING: archived log not deleted, not yet applied by standby archived log file name=/u01/app/oracle/recovery_area/PRMYFS/archivelog/2017_02_09/o1_mf_1_30_d9rkpshr_.arc thread=1 sequence=30 RMAN-08120: WARNING: archived log not deleted, not yet applied by standby archived log file name=/u01/app/oracle/recovery_area/PRMYFS/archivelog/2017_02_09/o1_mf_1_31_d9rkq54c_.arc thread=1 sequence=31 List of Archived Log Copies for database with db_unique_name PRMYFS ===================================================================== Key Thrd Seq S Low Time ------- ---- ------- - --------- 1 1 14 A 08-FEB-17 Name: /u01/app/oracle/recovery_area/PRMYFS/archivelog/2017_02_08/o1_mf_1_14_d9p7p3r1_.arc 2 1 15 A 08-FEB-17 Name: /u01/app/oracle/recovery_area/PRMYFS/archivelog/2017_02_08/o1_mf_1_15_d9p9oz02_.arc 5 1 16 A 08-FEB-17 Name: /u01/app/oracle/recovery_area/PRMYFS/archivelog/2017_02_08/o1_mf_1_16_d9ptoy8r_.arc 7 1 17 A 08-FEB-17 Name: /u01/app/oracle/recovery_area/PRMYFS/archivelog/2017_02_08/o1_mf_1_17_d9py6ov7_.arc 9 1 18 A 08-FEB-17 Name: /u01/app/oracle/recovery_area/PRMYFS/archivelog/2017_02_08/o1_mf_1_18_d9py7kf1_.arc 11 1 19 A 08-FEB-17 Name: /u01/app/oracle/recovery_area/PRMYFS/archivelog/2017_02_08/o1_mf_1_19_d9py9gdx_.arc 13 1 20 A 08-FEB-17 Name: /u01/app/oracle/recovery_area/PRMYFS/archivelog/2017_02_08/o1_mf_1_20_d9q1v3lh_.arc 15 1 21 A 08-FEB-17 Name: /u01/app/oracle/recovery_area/PRMYFS/archivelog/2017_02_09/o1_mf_1_21_d9qtbtgn_.arc 17 1 22 A 09-FEB-17 Name: /u01/app/oracle/recovery_area/PRMYFS/archivelog/2017_02_09/o1_mf_1_22_d9r1c9xw_.arc 19 1 23 A 09-FEB-17 Name: /u01/app/oracle/recovery_area/PRMYFS/archivelog/2017_02_09/o1_mf_1_23_d9r1dbvm_.arc 21 1 24 A 09-FEB-17 Name: /u01/app/oracle/recovery_area/PRMYFS/archivelog/2017_02_09/o1_mf_1_24_d9rjzr6q_.arc 23 1 25 A 09-FEB-17 Name: /u01/app/oracle/recovery_area/PRMYFS/archivelog/2017_02_09/o1_mf_1_25_d9rk7dk1_.arc Do you really want to delete the above objects (enter YES or NO)? yes deleted archived log archived log file name=/u01/app/oracle/recovery_area/PRMYFS/archivelog/2017_02_08/o1_mf_1_14_d9p7p3r1_.arc RECID=1 STAMP=935422563 deleted archived log archived log file name=/u01/app/oracle/recovery_area/PRMYFS/archivelog/2017_02_08/o1_mf_1_15_d9p9oz02_.arc RECID=2 STAMP=935424607 deleted archived log archived log file name=/u01/app/oracle/recovery_area/PRMYFS/archivelog/2017_02_08/o1_mf_1_16_d9ptoy8r_.arc RECID=5 STAMP=935442014 deleted archived log archived log file name=/u01/app/oracle/recovery_area/PRMYFS/archivelog/2017_02_08/o1_mf_1_17_d9py6ov7_.arc RECID=7 STAMP=935445622 deleted archived log archived log file name=/u01/app/oracle/recovery_area/PRMYFS/archivelog/2017_02_08/o1_mf_1_18_d9py7kf1_.arc RECID=9 STAMP=935445649 deleted archived log archived log file name=/u01/app/oracle/recovery_area/PRMYFS/archivelog/2017_02_08/o1_mf_1_19_d9py9gdx_.arc RECID=11 STAMP=935445710 deleted archived log archived log file name=/u01/app/oracle/recovery_area/PRMYFS/archivelog/2017_02_08/o1_mf_1_20_d9q1v3lh_.arc RECID=13 STAMP=935449347 deleted archived log archived log file name=/u01/app/oracle/recovery_area/PRMYFS/archivelog/2017_02_09/o1_mf_1_21_d9qtbtgn_.arc RECID=15 STAMP=935474427 deleted archived log archived log file name=/u01/app/oracle/recovery_area/PRMYFS/archivelog/2017_02_09/o1_mf_1_22_d9r1c9xw_.arc RECID=17 STAMP=935481610 deleted archived log archived log file name=/u01/app/oracle/recovery_area/PRMYFS/archivelog/2017_02_09/o1_mf_1_23_d9r1dbvm_.arc RECID=19 STAMP=935481642 deleted archived log archived log file name=/u01/app/oracle/recovery_area/PRMYFS/archivelog/2017_02_09/o1_mf_1_24_d9rjzr6q_.arc RECID=21 STAMP=935497624 deleted archived log archived log file name=/u01/app/oracle/recovery_area/PRMYFS/archivelog/2017_02_09/o1_mf_1_25_d9rk7dk1_.arc RECID=23 STAMP=935497868 Deleted 12 objects |
Step8:
Check the current archives.
1 2 3 4 5 6 7 8 9 10 11 12 13 14 15 16 17 18 19 20 21 22 23 24 | RMAN> list archivelog all; List of Archived Log Copies for database with db_unique_name PRMYFS ===================================================================== Key Thrd Seq S Low Time ------- ---- ------- - --------- 28 1 26 A 09-FEB-17 Name: /u01/app/oracle/recovery_area/PRMYFS/archivelog/2017_02_09/o1_mf_1_26_d9rkpsn1_.arc 26 1 27 A 09-FEB-17 Name: /u01/app/oracle/recovery_area/PRMYFS/archivelog/2017_02_09/o1_mf_1_27_d9rkpsl6_.arc 25 1 28 A 09-FEB-17 Name: /u01/app/oracle/recovery_area/PRMYFS/archivelog/2017_02_09/o1_mf_1_28_d9rkpskd_.arc 27 1 29 A 09-FEB-17 Name: /u01/app/oracle/recovery_area/PRMYFS/archivelog/2017_02_09/o1_mf_1_29_d9rkpslf_.arc 24 1 30 A 09-FEB-17 Name: /u01/app/oracle/recovery_area/PRMYFS/archivelog/2017_02_09/o1_mf_1_30_d9rkpshr_.arc 30 1 31 A 09-FEB-17 Name: /u01/app/oracle/recovery_area/PRMYFS/archivelog/2017_02_09/o1_mf_1_31_d9rkq54c_.arc |
Step9:
List which archives are stored at the location where the archives are stored.
1 2 3 4 | [oracle@prmyFS 2017_02_09]$ ls o1_mf_1_26_d9rkpsn1_.arc o1_mf_1_29_d9rkpslf_.arc o1_mf_1_27_d9rkpsl6_.arc o1_mf_1_30_d9rkpshr_.arc o1_mf_1_28_d9rkpskd_.arc o1_mf_1_31_d9rkq54c_.arc |
Step10:
Check if all of the archives are applied.
1 2 3 4 5 6 7 8 9 10 11 12 13 14 15 16 17 18 19 20 21 22 23 24 25 26 27 28 29 30 31 | [Physical] SQL> select sequence#,thread#,archived from v$archived_log order by thread#, sequence#; SEQUENCE# THREAD# ARC ---------- ---------- --- 10 1 YES 11 1 YES 12 1 YES 13 1 YES 14 1 YES 15 1 YES 16 1 YES 17 1 YES 18 1 YES 19 1 YES 20 1 YES SEQUENCE# THREAD# ARC ---------- ---------- --- 21 1 YES 22 1 YES 23 1 YES 24 1 YES 25 1 YES 26 1 YES 27 1 YES 28 1 YES 29 1 YES 30 1 YES 31 1 YES 22 rows selected. |
Create Far SYNC Instance For Role Change
Step1:
The first step is the same as the steps for creating a normal Far SYNC Instance.
Step2:
Check for an error in the LOG.
PING[ARC2]: Heartbeat failed to connect to standby ‘primary’. Error is 16009.
The reason for this error is that FAR SYNC Instance cannot connect to Primary. This error will go away after Role Change. It can be ignored at this stage.
Step3:
Check if Standby Redo Logs are created in Far SYNC Instance.
1 2 3 4 5 | [oracle@physclFS physclFS]$ ls -la /u01/app/oracle/oradata/physclFS/ total 9844 drwxr-xr-x 2 oracle oinstall 4096 Mar 3 10:11 . drwxr-xr-x 3 oracle oinstall 4096 Mar 3 10:02 .. -rw-r----- 1 oracle oinstall 10043392 Mar 3 10:35 physclFS01.ctl |
We have seen that Standby Redo Logs are not created. The reason is that there is no log flow due to the Physical Standby not being in the Primary Role. Standby Redo Log will be created after the role change.
Step4:
Check the LOG_ARCHIVE_DEST_n parameters to ensure successful log transfer after Role Exchange.
1 2 3 4 5 6 7 8 9 10 11 12 13 14 15 16 17 | [Physical - 03-03-2017 10:39:50] SQL> show parameter log_archive_dest_2 NAME TYPE VALUE ------------------------------------ ----------- ------------------------------ log_archive_dest_2 string SERVICE=physclFS SYNC REOPEN=1 5 valid_for=(ONLINE_LOGFILES,P RIMARY_ROLE) db_unique_name=ph ysclFS [Physical Far SYNC - 03-03-2017 10:40:53] SQL> show parameter log_archive_dest_2 NAME TYPE VALUE ------------------------------------ ----------- ------------------------------ log_archive_dest_2 string SERVICE=primary ASYNC REOPEN=1 5 valid_for=(STANDBY_LOGFILES, STANDBY_ROLE) db_unique_name=p rimary |
Step5:
Check if Physical Standby is suitable for Switchover and perfom switchover operation.
1 2 3 4 5 6 7 8 9 10 11 12 13 14 15 16 17 18 19 20 21 22 23 24 25 26 27 28 29 30 31 32 33 34 35 36 37 38 39 40 41 42 43 44 45 46 47 48 49 50 | [Primary - 03-03-2017 10:41:02] SQL> alter database switchover to 'physical' verify; Database altered. [Primary]----->ALERT LOG Fri Mar 03 10:42:20 2017 alter database switchover to 'physical' verify Fri Mar 03 10:42:20 2017 This is cascading configuration. Configuring a new LOG_ARCHIVE_DEST to switchover target physical. Using STANDBY_ARCHIVE_DEST parameter default value as USE_DB_RECOVERY_FILE_DEST Fri Mar 03 10:42:20 2017 ALTER SYSTEM SET log_archive_dest_31='service=physical ASYNC db_unique_name=physical' SCOPE=MEMORY SID='*'; SWITCHOVER VERIFY: Send VERIFY request to switchover target physical SWITCHOVER VERIFY COMPLETE Using STANDBY_ARCHIVE_DEST parameter default value as USE_DB_RECOVERY_FILE_DEST Fri Mar 03 10:42:20 2017 ALTER SYSTEM SET log_archive_dest_31='' SCOPE=MEMORY SID='*'; Completed: alter database switchover to 'physical' verify Fri Mar 03 10:42:21 2017 LGWR: Standby redo logfile selected for thread 1 sequence 23 for destination LOG_ARCHIVE_DEST_2 Fri Mar 03 10:42:21 2017 Thread 1 advanced to log sequence 23 (LGWR switch) Current log# 2 seq# 23 mem# 0: /u01/app/oracle/oradata/primary/redo02.log Fri Mar 03 10:42:21 2017 Archived Log entry 24 added for thread 1 sequence 22 ID 0x69cd176c dest 1: [Primary Far SYNC]----->ALERT LOG Fri Mar 03 10:42:21 2017 RFS[2]: Selected log 4 for thread 1 sequence 23 dbid 1775091820 branch 937609135 Fri Mar 03 10:42:21 2017 Archived Log entry 17 added for thread 1 sequence 22 ID 0x69cd176c dest 1: Fri Mar 03 10:42:21 2017 TT00: Standby redo logfile selected for thread 1 sequence 23 for destination LOG_ARCHIVE_DEST_2 [Physical]----->ALERT LOG Fri Mar 03 10:42:20 2017 SWITCHOVER VERIFY BEGIN SWITCHOVER VERIFY COMPLETE Fri Mar 03 10:42:21 2017 Archived Log entry 12 added for thread 1 sequence 22 ID 0x69cd176c dest 1: Fri Mar 03 10:42:21 2017 RFS[7]: Selected log 4 for thread 1 sequence 23 dbid 1775091820 branch 937609135 Fri Mar 03 10:42:21 2017 Media Recovery Waiting for thread 1 sequence 23 (in transit) Fri Mar 03 10:42:21 2017 Recovery of Online Redo Log: Thread 1 Group 4 Seq 23 Reading mem 0 Mem# 0: /u01/app/oracle/oradata/physical/stdbyredo01.log |
Determine Alternative Location If Far SYNC Cannot Receive Instance Redos
If Far SYNC instance cannot receive Redos due to any situation, we determine Alternative Location to provide High Availability.
Lest test it.
Step1:
Check the Broker Configuration.
1 2 3 4 5 6 7 8 9 10 11 12 13 14 15 16 17 18 | DGMGRL> show configuration Configuration - Broker_Configuration Protection Mode: MaxPerformance Members: primary - Primary database prmyFS - Far sync instance physical - Physical standby database logical - Logical standby database Members Not Receiving Redo: physclFS - Far sync instance Fast-Start Failover: DISABLED Configuration Status: SUCCESS (status updated 22 seconds ago) |
Step2:
We set MaxFailue property. If we set 1, the Redos are sent to the Alternative Location after 1 failed redo transfer.
1 2 | DGMGRL> edit far_sync 'prmyFS' set property 'MaxFailure'=1; Property "MaxFailure" updated |
Step3:
Set Alternative Locations.
1 2 3 4 | DGMGRL> edit database 'primary' set property 'RedoRoutes'='(LOCAL:prmyFS SYNC ALT=(physical,logical SYNC))'; Error: ORA-16680: value contains unbalanced set of parentheses Failed. |
You will see this error. 🙂
Error: ORA-16680: value contains unbalanced set of parentheses
Set a single Alternative Location.
1 2 | DGMGRL> edit database 'primary' set property 'RedoRoutes'='(LOCAL:prmyFS SYNC ALT=(physical SYNC))'; Property "RedoRoutes" updated |
Step4:
Set Broker Configuration.
1 2 3 4 5 6 7 8 9 10 11 12 13 14 15 16 17 18 19 20 | DGMGRL> show configuration Configuration - Broker_Configuration Protection Mode: MaxPerformance Members: primary - Primary database prmyFS - Far sync instance physical - Physical standby database logical - Logical standby database Warning: ORA-16686: database may not receive redo data if redo source is an alternate destination Members Not Receiving Redo: physclFS - Far sync instance Fast-Start Failover: DISABLED Configuration Status: WARNING (status updated 16 seconds ago) |
We came to the end of our article. You can ask your questions as comments.
![]()