In this article, I will be explaining how to create a Kubernetes cluster in Azure Kubernetes Service, and how to install SQL server on Azure Kubernetes cluster. This topic will represent the introduction to the Azure Arc Enabled Data Services topic.
What is Kubernetes?
First of all, I think it would be better to start the article by answering the kubernetes question in the mind of those who do not know kubernetes at all. The word Kubernetes comes from Greek and its meaning is helmsman (it means helmsman.Therefore its logo is similar to the helm of a ship). In most sources, it is abbreviated as k8s and this is because there are 8 letters between the letter K and the letter S.
See: Kubernetes
Kubernetes vs Virtualization
Similar to a VM, a container has its own filesystem, CPU, memory, process space, and more. Because they are separated from the underlying infrastructure, they can be transported in clouds and operating system deployments.
So where is Kubernetes in this? Kubernetes is a platform that provides you with a flexible environment for managing containers working together and running them seamlessly and flexibly.
We mentioned the meaning and abbreviation of Kubernetes, let’s return to our main topic after sharing the information for what it was developed for.
Kubernetes developed in Which Language?
Kubernetes is a platform developed with an Open source GO language that allows you to manage, expand and make your containerized workloads and services easily portable.
SQL Server on Azure Kubernetes
After this basic knowledge, we can move on to SQL Server installation in Azure Kubernetes Services, which is our main topic.
We will install a version of Microsoft SQL Server adapted to the container structure. Thus, we will ensure the flexible distribution, expansion and management of these containers with Azure Kubernetes service.
As a first step, we need an azure account. Assuming that you have completed this step, I continue my article and login to my Azure account. After logging into the portal, we click on the “>” box on the upper left and shown in Picture-1 and log into the azure cloud shell. If you have not used azure cloud shell before, it will ask you to create a storage address.

But before continuing our operations on Azure, we need to install Azure CLI and Kubectl on our computer that we are using and want to manage Azure resources.
Azure CLI is a command line tool we will use to manage Azure resources.
Kubectl is a command line tool for us to run commands in the Kubernetes cluster in Azure Kubernetes Services.
Both installations will allow us to use both from cmd – command prompt and powershell.
You can use the article below for the Azure CLI setup. I do not want to disrupt the flow of the article by providing more information.
https://docs.microsoft.com/en-us/cli/azure/install-azure-cli-windows?view=azure-cli-latest&tabs=azure-cli Azure CLI
We perform the installation using the address above. Then we use the following command to log in to the Azure account via command line.
1 | az login |

Azure CLI opens your default browser and prompts you to sign in using your Azure account.
To run kubectl commands via command line or powershell, you need to download kubectl.exe and define it from environment variables.
To download and install Kubectl;
https://kubernetes.io/docs/tasks/tools/install-kubectl-windows/#install-with-powershell-from-psgallery
To add to environment variables after installation;
Press the Windows Key + S key to open the “View Advanced System Settings” section.
Click on the environment variables part on the screen that appears and click on the path part on the screen that appears, add the path information of the kubectl.exe you downloaded and exit by clicking OK.
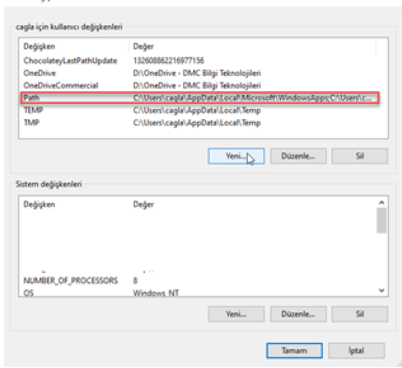
I store the kubectl.exe file in the .kubectl folder in the c directory and I entered this address information in the path information. Thus, we have completed the kubectl installation.
Now it is time to install Azure Kubernetes Service. In order to do this, the following Resource Providers need to be registered in Azure Cloud Shell.
1 2 3 | az provider register -n Microsoft.Compute az provider register -n Microsoft.ContainerService az provider register -n Microsoft.Networkaz provider register -n Microsoft.Storage |
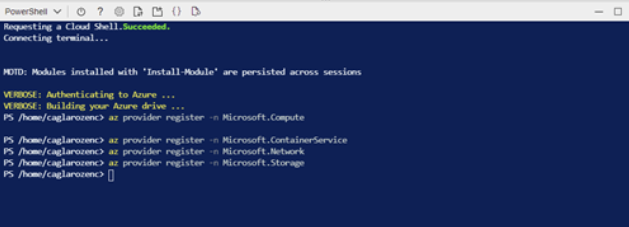
Now that we have registered Resource Providers, let’s create an Azure Resource Group and collect the resources we need in this group.
1 | az group create -n rg-dmc-azure-k8s --location westus2 |
With the code block above, we created a resource group in the westus2 area named rg-dmc-azure-k8s.

We have completed the creation of the resource group. Now let’s set up a kubernetes cluster with two nodes in this resource group with the code block below. The feature of Kubernetes cluster is standard_D8_v4, ie 8 vCPU, 32 GM Ram.
1 | az aks create --resource-group rg-dmc-azure-k8s --name dmc-demok8s --node-count 2 --generate-ssh-keys --node-vm-size=Standard_D8_v4 |

Our kubernetes cluster will be created in about ten minutes. After the process is completed, we can see all the resources in the resource group we created on the Azure Portal.
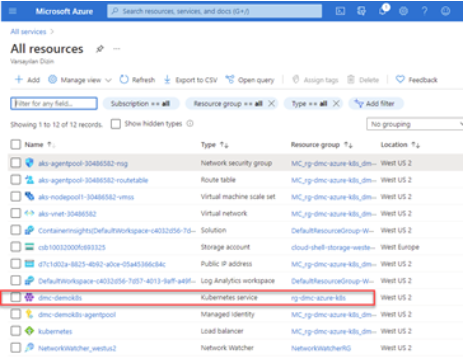
Let’s get the credentials of the cluster using the following command.

After this process, we can view all pods in the cluster with the following command.
1 | kubectl get pods –all -namespaces |

Persistent volume (Pv) and Persistent volume Claim (Pvc) in Kubernetes
Now we will configure Persistent volume (Pv) and Persistent volume Claim (Pvc), which we can call Kubernetes backbone, which is perhaps one of the most important issues. But first of all, I think it would be better to explain what these two terms are.
The importance of structuring Pv and Pvc concepts; Pv and Pvc configuration determines whether or not the data it contains is lost when a pod crashes or gets up again.
Save the following code block in a notebook as dmc_pv_pvc.yaml. After saving, let’s upload our yaml file via Azure Cloud Shell as shown in Picture11.
1 2 3 4 5 6 7 8 9 10 11 12 13 14 15 16 17 18 19 20 21 | kind: StorageClass apiVersion: storage.k8s.io/v1beta1 metadata: name: azure-disk provisioner: kubernetes.io/azure-disk parameters: storageaccounttype: Standard_LRS kind: Managed --- kind: PersistentVolumeClaim apiVersion: v1 metadata: name: mssql-data annotations: volume.beta.kubernetes.io/storage-class: azure-disk spec: accessModes: - ReadWriteOnce resources: requests: storage: 8Gi |

After the upload process is finished, we will see a notification as shown in Picture12.

Let’s run our yaml file that we transferred with the code block below.
1 | kubectl apply -f /home/caglarozenc/dmc_pv_pvc.yaml |

As seen in Picture 13, we have completed the pv and pvc configuration. We can check pv and pvc with the following code blocks.
1 2 | Kubectl get pv kubectl get pvc |

Now that we have completed our operations on the Kubernetes side, we can now install Microsoft SQL Server on our Cluster.
First of all, the password of the SA user that we will use in Kubernetes Cluster must be determined. We do this with the code block below. My password is “DMC-CaglarOZENC*!”
1 | kubectl create secret generic mssql --from-literal=SA_PASSWORD="DMC-CaglarOZENC*!" |

As we use in Pv and Pvc definitions, I create a yaml file as below in order to be able to install SQL Server and upload it. The port information will be 1433. I am installing SQL Server 2019 Developer Edition and the SA password will be the password I set in Picture15.
1 2 3 4 5 6 7 8 9 10 11 12 13 14 15 16 17 18 19 20 21 22 23 24 25 26 27 28 29 30 31 32 33 34 35 36 37 38 39 40 41 42 43 44 45 46 47 48 49 50 51 52 53 | apiVersion: apps/v1 kind: Deployment metadata: name: mssql-deployment spec: replicas: 1 selector: matchLabels: app: mssql template: metadata: labels: app: mssql spec: terminationGracePeriodSeconds: 30 hostname: mssqlinst securityContext: fsGroup: 10001 containers: - name: mssql image: mcr.microsoft.com/mssql/server:2019-latest ports: - containerPort: 1433 env: - name: MSSQL_PID value: "Developer" - name: ACCEPT_EULA value: "Y" - name: SA_PASSWORD valueFrom: secretKeyRef: name: mssql key: SA_PASSWORD volumeMounts: - name: mssqldb mountPath: /var/opt/mssql volumes: - name: mssqldb persistentVolumeClaim: claimName: mssql-data --- apiVersion: v1 kind: Service metadata: name: dmcsql spec: selector: app: mssql ports: - protocol: TCP port: 1433 targetPort: 1433 type: LoadBalancer |
After successfully uploading the Yaml file, I implement my yaml file with the code block below.
1 | kubectl apply -f /home/caglarozenc/dmc_k8s_sqlserver_kurulumu.yaml |

You can run the following query to query the status of the installation.
1 | kubectl get pods |

As can be seen in Picture17, the installation has been successfully completed and our SQL Server installed Pod has been running for 3 minutes and 10 seconds. If you want to get more details about the Running Pod, you can use the code block below.
1 | kubectl describe pods mssql-deployment-7cb7b5c689-ktvk9 |

As you can see in Picture 18, we can even see the address of Pulling and the Pvc information it attaches, in detailed information.
As the next step, we need to learn the IP address information of the running SQL Server. For this process, we can use the following code block.
1 | kubectl get services |

As can be seen in Picture19, we have learned both the Cluster’s internal IP address and External IP address. Now, let’s connect to the SQL Server with SQL Server Management Studio or Azure Data Studio.
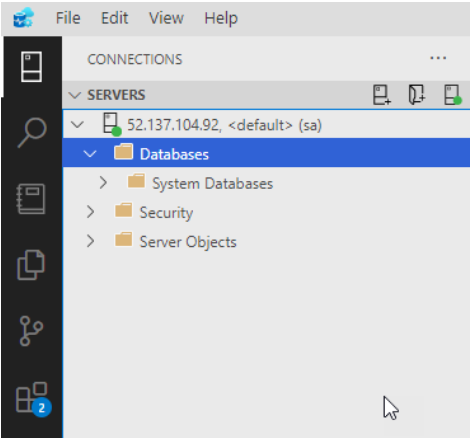
As you can see, we did not have any problems accessing the SQL Server we installed. Now we’re connected, let’s create a new DB and add a few records.
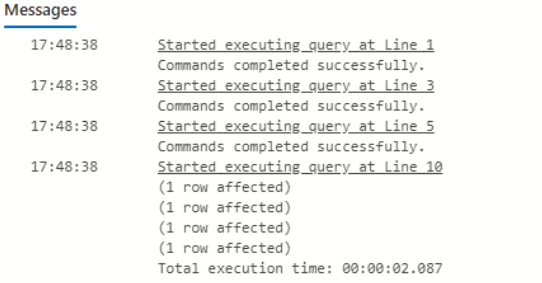
1 2 3 4 5 6 7 8 9 10 11 12 13 | create database DMC go use DMC go create table BLOG ( BlogName varchar(50) ) Go insert into BLOG(BlogName) values('www.dmcteknoloji.com') insert into BLOG(BlogName) values('www.caglarozenc.com') insert into BLOG(BlogName) values('www.sqlekibi.com') insert into BLOG(BlogName) values('www.mshowto.org') |
We created a database named DMC, created a table named BLOG and insert four row into it.
Now, we have actually come to the most important part of the work, and let’s delete the Pod we created using the command below, let’s see what will happen 😊
1 | az aks delete --name dmc-demok8s --resource-group rg-dmc-azure-k8s |

The deletion was also successful. We are checking Pods again.

As can be seen in Resim23, although I deleted the existing Pod, a new Pod was created for me. I’m running the following code to check the Pod details created.
1 | kubectl get services |

As can be seen in Picture24, the old Pod IP address has been assigned to the new Pod and the service names are also the same. But we deleted this pod. I want to check the BLOG table in the DMC database that I created by reconnecting with SQL Server Management Studio or Azure Data Studio to see if the data is still.

As you can see, if you have successfully configured the Pv and Pvc configurations, the Pod’s crash or deletion or reboot does not cause any data loss for us. Even our IP address does not change.
Now that we have successfully installed SQL Server on Azure Kubernetes Service, let’s not forget to delete the resource group we created on the Azure side and the resources in it, so that Microsoft does not invoice us 😊
1 | az aks delete --name dmc-demok8s --resource-group rg-dmc-azure-k8s |
Now that we are done with dmc-azure-k8s, we can delete our azure kubernetes cluster service with peace of mind. If you want, you can delete the resource group we created for this operation after deleting the cluster. Remember, if the Resource Group is empty, you will not be billed separately.
See you in our next article, goodbye.
DMC Bilgi Teknolojileri
Çağlar ÖZENÇ
![]()
 Database Tutorials MSSQL, Oracle, PostgreSQL, MySQL, MariaDB, DB2, Sybase, Teradata, Big Data, NOSQL, MongoDB, Couchbase, Cassandra, Windows, Linux