 Database Tutorials MSSQL, Oracle, PostgreSQL, MySQL, MariaDB, DB2, Sybase, Teradata, Big Data, NOSQL, MongoDB, Couchbase, Cassandra, Windows, Linux
In today’s article, we will look for an answer to the question of How To Setup Physical Standby Database.
In this article, DataGuard installation on Primary and Standby databases in Oracle 11g R2 architecture is explained using SQL*Plus and RMAN without using OEM.
Operating system : RedHat 5.9
Database Software : Oracle 11g R2
Cluster Software : Oracle 11g R2 Grid Infrastructure
Storage Structure : Oracle ASM
Server RAM : 12G
Server CPU : 4 cores
1. First, we install RedHat Linux 5.9 O.S on both the Primary and Standby sides on all four NODEs.
2. We are making the necessary configuration changes on the Primary and Standby RAC nodes.
3. We install Grid Infrastructure on all RAC nodes on both the Primary and Standby sides.
4. We need to install RDBMS software on all RAC nodes on both the Primary and Standby sides.
5. We should install Oracle 11 g R2 database only on the Primary side.
6. We created new listeners named EMR_LISTENER in both databases separately.
You can find the installations at dbtut.com.
7. Information about the installed systems is as follows.
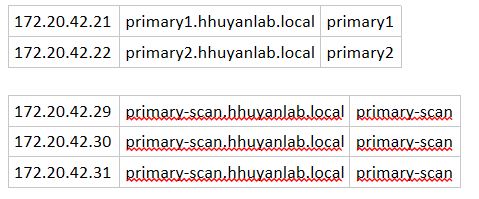
Primary party information.
1 2 3 4 5 6 7 8 9 10 11 12 13 14 15 16 17 18 19 20 21 22 23 24 25 26 27 28 29 30 31 | ORACLE_UNQNAME=primary Node 1 ORACLE_SID=primary1 Node 2 ORACLE_SID=primary2 Oracle ASM DATA FRA OCR [oracle@primary1 ~]$ srvctl config database -d primary Database unique name: primary Database name: primary Oracle home: /u01/app/oracle/product/11.2.0/db_1 Oracle user: oracle Spfile: +DATA/primary/spfileprimary.ora Domain: Start options: open Stop options: immediate Database role: PRIMARY Management policy: AUTOMATIC Server pools: primary Database instances: primary1,primary2 Disk Groups: DATA Mount point paths: Services: Type: RAC Database is administrator managed |
1 2 3 4 5 6 7 8 9 10 11 12 13 14 15 16 17 18 19 20 21 22 23 24 25 26 27 28 29 30 31 32 33 34 35 36 37 38 39 40 41 42 43 44 45 46 47 48 49 50 51 52 53 54 55 56 57 58 59 60 61 62 63 64 65 66 67 68 69 70 71 72 73 74 75 76 77 78 79 80 81 82 83 84 85 86 87 88 89 90 91 92 93 94 95 96 97 98 99 100 101 102 103 104 105 106 107 108 109 110 111 112 113 114 115 116 117 118 119 120 121 122 123 124 125 126 127 128 129 130 131 132 133 134 135 136 137 138 139 140 141 142 143 144 145 146 147 148 149 150 151 152 153 154 155 156 157 158 159 160 161 162 163 164 165 166 167 168 169 170 171 172 173 174 175 176 177 178 179 180 181 182 183 184 185 186 187 188 189 190 191 192 193 194 195 196 197 198 199 200 201 202 203 204 205 206 207 208 209 210 211 212 213 214 215 216 217 218 219 220 221 222 223 224 225 226 227 228 229 230 231 232 233 234 235 236 237 238 239 240 241 242 243 244 245 246 247 248 249 250 251 252 253 254 255 256 257 258 259 260 261 262 263 264 265 266 267 268 269 270 271 272 273 274 275 276 277 278 279 280 281 282 283 284 285 286 287 288 289 290 291 292 293 294 295 296 297 298 299 300 301 302 303 304 305 306 307 308 309 310 311 312 313 | ORACLE_UNQNAME=standby Node 1 ORACLE_SID=standby1 Node 2 ORACLE_SID=standby2 Oracle ASM DATA FRA OCR Primary ve Standby taraf Oracle .bash_profile. (Primary 1) # .bash_profile # Get the aliases and functions if [ -f ~/.bashrc ]; then . ~/.bashrc fi # User specific environment and startup programs PATH=$PATH:$HOME/bin export PATH TMP=/tmp; export TMP TMPDIR=$TMP; export TMPDIR ORACLE_UNQNAME=primary; export ORACLE_UNQNAME ORACLE_BASE=/u01/app/oracle; export ORACLE_BASE GRID_HOME=/u01/11.2.0/grid; export GRID_HOME DB_HOME=$ORACLE_BASE/product/11.2.0/db_1; export DB_HOME ORACLE_HOME=$DB_HOME; export ORACLE_HOME ORACLE_SID=primary1; export ORACLE_SID ORACLE_TERM=xterm; export ORACLE_TERM BASE_PATH=/usr/sbin:$PATH; export BASE_PATH PATH=$ORACLE_HOME/bin:$GRID_HOME/bin:$BASE_PATH; export PATH LD_LIBRARY_PATH=$ORACLE_HOME/lib:/lib:/usr/lib; export LD_LIBRARY_PATH CLASSPATH=$ORACLE_HOME/JRE:$ORACLE_HOME/jlib:$ORACLE_HOME/rdbms/jlib; export CLASSPATH ulimit -u 65536 ulimit -n 65536 alias log='cd /u01/app/oracle/diag/rdbms/primary/primary1/trace; pwd' alias oh='cd $ORACLE_HOME; pwd' (Primary 2) # .bash_profile # Get the aliases and functions if [ -f ~/.bashrc ]; then . ~/.bashrc fi # User specific environment and startup programs PATH=$PATH:$HOME/bin export PATH TMP=/tmp; export TMP TMPDIR=$TMP; export TMPDIR ORACLE_UNQNAME=primary; export ORACLE_UNQNAME ORACLE_BASE=/u01/app/oracle; export ORACLE_BASE GRID_HOME=/u01/11.2.0/grid; export GRID_HOME DB_HOME=$ORACLE_BASE/product/11.2.0/db_1; export DB_HOME ORACLE_HOME=$DB_HOME; export ORACLE_HOME ORACLE_SID=primary2; export ORACLE_SID ORACLE_TERM=xterm; export ORACLE_TERM BASE_PATH=/usr/sbin:$PATH; export BASE_PATH PATH=$ORACLE_HOME/bin:$GRID_HOME/bin:$BASE_PATH; export PATH LD_LIBRARY_PATH=$ORACLE_HOME/lib:/lib:/usr/lib; export LD_LIBRARY_PATH CLASSPATH=$ORACLE_HOME/JRE:$ORACLE_HOME/jlib:$ORACLE_HOME/rdbms/jlib; export CLASSPATH ulimit -u 65536 ulimit -n 65536 alias log='cd /u01/app/oracle/diag/rdbms/primary/primary2/trace; pwd' alias oh='cd $ORACLE_HOME; pwd' (Standby 1) # .bash_profile # Get the aliases and functions if [ -f ~/.bashrc ]; then . ~/.bashrc fi # User specific environment and startup programs PATH=$PATH:$HOME/bin export PATH TMP=/tmp; export TMP TMPDIR=$TMP; export TMPDIR ORACLE_UNQNAME=standby; export ORACLE_UNQNAME ORACLE_BASE=/u01/app/oracle; export ORACLE_BASE GRID_HOME=/u01/11.2.0/grid; export GRID_HOME DB_HOME=$ORACLE_BASE/product/11.2.0/db_1; export DB_HOME ORACLE_HOME=$DB_HOME; export ORACLE_HOME ORACLE_SID=primary1; export ORACLE_SID ORACLE_TERM=xterm; export ORACLE_TERM BASE_PATH=/usr/sbin:$PATH; export BASE_PATH PATH=$ORACLE_HOME/bin:$GRID_HOME/bin:$BASE_PATH; export PATH LD_LIBRARY_PATH=$ORACLE_HOME/lib:/lib:/usr/lib; export LD_LIBRARY_PATH CLASSPATH=$ORACLE_HOME/JRE:$ORACLE_HOME/jlib:$ORACLE_HOME/rdbms/jlib; export CLASSPATH ulimit -u 65536 ulimit -n 65536 alias log='cd /u01/app/oracle/diag/rdbms/standby/standby1/trace; pwd' alias oh='cd $ORACLE_HOME; pwd' (Standby 2) # .bash_profile # Get the aliases and functions if [ -f ~/.bashrc ]; then . ~/.bashrc fi # User specific environment and startup programs PATH=$PATH:$HOME/bin export PATH TMP=/tmp; export TMP TMPDIR=$TMP; export TMPDIR ORACLE_UNQNAME=standby; export ORACLE_UNQNAME ORACLE_BASE=/u01/app/oracle; export ORACLE_BASE GRID_HOME=/u01/11.2.0/grid; export GRID_HOME DB_HOME=$ORACLE_BASE/product/11.2.0/db_1; export DB_HOME ORACLE_HOME=$DB_HOME; export ORACLE_HOME ORACLE_SID=primary2; export ORACLE_SID ORACLE_TERM=xterm; export ORACLE_TERM BASE_PATH=/usr/sbin:$PATH; export BASE_PATH PATH=$ORACLE_HOME/bin:$GRID_HOME/bin:$BASE_PATH; export PATH LD_LIBRARY_PATH=$ORACLE_HOME/lib:/lib:/usr/lib; export LD_LIBRARY_PATH CLASSPATH=$ORACLE_HOME/JRE:$ORACLE_HOME/jlib:$ORACLE_HOME/rdbms/jlib; export CLASSPATH ulimit -u 65536 ulimit -n 65536 alias log='cd /u01/app/oracle/diag/rdbms/standby/standby2/trace; pwd' alias oh='cd $ORACLE_HOME; pwd' Primary ve Standby taraf Grid .bash_profile. (Primary 1) # .bash_profile # Get the aliases and functions if [ -f ~/.bashrc ]; then . ~/.bashrc fi # User specific environment and startup programs PATH=$PATH:$HOME/bin export PATH TMP=/tmp; export TMP TMPDIR=$TMP; export TMPDIR ORACLE_UNQNAME=primary; export ORACLE_UNQNAME ORACLE_BASE=/u01/app/oracle; export ORACLE_BASE ORACLE_HOME=/u01/11.2.0/grid; export ORACLE_HOME GRID_HOME=/u01/11.2.0/grid; export GRID_HOME ORACLE_SID=+ASM1; export ORACLE_SID ORACLE_TERM=xterm; export ORACLE_TERM BASE_PATH=/usr/sbin:$PATH; export BASE_PATH PATH=$ORACLE_HOME/bin:$GRID_HOME/bin:$BASE_PATH; export PATH LD_LIBRARY_PATH=$ORACLE_HOME/lib:/lib:/usr/lib; export LD_LIBRARY_PATH CLASSPATH=$ORACLE_HOME/JRE:$ORACLE_HOME/jlib:$ORACLE_HOME/rdbms/jlib; export CLASSPATH ulimit -u 65536 ulimit -n 65536 alias log='cd /u01/11.2.0/grid/log/primary01; pwd' alias oh='cd $ORACLE_HOME; pwd' (Primary 2) # .bash_profile # Get the aliases and functions if [ -f ~/.bashrc ]; then . ~/.bashrc fi # User specific environment and startup programs PATH=$PATH:$HOME/bin export PATH TMP=/tmp; export TMP TMPDIR=$TMP; export TMPDIR ORACLE_UNQNAME=primary; export ORACLE_UNQNAME ORACLE_BASE=/u01/app/oracle; export ORACLE_BASE ORACLE_HOME=/u01/11.2.0/grid; export ORACLE_HOME GRID_HOME=/u01/11.2.0/grid; export GRID_HOME ORACLE_SID=+ASM2; export ORACLE_SID ORACLE_TERM=xterm; export ORACLE_TERM BASE_PATH=/usr/sbin:$PATH; export BASE_PATH PATH=$ORACLE_HOME/bin:$GRID_HOME/bin:$BASE_PATH; export PATH LD_LIBRARY_PATH=$ORACLE_HOME/lib:/lib:/usr/lib; export LD_LIBRARY_PATH CLASSPATH=$ORACLE_HOME/JRE:$ORACLE_HOME/jlib:$ORACLE_HOME/rdbms/jlib; export CLASSPATH ulimit -u 65536 ulimit -n 65536 alias log='cd /u01/11.2.0/grid/log/primary02; pwd' alias oh='cd $ORACLE_HOME; pwd' (Standby 1) # .bash_profile # Get the aliases and functions if [ -f ~/.bashrc ]; then . ~/.bashrc fi # User specific environment and startup programs PATH=$PATH:$HOME/bin export PATH TMP=/tmp; export TMP TMPDIR=$TMP; export TMPDIR ORACLE_UNQNAME=standby; export ORACLE_UNQNAME ORACLE_BASE=/u01/app/oracle; export ORACLE_BASE ORACLE_HOME=/u01/11.2.0/grid; export ORACLE_HOME GRID_HOME=/u01/11.2.0/grid; export GRID_HOME ORACLE_SID=+ASM1; export ORACLE_SID ORACLE_TERM=xterm; export ORACLE_TERM BASE_PATH=/usr/sbin:$PATH; export BASE_PATH PATH=$ORACLE_HOME/bin:$GRID_HOME/bin:$BASE_PATH; export PATH LD_LIBRARY_PATH=$ORACLE_HOME/lib:/lib:/usr/lib; export LD_LIBRARY_PATH CLASSPATH=$ORACLE_HOME/JRE:$ORACLE_HOME/jlib:$ORACLE_HOME/rdbms/jlib; export CLASSPATH ulimit -u 65536 ulimit -n 65536 alias log='cd /u01/11.2.0/grid/log/standby01; pwd' alias oh='cd $ORACLE_HOME; pwd' (Standby 2) # .bash_profile # Get the aliases and functions if [ -f ~/.bashrc ]; then . ~/.bashrc fi # User specific environment and startup programs PATH=$PATH:$HOME/bin export PATH TMP=/tmp; export TMP TMPDIR=$TMP; export TMPDIR ORACLE_UNQNAME=standby; export ORACLE_UNQNAME ORACLE_BASE=/u01/app/oracle; export ORACLE_BASE ORACLE_HOME=/u01/11.2.0/grid; export ORACLE_HOME GRID_HOME=/u01/11.2.0/grid; export GRID_HOME ORACLE_SID=+ASM2; export ORACLE_SID ORACLE_TERM=xterm; export ORACLE_TERM BASE_PATH=/usr/sbin:$PATH; export BASE_PATH PATH=$ORACLE_HOME/bin:$GRID_HOME/bin:$BASE_PATH; export PATH LD_LIBRARY_PATH=$ORACLE_HOME/lib:/lib:/usr/lib; export LD_LIBRARY_PATH CLASSPATH=$ORACLE_HOME/JRE:$ORACLE_HOME/jlib:$ORACLE_HOME/rdbms/jlib; export CLASSPATH ulimit -u 65536 ulimit -n 65536 alias log='cd /u01/11.2.0/grid/log/standby02; pwd' alias oh='cd $ORACLE_HOME; pwd' |
On the standby side, Grid Infrastructure and Oracle RDBMS are installed. On the standby side, the database is not installed.
SPFILE will be used in the primary database.
There will be Standby Redo Log files in the primary database.
For standby servers, a non-case sensitive password file will be created with the Password File ignorecase=y parameter.
Necessary directories will be created on the standby side.
Primary database must be in ARCHIVE MODE. If it is not in ARCHIVE MODE, we can put it in archive mode as follows. (Step 1 – Primary)
First, we check if the database is in archive mode. (Primary)
1 2 3 4 5 | SQL> select log_mode from v$database; LOG_MODE ------------ NOARCHIVELOG |
We determine where the database archive log files will be saved (for the FRA field) (Primary 1);
1 2 3 4 | SQL> alter system set db_recovery_file_dest_size=10G scope=both; SQL> alter system set db_recovery_file_dest='+FRA' scope=both; |
We determine where to save database archive log files (File System Location);
1 | SQL> alter system set log_archive_dest_1 = 'location=/…… ' scope = both; |
If the database is not in archive mode, we can put it in archive mode as follows.
1 2 3 4 5 6 7 8 9 10 11 12 13 14 15 16 17 18 19 20 21 22 23 24 25 26 27 | (Primary 1-2) SQL> shutdown immediate; Database closed. Database dismounted. ORACLE instance shut down. (Primary 1-2) SQL> startup mount; ORACLE instance started. (Primary 1) SQL> alter database archivelog; Database altered. (Primary 1-2) SQL> alter database open; Database altered. |
Now let’s check the database, is it in archive mode? (Primary 1-2)
1 2 3 4 5 | SQL> select log_mode from v$database; LOG_MODE ------------ ARCHIVELOG |
We perform a log switch operation to check whether it is archived to the correct location. (Primary 1)
1 2 3 4 5 6 7 8 9 10 11 12 13 14 15 16 17 18 19 20 21 22 23 24 25 26 | SQL> alter system switch logfile; System altered. SQL> exit Disconnected from Oracle Database 11g Enterprise Edition Release 11.2.0.4.0 - 64bit Production With the Partitioning, Real Application Clusters, Automatic Storage Management, OLAP, Data Mining and Real Application Testing options [oracle@primary1 ~]$ exit logout [root@primary1 ~]# su - grid [grid@primary1 ~]$ asmcmd ASMCMD> ls DATA/ FRA/ OCR_VOTE/ ASMCMD> cd fra ASMCMD> ls PRIMARY/ ASMCMD> cd primary ASMCMD> ls ARCHIVELOG/ ASMCMD> cd archivelog ASMCMD> ls 2016_12_29/ |
Primary database must be FORCE LOGGING. If the FORCE LOGGING feature of the database is not active, we need to activate it. (Step 2 – Primary)
This is important because logging can still be performed even if users run queries with the NOLOGGING hint.
1 2 3 4 5 6 | SQL> select FORCE_LOGGING from v$database; FOR --- NO |
If the FORCE LOGGING feature is not active in the database as above, we can activate it as follows. Since this parameter is activated for newly created sessions, the connected sessions must be terminated first.
For this, the database is closed and brought to mount mode. (Primary)
1 2 3 4 5 6 7 8 9 10 11 12 13 14 15 16 17 18 19 20 21 22 23 24 25 26 27 28 29 30 31 32 33 | SQL> shutdown immediate; (Primary 1-2) Database closed. Database dismounted. ORACLE instance shut down. SQL> startup mount; ORACLE instance started. Total System Global Area 6480490496 bytes Fixed Size 2265384 bytes Variable Size 1241517784 bytes Database Buffers 5217714176 bytes Redo Buffers 18993152 bytes Database mounted. SQL> alter database force logging; (Primary 1) Database altered. SQL> select force_logging from v$database; (Primary 1-2) FOR --- YES SQL> alter database open; (Primary 1-2) Database altered. SQL> select status from gv$instance; (Primary 1) STATUS ------------ OPEN OPEN |
Now we check again. (Primary)
1 2 3 4 5 | SQL> select FORCE_LOGGING from v$database; FOR --- YES |
1 | http://www.oracledba.org/11gR2/dr/11gR2_dataguard_RAC_to_RAC.html |
We configure the Redo Log transport direction in the database from the Primary database to the Standby database. (Step 4 – Primary)
1 2 3 4 5 6 7 8 9 10 11 12 | 1 (Primary) SQL> ALTER SYSTEM SET LOG_ARCHIVE_CONFIG='DG_CONFIG=(primary,standby)' sid='*' scope=both; System altered. SQL> show parameter log_archive_config; NAME TYPE VALUE ------------------------------------ ----------- ------------------------------ log_archive_config string DG_CONFIG=(primary,standby) |
We can see the config change made as follows.
1 2 3 4 5 6 | [Primary-1] SQL> select * from v$dataguard_config; DB_UNIQUE_NAME ------------------------------ primary standby |
1 2 3 4 5 6 7 8 9 10 11 12 13 14 15 16 17 18 19 20 21 22 23 24 25 26 27 28 29 | 2 (Primary) SQL> ALTER SYSTEM SET LOG_ARCHIVE_DEST_1='LOCATION=USE_DB_RECOVERY_FILE_DEST VALID_FOR=(ALL_LOGFILES,ALL_ROLES) DB_UNIQUE_NAME=primary' scope=both sid='*'; System altered. SQL> show parameter LOG_ARCHIVE_DEST_1 NAME TYPE VALUE ------------------------------------ ----------- ------------------------------ log_archive_dest_1 string LOCATION=USE_DB_RECOVERY_FILE_DEST VALID_FOR=(ALL_LOGFILES,A LL_ROLES) DB_UNIQUE_NAME=primary o 3 (Primary) SQL> ALTER SYSTEM SET LOG_ARCHIVE_DEST_2='SERVICE=standby SYNC VALID_FOR=(ONLINE_LOGFILES,PRIMARY_ROLE) DB_UNIQUE_NAME=standby' sid='*' scope=both; System altered. SQL> show parameter LOG_ARCHIVE_DEST_2 NAME TYPE VALUE ------------------------------------ ----------- ------------------------------ log_archive_dest_2 string SERVICE=standby SYNC VALID_FOR=(ONLINE_LOGFILES,PRIMARY_ROLE ) DB_UNIQUE_NAME=standby |
The “LOG_ARCHIVE_FORMAT” parameter of the Database is set. (Step 5 – Primary)
1 2 3 4 5 6 7 8 9 10 11 12 13 14 15 16 17 | SQL> ALTER SYSTEM SET LOG_ARCHIVE_FORMAT='%t_%s_%r.arc' SCOPE=SPFILE; System altered. o ARC process sayısı belirlenir. (Primary) SQL> ALTER SYSTEM SET LOG_ARCHIVE_MAX_PROCESSES=8 scope=both sid='*'; System altered. SQL> show parameter log_archive_max_processes NAME TYPE VALUE ------------------------------------ ----------- ------------------------------ log_archive_max_processes integer 8 |
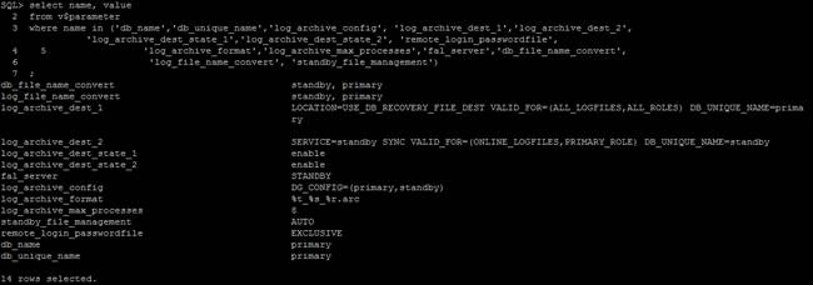
We set FAL_SERVER. This parameter is required after Switchover. Since the Standby database will be Primary after Switchover, we write Standby because the flow of ARCHIVEs will be from it. (Primary)
1 2 3 4 5 6 7 8 9 10 11 12 13 14 15 16 17 18 19 20 21 22 23 24 25 26 27 28 29 30 31 32 33 34 35 36 37 38 39 40 41 42 43 44 45 46 | SQL> alter system set fal_server=standby scope=both sid='*'; System altered. SQL> show parameter fal_server NAME TYPE VALUE ------------------------------------ ----------- ------------------------------ fal_server string STANDBY o 7 ** Restart Required ** (Primary) SQL> ALTER SYSTEM SET DB_FILE_NAME_CONVERT='standby','primary' scope=spfile sid='*'; System altered. o 8 ** Restart Required ** (Primary) SQL> ALTER SYSTEM SET LOG_FILE_NAME_CONVERT='standby','primary' scope=spfile sid='*'; System altered. o 9 (Primary) SQL> SHOW PARAMETER standby_file_management NAME TYPE VALUE ------------------------------------ ----------- ------------------------------ standby_file_management string MANUAL SQL> ALTER SYSTEM SET STANDBY_FILE_MANAGEMENT=AUTO scope=both sid='*'; System altered. SQL> SHOW PARAMETER standby_file_management NAME TYPE VALUE ------------------------------------ ----------- ------------------------------ standby_file_management string AUTO |
A STANDBY REDO LOG is created in the primary database. The number of Standby Redo Logs created is equal to the number of Redo Logs in our database. (Step 3 – Primary)
First, let’s look at the number and size of REDO LOGs we have.
1 2 3 4 5 6 7 8 9 10 11 | SQL> select GROUP#, THREAD#, BYTES/1024/1024 MB, STATUS from v$log; GROUP# THREAD# MB STATUS ---------- ---------- ---------- ---------------- 1 1 50 CURRENT 2 1 50 INACTIVE 3 2 50 INACTIVE 4 2 50 INACTIVE 5 1 50 INACTIVE 6 2 50 CURRENT |
Now we are creating a Standby Redo Log (Primary).
1 2 3 4 5 6 7 8 9 10 11 12 13 14 15 16 17 18 19 20 21 22 23 24 | SQL> alter system set standby_file_management=manual scope=both sid='*'; System altered. SQL> alter database add standby logfile thread 1 group 7 '+FRA' size 50M; Database altered. SQL> alter database add standby logfile thread 1 group 8 '+FRA' size 50M; Database altered. SQL> alter database add standby logfile thread 2 group 9 '+FRA' size 50M; Database altered. SQL> alter database add standby logfile thread 2 group 10 '+FRA' size 50M; Database altered. SQL> alter system set standby_file_management=auto scope=both sid='*'; System altered. |
Now let’s check the Standby log status(Primary).
1 2 3 4 5 6 7 8 | SQL> select GROUP#, THREAD#, BYTES/1024/1024 MB, STATUS from V$STANDBY_LOG; GROUP# THREAD# MB STATUS ---------- ---------- ---------- ---------- 7 1 50 UNASSIGNED 8 1 50 UNASSIGNED 9 2 50 UNASSIGNED 10 2 50 UNASSIGNED |
The database is initialized to set the parameters (Primary).
1 2 3 4 | [oracle@primary1 dbs]$ srvctl stop database -d primary [oracle@primary1 dbs]$ srvctl start database -d primary |
15. The primary database should be backed up and we will create a directory to put this backup file (Primary1 – Oracle).
1 2 3 4 5 6 7 8 9 10 11 12 13 14 15 16 17 18 19 20 21 22 23 24 25 26 27 28 29 30 31 32 33 34 35 36 37 38 39 40 41 42 43 44 45 46 47 48 49 50 51 52 53 54 55 56 57 58 59 60 61 62 63 64 65 66 67 68 69 70 | [oracle@primary1 ~]$ mkdir /home/oracle/backup [oracle@primary1 ~]$ rman target / nocatalog Recovery Manager: Release 11.2.0.4.0 - Production on Tue Apr 14 16:32:52 2015 Copyright (c) 1982, 2011, Oracle and/or its affiliates. All rights reserved. connected to target database: PRIMARY (DBID=1714152137) using target database control file instead of recovery catalog RMAN> run{ sql "alter system switch logfile"; allocate channel ch1 type disk format '/nfs_alan/backup/logical/Primary_bkp_for_logical_%U'; backup database; backup current controlfile for standby; sql "alter system archive log current"; } sql statement: alter system switch logfile allocated channel: ch1 channel ch1: SID=216 instance=primary1 device type=DISK Starting backup at 14-APR-15 channel ch1: starting full datafile backup set channel ch1: specifying datafile(s) in backup set input datafile file number=00001 name=+DATA/primary/datafile/system.256.876669367 input datafile file number=00002 name=+DATA/primary/datafile/sysaux.257.876669369 input datafile file number=00005 name=+DATA/primary/datafile/example.264.876669465 input datafile file number=00003 name=+DATA/primary/datafile/undotbs1.258.876669369 input datafile file number=00006 name=+DATA/primary/datafile/undotbs2.265.876669727 input datafile file number=00004 name=+DATA/primary/datafile/users.259.876669369 channel ch1: starting piece 1 at 14-APR-15 channel ch1: finished piece 1 at 14-APR-15 piece handle=/home/oracle/backup/Primary_bkp_for_stndby_01q4cge7_1_1 tag=TAG20150414T163311 comment=NONE channel ch1: backup set complete, elapsed time: 00:00:25 channel ch1: starting full datafile backup set channel ch1: specifying datafile(s) in backup set including current control file in backup set including current SPFILE in backup set channel ch1: starting piece 1 at 14-APR-15 channel ch1: finished piece 1 at 14-APR-15 piece handle=/home/oracle/backup/Primary_bkp_for_stndby_02q4cgf0_1_1 tag=TAG20150414T163311 comment=NONE channel ch1: backup set complete, elapsed time: 00:00:01 Finished backup at 14-APR-15 Starting backup at 14-APR-15 channel ch1: starting full datafile backup set channel ch1: specifying datafile(s) in backup set including standby control file in backup set channel ch1: starting piece 1 at 14-APR-15 channel ch1: finished piece 1 at 14-APR-15 piece handle=/home/oracle/backup/Primary_bkp_for_stndby_03q4cgf4_1_1 tag=TAG20150414T163340 comment=NONE channel ch1: backup set complete, elapsed time: 00:00:01 Finished backup at 14-APR-15 sql statement: alter system archive log current released channel: ch1 RMAN> RMAN> RMAN> exit Recovery Manager complete. |
16. We create a PFILE parameter file for the Standby database from the parameter file. (Primary)
1 2 3 | SQL> create pfile='/u01/app/oracle/product/11.2.0/db_1/dbs/initstandby.ora' from spfile; File created. |
17. In this step, we will edit the TNS files. In the figure below, all 4 NODEs must be present. Otherwise, we will get an error as follows;
1 2 3 4 5 6 7 8 9 10 11 | tail -1000f /u01/app/oracle/diag/rdbms/primary/primary2/trace/alert_primary2.log Error 12154 received logging on to the standby Thu May 07 07:10:27 2015 SQL> select error from v$archive_dest; ERROR ----------------------------------------------------------------- ORA-12154: TNS:could not resolve the connect identifier specified |
On the primary side, we update the tnsnames.ora file on both NODEs. And the result is as follows (Step 6 – Primary 1 – 2).
1 2 3 4 5 6 7 8 9 10 11 12 13 14 15 16 17 18 19 20 21 22 23 24 25 26 27 28 29 30 31 32 33 34 35 36 37 38 39 40 41 42 43 44 45 46 47 48 49 50 51 52 53 54 55 56 57 58 | $ vi /u01/app/oracle/product/11.2.0/db_1/network/admin/tnsnames.ora PRIMARY = (DESCRIPTION = (ADDRESS = (PROTOCOL = TCP)(HOST = primary-scan.hhuyanlab.local)(PORT = 1521)) (CONNECT_DATA = (SERVER = DEDICATED) (SERVICE_NAME = primary) ) ) STANDBY = (DESCRIPTION = (ADDRESS = (PROTOCOL = TCP)(HOST = standby-scan.hhuyanlab.local)(PORT = 1521)) (CONNECT_DATA = (SERVER = DEDICATED) (SERVICE_NAME = standby) ) ) PRIMARY1 = (DESCRIPTION = (ADDRESS = (PROTOCOL = TCP)(HOST = primary1-vip.hhuyanlab.local)(PORT = 1521)) (CONNECT_DATA = (SERVER = DEDICATED) (SID = primary1) ) ) PRIMARY2 = (DESCRIPTION = (ADDRESS = (PROTOCOL = TCP)(HOST = primary2-vip.hhuyanlab.local)(PORT = 1521)) (CONNECT_DATA = (SERVER = DEDICATED) (SID = primary2) ) ) STANDBY1 = (DESCRIPTION = (ADDRESS = (PROTOCOL = TCP)(HOST = standby1-vip.hhuyanlab.local)(PORT = 1521)) (CONNECT_DATA = (SERVER = DEDICATED) (SERVICE_NAME = standby) ) ) STANDBY2 = (DESCRIPTION = (ADDRESS = (PROTOCOL = TCP)(HOST = standby2-vip.hhuyanlab.local)(PORT = 1521)) (CONNECT_DATA = (SERVER = DEDICATED) (SERVICE_NAME = standby) ) ) |
We transfer the PFILE parameter file that we previously created for Standby to the Standby Node-1 side. (Primary)
1 2 3 4 5 6 7 8 9 | [oracle@primary1 dbs]$ scp initstandby.ora oracle@172.20.42.25:/u01/app/oracle/product/11.2.0/db_1/dbs/ The authenticity of host '172.20.42.25 (172.20.42.25)' can't be established. RSA key fingerprint is c6:6c:b3:f3:c9:f4:52:1e:82:a9:2f:ab:e2:5c:ee:59. Are you sure you want to continue connecting (yes/no)? yes Warning: Permanently added '172.20.42.25' (RSA) to the list of known hosts. initstandby.ora 100% 2007 2.0KB/s 00:00 |
Then the BACKUP files are moved to the Standby side (Primary 1 – Oracle).
1 | $ scp –r /home/oracle/backup standby1:/home/oracle |
3.Password files on the primary side are transferred to the Standby side with SCP (Primary 1 – Oracle).
1 2 3 4 5 6 7 8 9 10 11 12 13 14 15 16 17 18 19 | [oracle@primary1 dbs]$ scp orapwprimary1 standby1:/u01/app/oracle/product/11.2.0/db_1/dbs/orapwprimary1 The authenticity of host 'standby1 (172.20.42.25)' can't be established. RSA key fingerprint is c6:6c:b3:f3:c9:f4:52:1e:82:a9:2f:ab:e2:5c:ee:59. Are you sure you want to continue connecting (yes/no)? yes Warning: Permanently added 'standby1' (RSA) to the list of known hosts. oracle@standby1's password: orapwprimary1 100% 1536 1.5KB/s 00:00 [oracle@primary1 dbs]$ scp orapwprimary1 standby2:/u01/app/oracle/product/11.2.0/db_1/dbs/orapwprimary2 The authenticity of host 'standby2 (172.20.42.26)' can't be established. RSA key fingerprint is db:4a:b2:97:ee:0f:0f:ae:3f:81:56:a6:0e:cf:53:b8. Are you sure you want to continue connecting (yes/no)? yes Warning: Permanently added 'standby2,172.20.42.26' (RSA) to the list of known hosts. oracle@standby2's password: orapwprimary1 100% 1536 1.5KB/s 00:00 |
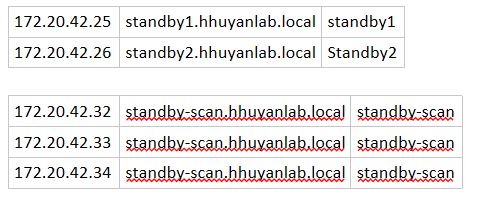
4. We must create DUMP directories on the standby side (Standby 1 – 2).
1 2 3 4 5 6 7 8 9 10 11 12 13 14 | o STANDBY-1 $ mkdir -p /u01/app/oracle/admin/standby/adump $ mkdir -p /u01/app/oracle/diag/rdbms/standby/primary1 $ cd /u01/app/oracle/diag/rdbms/standby/primary1 $ mkdir trace cdump o STANDBY-2 $ mkdir -p /u01/app/oracle/admin/standby/adump $ mkdir -p /u01/app/oracle/diag/rdbms/standby/primary2 $ cd /u01/app/oracle/diag/rdbms/standby/primary2 $ mkdir trace cdump |
5.Now we are making updates to the Standby PFILE file we created earlier. (Standby1) ** No errors here.
1 2 3 4 5 6 7 8 9 10 11 12 13 14 15 16 17 18 19 20 21 22 23 24 25 26 27 28 29 30 31 32 33 34 35 36 37 38 | *.audit_file_dest='/u01/app/oracle/admin/standby/adump' *.audit_trail='db' *.cluster_database=true *.compatible='11.2.0.4.0' *.control_files='+DATA/standby/controlfile/control01.ctl','+FRA/standby/controlfile/control02.ctl' *.db_block_size=8192 *.db_create_file_dest='+DATA' *.db_create_online_log_dest_1='+DATA' *.db_create_online_log_dest_2='+FRA' *.db_domain='' *.db_file_name_convert='primary','standby' *.db_name='primary' *.db_unique_name='standby' *.db_recovery_file_dest='+FRA' *.db_recovery_file_dest_size=48318382080 *.diagnostic_dest='/u01/app/oracle' *.dispatchers='(PROTOCOL=TCP) (SERVICE=primaryXDB)' *.fal_server='PRIMARY' primary1.instance_number=1 primary2.instance_number=2 *.log_archive_config='DG_CONFIG=(primary,standby)' *.log_archive_dest_1='LOCATION=USE_DB_RECOVERY_FILE_DEST VALID_FOR=(ALL_LOGFILES,ALL_ROLES) DB_UNIQUE_NAME=standby' *.log_archive_dest_2='SERVICE=primary SYNC VALID_FOR=(ONLINE_LOGFILES,PRIMARY_ROLE) DB_UNIQUE_NAME=primary' *.log_archive_format='%t_%s_%r.arc' *.log_archive_max_processes=8 *.log_file_name_convert='primary','standby' *.open_cursors=300 *.pga_aggregate_target=1258291200 *.processes=512 *.remote_listener='standby-scan.hhuyanlab.local:1521' *.remote_login_passwordfile='exclusive' *.sessions=568 *.sga_target=3776970752 *.standby_file_management='AUTO' primary2.thread=2 primary1.thread=1 primary2.undo_tablespace='UNDOTBS2' primary1.undo_tablespace='UNDOTBS1' |
6. We copy the TNS files to the Standby side (Step 7 – Primary).
1 2 3 4 5 6 7 8 9 10 | [oracle@primary1 admin]$ scp tnsnames.ora standby1:/u01/app/oracle/product/11.2.0/db_1/network/admin/ oracle@standby1's password: tnsnames.ora 100% 547 0.5KB/s 00:00 [oracle@primary1 admin]$ scp tnsnames.ora standby2:/u01/app/oracle/product/11.2.0/db_1/network/admin/ oracle@standby2's password: tnsnames.ora 100% 547 0.5KB/s 00:00 |
7. We need to create ASM folders. (Standby 1)
1 2 3 4 5 6 7 8 9 10 11 12 13 14 15 16 17 | [root@standby1 ~]# su - grid [grid@standby1 ~]$ asmcmd ASMCMD> ls DATA/ FRA/ OCRVOTE/ ASMCMD> cd DATA ASMCMD> ls ASMCMD> mkdir STANDBY ASMCMD> cd STANDBY ASMCMD> mkdir PARAMETERFILE DATAFILE CONTROLFILE TEMPFILE ONLINELOG ASMCMD> cd FRA ASMCMD> ls ASMCMD> mkdir STANDBY ASMCMD> cd STANDBY ASMCMD> mkdir ARCHIVELOG CONTROLFILE ONLINELOG STANDBYLOG |
8. TNS files have been updated. On all nodes. (Standby 1) (Standby 2)
1 2 3 4 5 6 7 8 9 10 11 12 13 14 15 16 17 18 19 20 21 22 23 24 25 26 27 28 29 30 31 32 33 34 35 36 37 38 39 40 41 42 43 44 45 46 47 48 49 50 51 52 53 | PRIMARY = (DESCRIPTION = (ADDRESS = (PROTOCOL = TCP)(HOST = primary-scan.hhuyanlab.local)(PORT = 1521)) (CONNECT_DATA = (SERVER = DEDICATED) (SERVICE_NAME = primary) ) ) STANDBY = (DESCRIPTION = (ADDRESS = (PROTOCOL = TCP)(HOST = standby-scan.hhuyanlab.local)(PORT = 1521)) (CONNECT_DATA = (SERVER = DEDICATED) (SERVICE_NAME = standby) ) ) PRIMARY1 = (DESCRIPTION = (ADDRESS = (PROTOCOL = TCP)(HOST = primary1-vip.hhuyanlab.local)(PORT = 1521)) (CONNECT_DATA = (SERVER = DEDICATED) (SERVICE_NAME = primary) ) ) PRIMARY2 = (DESCRIPTION = (ADDRESS = (PROTOCOL = TCP)(HOST = primary2-vip.hhuyanlab.local)(PORT = 1521)) (CONNECT_DATA = (SERVER = DEDICATED) (SERVICE_NAME = primary) ) ) STANDBY1 = (DESCRIPTION = (ADDRESS = (PROTOCOL = TCP)(HOST = standby1-vip.hhuyanlab.local)(PORT = 1521)) (CONNECT_DATA = (SERVER = DEDICATED) (SERVICE_NAME = standby) ) ) STANDBY2 = (DESCRIPTION = (ADDRESS = (PROTOCOL = TCP)(HOST = standby2-vip.hhuyanlab.local)(PORT = 1521)) (CONNECT_DATA = (SERVER = DEDICATED) (SERVICE_NAME = standby) ) ) |
9. This process will be done on standby 1.hhuyanlab.localhost. (Standby 1)
1 2 3 4 | [oracle@standby1 ~]$ export ORACLE_SID=primary1 [oracle@standby1 ~]$ export ORACLE_BASE=/u01/app/oracle [oracle@standby1 ~]$ export ORACLE_HOME=/u01/app/oracle/product/11.2.0/db_1/ [oracle@standby1 ~]$ export PATH=$PATH:$ORACLE_HOME/bin:. |
10. We check the remote connection and parameters to the database with TNS. This will be done on standby1.hhuyanlab.local host. (Standby1)
1 2 3 4 5 6 7 8 9 10 11 12 13 14 15 16 17 18 19 20 21 22 23 24 25 26 27 28 29 | [oracle@standby1 ~]$ sqlplus sys/Passw0rd4@PRIMARY as sysdba SQL*Plus: Release 11.2.0.4.0 Production on Tue Apr 14 16:19:38 2015 Copyright (c) 1982, 2013, Oracle. All rights reserved. Connected to: Oracle Database 11g Enterprise Edition Release 11.2.0.4.0 - 64bit Production With the Partitioning, Real Application Clusters, Automatic Storage Management, OLAP, Data Mining and Real Application Testing options SQL> show parameter name NAME TYPE VALUE ------------------------------------ ----------- ------------------------------ cell_offloadgroup_name string db_file_name_convert string standby, primary db_name string primary db_unique_name string primary global_names boolean FALSE instance_name string primary1 lock_name_space string log_file_name_convert string standby, primary processor_group_name string service_names string primary SQL> exit |
11. Then, we open the database in mount mode on the standby side. This will be done on standby1.hhuyanlab.local host. (Standby1)
1 2 3 4 5 6 7 8 9 10 11 12 13 14 15 16 17 18 19 20 21 22 | [oracle@standby1 ~]$ sqlplus / as sysdba SQL*Plus: Release 11.2.0.4.0 Production on Tue Apr 14 16:29:04 2015 Copyright (c) 1982, 2013, Oracle. All rights reserved. Connected to an idle instance. SQL> startup nomount pfile='/u01/app/oracle/product/11.2.0/db_1/dbs/initstandby.ora'; ORACLE instance started. Total System Global Area 3774713856 bytes Fixed Size 2258880 bytes Variable Size 989857856 bytes Database Buffers 2768240640 bytes Redo Buffers 14356480 bytes SQL> SQL> exit Disconnected from Oracle Database 11g Enterprise Edition Release 11.2.0.4.0 - 64bit Production With the Partitioning, Real Application Clusters, OLAP, Data Mining and Real Application Testing options |
12. We will connect to two databases at the same time from the standby side and complete the database copying process. This will be done on standby1.hhuyanlab.local host. (Standby1)
1 2 3 4 5 6 7 8 9 10 11 | [oracle@standby1 ~]$ rman target sys/Passw0rd4@PRIMARY1 auxiliary / Recovery Manager: Release 11.2.0.4.0 - Production on Tue Apr 14 16:31:30 2015 Copyright (c) 1982, 2011, Oracle and/or its affiliates. All rights reserved. connected to target database: PRIMARY (DBID=1714152137) connected to auxiliary database: PRIMARY (not mounted) RMAN> |
13. We will copy the database RESTORE operation with RMAN using the DUPLICATE DATABASE option. For this process, in the previous step, we connected to PRIMARY, which is the TARGET database, and to STANDBY, which is the AUXILIARY database, via standby1.hhuyanlab.local host. (Standby1)
1 2 3 4 5 6 7 8 9 10 11 12 13 14 15 16 17 18 19 20 21 22 23 24 25 26 27 28 29 30 31 32 33 34 35 36 37 38 39 40 41 42 43 44 45 46 47 48 49 50 51 52 53 54 55 56 57 58 59 60 61 62 63 64 65 66 67 68 69 70 71 72 73 74 75 76 77 78 79 80 81 82 83 84 85 86 87 88 89 90 91 92 93 94 95 96 97 98 99 100 101 102 103 104 105 106 107 108 | RMAN> DUPLICATE TARGET DATABASE FOR STANDBY NOFILENAMECHECK; Starting Duplicate Db at 14-APR-15 using channel ORA_AUX_DISK_1 contents of Memory Script: { restore clone standby controlfile; } executing Memory Script Starting restore at 14-APR-15 channel ORA_AUX_DISK_1: starting datafile backup set restore channel ORA_AUX_DISK_1: restoring control file channel ORA_AUX_DISK_1: reading from backup piece /home/oracle/backup/Primary_bkp_for_stndby_03q4cgf4_1_1 channel ORA_AUX_DISK_1: piece handle=/home/oracle/backup/Primary_bkp_for_stndby_03q4cgf4_1_1 tag=TAG20150414T163340 channel ORA_AUX_DISK_1: restored backup piece 1 channel ORA_AUX_DISK_1: restore complete, elapsed time: 00:00:01 output file name=+DATA/primary/controlfile/control01.ctl output file name=+FRA/primary/controlfile/control02.ctl Finished restore at 14-APR-15 contents of Memory Script: { sql clone 'alter database mount standby database'; } executing Memory Script sql statement: alter database mount standby database RMAN-05529: WARNING: DB_FILE_NAME_CONVERT resulted in invalid ASM names; names changed to disk group only. contents of Memory Script: { set newname for tempfile 1 to "+data"; switch clone tempfile all; set newname for datafile 1 to "+data"; set newname for datafile 2 to "+data"; set newname for datafile 3 to "+data"; set newname for datafile 4 to "+data"; set newname for datafile 5 to "+data"; set newname for datafile 6 to "+data"; restore clone database ; } executing Memory Script executing command: SET NEWNAME renamed tempfile 1 to +data in control file executing command: SET NEWNAME executing command: SET NEWNAME executing command: SET NEWNAME executing command: SET NEWNAME executing command: SET NEWNAME executing command: SET NEWNAME Starting restore at 14-APR-15 using channel ORA_AUX_DISK_1 channel ORA_AUX_DISK_1: starting datafile backup set restore channel ORA_AUX_DISK_1: specifying datafile(s) to restore from backup set channel ORA_AUX_DISK_1: restoring datafile 00001 to +data channel ORA_AUX_DISK_1: restoring datafile 00002 to +data channel ORA_AUX_DISK_1: restoring datafile 00003 to +data channel ORA_AUX_DISK_1: restoring datafile 00004 to +data channel ORA_AUX_DISK_1: restoring datafile 00005 to +data channel ORA_AUX_DISK_1: restoring datafile 00006 to +data channel ORA_AUX_DISK_1: reading from backup piece /home/oracle/backup/Primary_bkp_for_stndby_01q4cge7_1_1 channel ORA_AUX_DISK_1: piece handle=/home/oracle/backup/Primary_bkp_for_stndby_01q4cge7_1_1 tag=TAG20150414T163311 channel ORA_AUX_DISK_1: restored backup piece 1 channel ORA_AUX_DISK_1: restore complete, elapsed time: 00:00:25 Finished restore at 14-APR-15 contents of Memory Script: { switch clone datafile all; } executing Memory Script datafile 1 switched to datafile copy input datafile copy RECID=8 STAMP=877020979 file name=+DATA/standby/datafile/system.257.877020955 datafile 2 switched to datafile copy input datafile copy RECID=9 STAMP=877020979 file name=+DATA/standby/datafile/sysaux.258.877020955 datafile 3 switched to datafile copy input datafile copy RECID=10 STAMP=877020979 file name=+DATA/standby/datafile/undotbs1.260.877020955 datafile 4 switched to datafile copy input datafile copy RECID=11 STAMP=877020979 file name=+DATA/standby/datafile/users.262.877020955 datafile 5 switched to datafile copy input datafile copy RECID=12 STAMP=877020979 file name=+DATA/standby/datafile/example.259.877020955 datafile 6 switched to datafile copy input datafile copy RECID=13 STAMP=877020980 file name=+DATA/standby/datafile/undotbs2.261.877020955 Finished Duplicate Db at 14-APR-15 |
14. We create an SPFILE parameter file from the PFILE parameter file in the standby database. (Standby1)
1 2 3 | SQL> create spfile='+DATA/STANDBY/PARAMETERFILE/spfilestandby.ora' from pfile='/u01/app/oracle/product/11.2.0/db_1/dbs/initstandby.ora'; File created. |
15. Then, on the standby side, we update the PFILE parameter files on both NODEs as follows. (Standby 1 – 2)
1 2 3 4 5 6 7 8 9 10 11 12 13 | standby1.hhuyanlab.local $ vi /u01/app/oracle/product/11.2.0/db_1/dbs/initprimary1.ora spfile='+DATA/STANDBY/PARAMETERFILE/spfilestandby.ora' standby2.hhuyanlab.local $ vi /u01/app/oracle/product/11.2.0/db_1/dbs/initprimary2.ora spfile='+DATA/STANDBY/PARAMETERFILE/spfilestandby.ora' |
16. Now we complete the process of adding the Standby database (Standby 1 – Oracle). (in a new SESSION)
1 2 3 4 | [oracle@standby1 ~]$ srvctl add database -d standby -n primary -o /u01/app/oracle/product/11.2.0/db_1 -p +DATA/STANDBY/PARAMETERFILE/spfilestandby.ora -r physical_standby -a DATA,FRA [oracle@standby1 ~]$ srvctl add instance -d standby -i primary1 -n standby1 [oracle@standby1 ~]$ srvctl add instance -d standby -i primary2 -n standby2 [oracle@standby1 ~]$ srvctl start database -d standby |
If it does not open;
1 2 3 4 5 6 7 8 9 10 11 12 13 14 15 16 17 18 19 20 21 22 23 24 25 26 27 28 29 30 31 32 33 34 35 36 37 38 39 40 41 42 43 44 45 46 47 48 | [oracle@standby1 ~]$ srvctl modify database -d standby -s mount [oracle@standby1 ~]$ srvctl config database -d standby Database unique name: standby Database name: primary Oracle home: /u01/app/oracle/product/11.2.0/db_1 Oracle user: oracle Spfile: +DATA/STANDBY/PARAMETERFILE/spfilestandby.ora Domain: Start options: mount Stop options: immediate Database role: PHYSICAL_STANDBY Management policy: AUTOMATIC Server pools: standby Database instances: primary1,primary2 Disk Groups: DATA,FRA Mount point paths: Services: Type: RAC Database is administrator managed [oracle@standby1 ~]$ srvctl start database -d standby [oracle@standby1 ~]$ srvctl status database -d standby Instance primary1 is running on node standby1 Instance primary2 is running on node standby2 (Standby1) [oracle@standby1 dbs]$ sqlplus / as sysdba SQL*Plus: Release 11.2.0.4.0 Production on Wed Apr 22 14:00:57 2015 Copyright (c) 1982, 2013, Oracle. All rights reserved. (Standby1) SQL> select status from gv$instance; STATUS ------------ MOUNTED MOUNTED |
At this stage, the database did not stand up. By connecting both nodes one by one, I opened the database with the following command (Standby1 – 2).
1 2 3 4 | [oracle@standby1 dbs]$ sqlplus / as sysdba SQL> startup mount; |
17. Now we can check the database. (Standby 1)
1 2 3 4 5 6 7 8 | $ sqlplus / as sysdba SQL> select name, database_role, open_mode from gv$database; NAME DATABASE_ROLE OPEN_MODE --------- ---------------- -------------------- PRIMARY PHYSICAL STANDBY MOUNTED PRIMARY PHYSICAL STANDBY MOUNTED |
18. We are checking the Primary side now. (Primary 1)
1 2 3 4 5 6 | SQL> select name, database_role, open_mode from gv$database; NAME DATABASE_ROLE OPEN_MODE --------- ---------------- -------------------- PRIMARY PRIMARY READ WRITE PRIMARY PRIMARY READ WRITE |
19. Finally, we activate the Standby Database by running the command below (Standby1 or Standby2).
1 2 3 4 5 | SQL> ALTER DATABASE RECOVER MANAGED STANDBY DATABASE DISCONNECT FROM SESSION; Database altered. alter database recover managed standby database using current logfile disconnect; |
20. We check the Primary and Standby side.
1 2 3 4 5 6 7 8 9 10 11 12 13 14 15 16 17 18 19 20 21 22 23 24 25 26 27 28 29 30 31 32 33 34 35 | (Primary) SQL> select thread#, sequence#, status from v$log; THREAD# SEQUENCE# STATUS ---------- ---------- ---------------- 1 47 CURRENT 1 46 INACTIVE 2 27 CURRENT 2 26 INACTIVE (Standby) SQL> select process, status, thread#, sequence#, block#, blocks from v$managed_standby; PROCESS STATUS THREAD# SEQUENCE# BLOCK# BLOCKS --------- ------------ ---------- ---------- ---------- ---------- ARCH CONNECTED 0 0 0 0 ARCH CONNECTED 0 0 0 0 ARCH CONNECTED 0 0 0 0 ARCH CONNECTED 0 0 0 0 ARCH CONNECTED 0 0 0 0 ARCH CONNECTED 0 0 0 0 ARCH CONNECTED 0 0 0 0 ARCH CONNECTED 0 0 0 0 MRP0 APPLYING_LOG 1 47 22711 102400 RFS IDLE 0 0 0 0 RFS IDLE 0 0 0 0 PROCESS STATUS THREAD# SEQUENCE# BLOCK# BLOCKS --------- ------------ ---------- ---------- ---------- ---------- RFS IDLE 0 0 0 0 RFS IDLE 0 0 0 0 RFS IDLE 0 0 0 0 14 rows selected. |
21. We control the Primary and Standby side.
1 2 3 4 5 6 7 8 9 10 11 12 13 14 15 16 17 | Standby taraftan SCN numarası alınarak Primary veritabanında saat kontrolü yapılabilir. (Standby) SQL> select current_scn from v$database; CURRENT_SCN ----------- 1681797 (Primary) SQL> select scn_to_timestamp(1681797) from dual; SCN_TO_TIMESTAMP(1681797) --------------------------------------------------------------------------- 07-MAY-15 03.00.05.000000000 PM |
1 | http://www.oracledba.org/11gR2/dr/11gR2_dataguard_RAC_to_RAC.html |
![]()