 Database Tutorials MSSQL, Oracle, PostgreSQL, MySQL, MariaDB, DB2, Sybase, Teradata, Big Data, NOSQL, MongoDB, Couchbase, Cassandra, Windows, Linux
SQL Server 2017 and SQL Server 2019 can run on Linux operating system, and SQL Server Always On Availability Groups can be Setup without the need for Windows Failover Cluster with SQL Server 2017.
In SQL Server Always On classic usage, we need Windows Server Failover Cluster (WSFC), we can do this on Linux using Pacemaker.
You can use SQL Server AlwaysOn AG with two cluster types in Linux.
External : used to provide automatic failover and increase continuity, using a pacemaker.
None : It is used only for read scale and manual failover, without the need for a pacemaker.
Windows Failover Cluster on Windows; It has functions such as failover, health monitoring, resource management, hosted application configuration, updating changes in nodes and spreading them to the cluster.
The importance and role of the Windows Failover Cluster for Windows is huge.
What about Linux?
Since there is no WSFC service on Linux, this configuration information (metadata) is kept in the master database by the SQL Server instance.
Since there is no witness needed in Windows (such as file-share witness), it is necessary to have a third solution to ensure that the cluster survives in case of a problem.
In other words, if you are going to make a Linux SQL Server AG with External selected, you need to set up a structure with three nodes, not two,
but of course, since the cost of having three nodes here will increase the cost, it has been resolved by providing the necessary metadata distribution and keeping the relevant data for continuity with the definition of “configuration only replica”.
After all this theoretical information, let’s move on to a quick example.
I have two Linux machines positioned on Microsoft Azure for the test environment. The information of the servers with Ubuntu 20.04 installed is as follows.
sqlinuxnode1 : 10.1.0.4
sqlinuxnode2: 10.1.0.6
We will be performing SQL Server Linux installations together, so you can experience it in your own environments.
We grant access to ports 1433 and 5022 on each server.
We access servers through Putty and ensure that existing incoming packages are updated before installing new packages.
1 2 3 | sudo apt-get update sudo apt-get -y upgrade |
I restart my servers just in case for the updates to take effect.
1 | sudo reboot |
I add the GPG key for the system to trust the MS SQL apt repos.
1 | sudo wget -qO- https://packages.microsoft.com/keys/microsoft.asc | sudo apt-key add – |
I mentioned that I am using Ubuntu 20.04. I add the Microsoft SQL Server 2019 apt repository that we need for this version to the system.
1 | sudo add-apt-repository "$(wget -qO- https://packages.microsoft.com/config/ubuntu/18.04/mssql-server-2019.list)" |
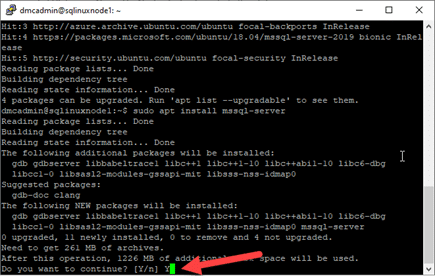
Let’s use the following commands to perform SQL Server installations.
1 2 3 | sudo apt update sudo apt install mssql-server |
During the installation, you will be asked to accept the agreement. Type Y and continue with enter.
After completing the installation, you will be prompted to run the “sudo /opt/mssql/bin/mssql-conf setup” command.

When you run the code you need for installation, you will be asked which version of SQL Server you want to choose.
In our example, we choose the “Developer” edition. So we continue with 2.
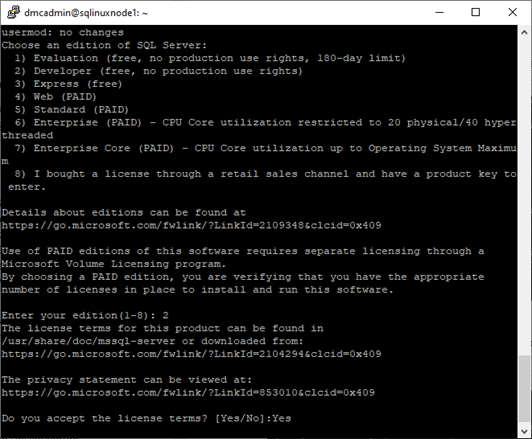
After the version selection, it asks for a license confirmation again. We skip this step too.
As the last step for installation, it asks us for a system administrator (sa user) password.
We create a strong password and continue.
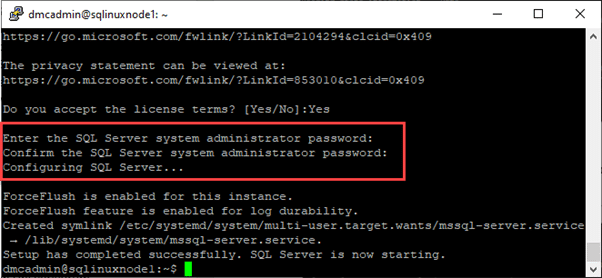
We also set the SA user’s password, and as you can see, the SQL Server service is running.
We have successfully installed SQL Server 2019 on Linux Ubuntu 20.04. So we actually successfully provided the first step.
Before going to other steps, I assigned local IP addresses (IP addresses I shared with you) as Fixed IP over Azure.
While you are experiencing this issue in your own environment, you must assign local IP addresses as fixed IP.
You can run the code below via putty to check the IP addresses.
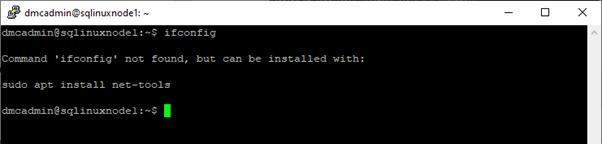
As you can see, ifconfig is not found, it shows me how to run it. I needed to run “sudo apt install net-tools”. After running the required code, I run it again via ifconfig putty.
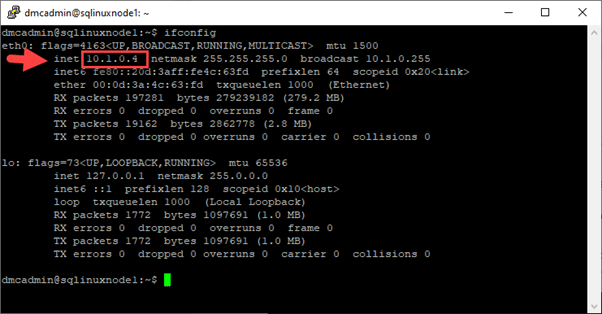
Just like the SQL Server 2019 installation, I performed these ip check operations on both servers separately.
The next step is to check the hostname of the server we are working on. Hostname information should not be longer than 15 characters.
1 | sudo cat /etc/hostname |
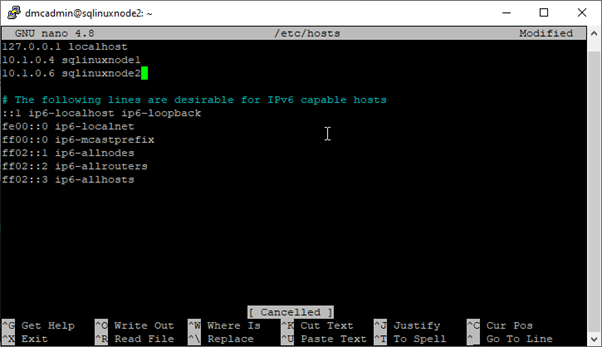
After checking the server names, let’s update the /etc/hosts files so that your servers do not have problems communicating with each other.
But for this process, we need to have root privileges first. (We are switching to root using sudo su.)
1 | /etc/hosts file for sqlinuxnode1; nano /etc/hosts or sudo nano /etc/hosts |
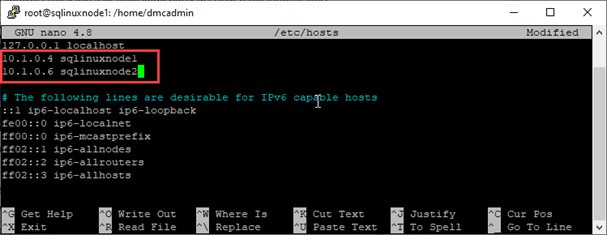
The part marked in red here is my server information that I entered.
You must enter your own server local fixed IP addresses and server hostname information so that the servers do not have problems communicating with each other.
We open it with the nano editor, make changes and save and exit with Ctrl + X. We do the same for sqllinuxnode2.
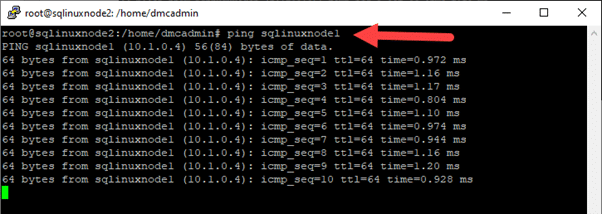
After performing the necessary operations on the host files, we ping to check if there is a problem in communication between the servers.
1 | ping sqlinuxnode2 |
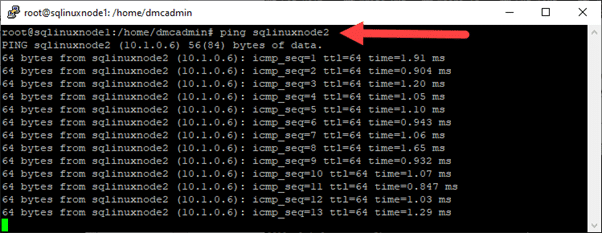
In Picture9, we pinged the sqlinuxnode2 server from the sqlinuxnode1 server.
Now let’s ping the sqlinuxnode1 server from the sqlinuxnode2 server and check.
Both of our servers are ready, what we need to do now is to access these servers either through a server that accesses this environment or from a computer you use in the local environment and do the other steps.
I opened ports 1433 and 5022. I just need to edit the host file on my Windows computer to access the hostnames of the servers I need to do.
In Windows, the host file is located in C:\Windows\System32\drivers\etc and you can open it with a text editor and make changes.
After making the adjustments, we connect with SSMS.
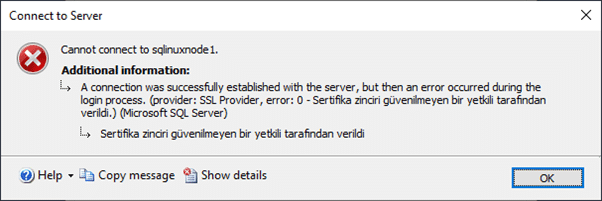
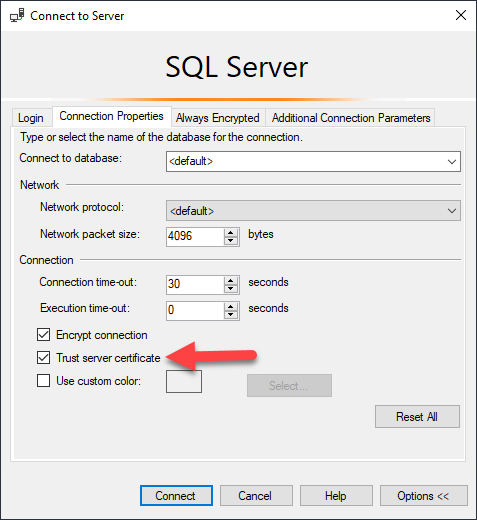
If you are getting an error like the one above while connecting with SSMS, you should select “Trust server certificate” in the Connection Properties section of SSMS Connect To Server.
We try to connect with SSMS again, if there is no problem, our connection will be successful as in the picture below.

Now that there is no problem in our connection settings, let’s start configuring Always On on SQL Server Linux.
We enable SQL Server Always On using SQL Server Configuration Manager on Windows SQL Server.
But SQL Server Linux does not have a GUI configuration manager. We use the mssql-conf utility to enable HADR.
We run the following command on both servers.
1 | sudo /opt/mssql/bin/mssql-conf set hadr.hadrenabled 1 |

After running the command, as you can see in the picture above, it tells us that we need to restart the SQL Server service and gives the code we need for the process.
1 | systemctl restart mssql-server.service |
After performing the restart process, we can now continue the Always On High Availability operations via SSMS.
In order to create an AG, we need to open the AlwaysOn_health Extended Event feature on both servers with the following code.
You can do this through SSMS or Azure Data Studio.
1 | ALTER EVENT SESSION AlwaysOn_health ON SERVER WITH (STARTUP_STATE=ON); |
Now we come to the most important part of SQL Server Linux’s Always On configuration.
Here we will create Master Key, Certificate and return the backup to the other server.
iBecause the communication between mirroring endpoints on Linux is with a certificate.
After the certificate process, we need to create the endpoints.
We can create the master key and certificate by running the following codes on one of the two servers.
1 2 3 | CREATE MASTER KEY ENCRYPTION BY PASSWORD = 'DMC@123*!'; CREATE CERTIFICATE sqllinuxdb_certificate WITH SUBJECT = 'sqllinuxdb_certificate'; |
I ran the above codes in sqlinuxnode1. Now, let’s back up the “sqllinuxdb_certificate” we created.
1 2 3 4 5 6 | BACKUP CERTIFICATE sqllinuxdb_sertifika TO FILE = '/var/opt/mssql/data/sqllinuxdb_sertifika.cer' WITH PRIVATE KEY ( FILE = '/var/opt/mssql/data/sqllinuxdb_sertifika_pvk.pvk', ENCRYPTION BY PASSWORD = 'DMC@123*!' ); |
If for some reason you want to delete the certificate you created, delete the cer and pvk files under /var/opt/mssql/data/.
Then “DROP CERTIFICATE sqllinuxdb_certificate; Delete the certificate and the latest master key with ”
1 2 | USE master; DROP MASTER KEY; |
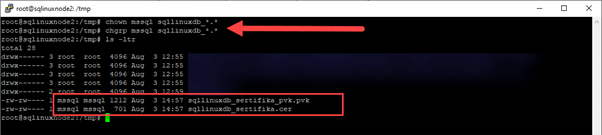
Now we have a certificate we created and we need to copy this certificate to the other server.
1 | sudo scp sqllinuxdb_*.* dmcadmin@sqlinuxnode2/var/opt/mssql/data/ |

As you can see in Picture 15, we successfully moved the cer and pvk files to sqllinuxnode2 to the /tmp directory.
After the migration, let’s give the ownership of the files to the mssql user by using the chown command. But first, let’s check with ls -ltr.

As you can see, the files are owned by dmcadmin. Let’s move these files into the /var/opt/mssql/data folder, then let’s take ownership of them to mssql.
1 | scp sqllinuxdb_*.* /var/opt/mssql/data |
1 2 | chown mssql sqllinuxdb_*.* chgrp mssql sqllinuxdb_*.* |
Let’s import our backup to sqllinuxnode2 now.
1 2 3 4 5 6 7 8 9 10 11 12 13 14 | CREATE MASTER KEY ENCRYPTION BY PASSWORD = 'DMC@123*!'; USE master GO OPEN MASTER KEY DECRYPTION BY PASSWORD = 'DMC@123*!' IF EXISTS (SELECT * FROM sys.certificates WHERE name = 'sqllinuxdb_certificate') DROP CERTIFICATE sqllinuxdb_certificate CREATE CERTIFICATE sqllinuxdb_certificate FROM FILE = '/var/opt/mssql/data/sqllinuxdb_certificate.cer' WITH PRIVATE KEY ( FILE = '/var/opt/mssql/data/sqllinuxdb_certificate_pvk.pvk' , DECRYPTION BY PASSWORD = 'DMC@123*!' ) |
Now that we’ve done the certification process, it’s time to create the Endpoints. Let’s run the code below on both servers. I gave the port information 5022, which comes by default.
1 2 3 4 5 6 7 8 | CREATE ENDPOINT [Hadr_endpoint] AS TCP (LISTENER_PORT = 5022) FOR DATABASE_MIRRORING ( ROLE = ALL, AUTHENTICATION = CERTIFICATE sqllinuxdb_certificate, ENCRYPTION = REQUIRED ALGORITHM AES ); ALTER ENDPOINT [Hadr_endpoint] STATE = STARTED; |
Let’s give firewall permissions on ubuntu for 5022 with the code below.
1 2 | sudo apt install ufw sudo ufw allow 5022 |
Now, in the remaining steps, we can perform the SQL Server AG operations, which is our classic process, in order.
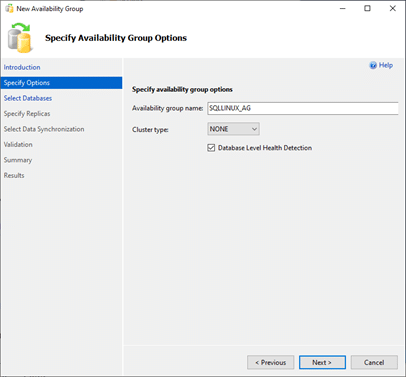
In the cluster type field you see in the picture above, there is EXTERNAL along with NONE.
I explained what these two cluster types are at the beginning of the article. That’s why I go with NONE.
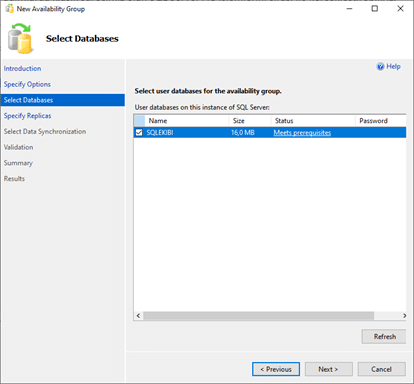
The next screen is the section where you will select the databases you want to be included in the AG.
Here I only have a database named SQLEKIBI. I choose it and continue.
The next screen contains the instance information you will add for AG. Here I say “Add instance…” and add linuxsqlnode2.
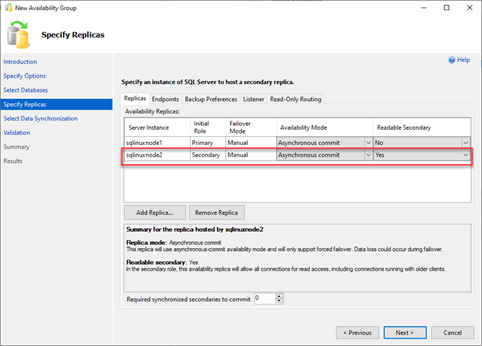
As you can see in the picture above, I marked the secondary node as readable for the new instance I added.
I switch to the Endpoints tab and revise the endpoint information according to myself.
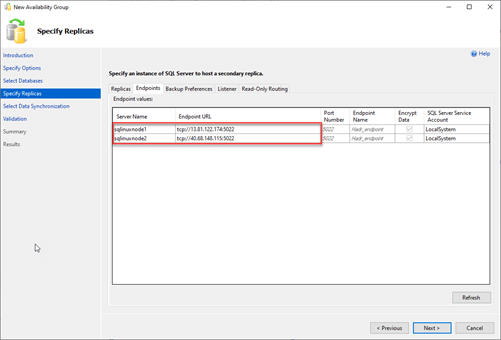
I leave the other settings as default.
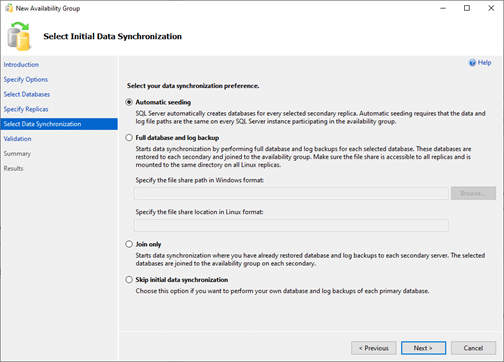
The next screen shows how to sync Data. I leave this part as default.
We come to the final steps, the next screen is the one where the verification of the definitions we made for the AG is done.
We will see a warning as we do not define a listener on this screen, but we continue our process.
Finally, we come to the last step and as a result of the actions we have taken, we are faced with a green screen.
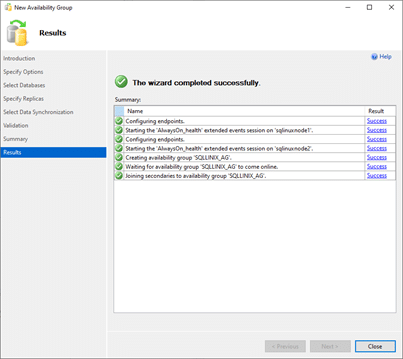
As you can see in the picture above, we have successfully defined Always On AG on SQL Server Linux.
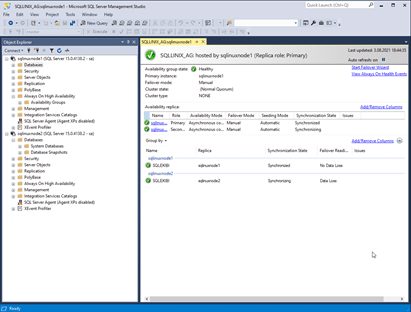
Finally, let’s take a look at the Always On Dashboard and end our article.
I am happy to have finished another article. In this article, I told you how you can run a SQL Server Always On Cluster on Linux, and for what purpose you can use the SQL Server Linux Always On Cluster. See you in the next content.
![]()