 Database Tutorials MSSQL, Oracle, PostgreSQL, MySQL, MariaDB, DB2, Sybase, Teradata, Big Data, NOSQL, MongoDB, Couchbase, Cassandra, Windows, Linux
In today’s article, we will be explaining the 2nd part of Single Instance (Standalone) 19C Database Installation with Oracle Grid Infrastructure.
For the first part:
1 | https://dbtut.com/index.php/2023/08/30/single-instance-19c-database-installation/ |
In Part 1, we will use 2 additional disks in the virtual machine we created for the Grid.
One of these disks will be used as +DATA and the other as +FRA area.
For this reason, if you haven’t added one, you need to add two extra disks.
These added disks will appear as “sdb” and “sdc” in our operating system.
Before starting the grid installation, some packages need to be installed.
We make the following updates one by one and install the Grid and database setups for 19C via Oracle Delivery Cloud.
1 | https://edelivery.oracle.com/osdc/faces/Home.jspx |
Now we can start our operations by opening a new terminal window.
#: root user
$: oracle user
1 2 | # yum install -y oracle-database-preinstall-19c # yum update -y |
We organize our hosts file according to our needs.
1 2 | # vi /etc/hosts 192.168.100.90 database.parlayan.local database |
We are shutting down our Selinux service.
1 2 3 | #vi /etc/selinux/config SELINUX=disabled |
We are shutting down our firewall services.
1 2 | # systemctl stop firewalld # systemctl disable firewalld |
We create folders for Grid and Database.
1 2 3 4 | mkdir -p /u01/app/oracle/product/19.0.0.0/db mkdir -p /u01/app/19.0.0.0/grid chown -R oracle:oinstall /u01 chmod -R 775 /u01 |
We create variables.
Here you need to edit your Host and SID names according to your needs.
1 2 3 4 5 6 7 8 9 10 11 12 13 14 15 16 17 18 19 20 21 22 23 24 25 | # su - oracle $ cd /home/oracle $ vi .setEnv TMP=/tmp; export TMP TMPDIR=$TMP; export TMPDIR ORACLE_HOSTNAME=database.parlayan.local; export ORACLE_HOSTNAME ORACLE_UNQNAME=BUGRA; export ORACLE_UNQNAME ORACLE_BASE=/u01/app/oracle; export ORACLE_BASE GRID_HOME=/u01/app/19.0.0.0/grid; export GRID_HOME DB_HOME=$ORACLE_BASE/product/19.0.0.0/db; export DB_HOME ORACLE_HOME=$DB_HOME; export ORACLE_HOME ORACLE_SID=BUGRA; export ORACLE_SID ORACLE_HOME_LISTNER=$ORACLE_HOME export ORACLE_HOME_LISTNER ORACLE_TERM=xterm; export ORACLE_TERM BASE_PATH=/usr/sbin:$PATH; export BASE_PATH PATH=$ORACLE_HOME/bin:$BASE_PATH; export PATH LD_LIBRARY_PATH=$ORACLE_HOME/lib:/lib:/usr/lib; export LD_LIBRARY_PATH CLASSPATH=$ORACLE_HOME/JRE:$ORACLE_HOME/jlib:$ORACLE_HOME/rdbms/jlib; export CLASSPATH alias grid_env='. /home/oracle/.grid' alias db_env='. /home/oracle/.db' |
1 2 3 4 5 6 7 8 9 10 | # su - oracle $ cd /home/oracle $ vi .db ORACLE_SID=BUGRA; export ORACLE_SID ORACLE_HOME=$DB_HOME; export ORACLE_HOME PATH=$ORACLE_HOME/bin:$BASE_PATH; export PATH LD_LIBRARY_PATH=$ORACLE_HOME/lib:/lib:/usr/lib; export LD_LIBRARY_PATH CLASSPATH=$ORACLE_HOME/JRE:$ORACLE_HOME/jlib:$ORACLE_HOME/rdbms/jlib; export CLASSPATH |
1 2 3 4 5 6 7 8 9 10 | # su - oracle $ cd /home/oracle $ vi .grid ORACLE_SID=+ASM; export ORACLE_SID ORACLE_HOME=$GRID_HOME; export ORACLE_HOME PATH=$ORACLE_HOME/bin:$BASE_PATH; export PATH LD_LIBRARY_PATH=$ORACLE_HOME/lib:/lib:/usr/lib; export LD_LIBRARY_PATH CLASSPATH=$ORACLE_HOME/JRE:$ORACLE_HOME/jlib:$ORACLE_HOME/rdbms/jlib; export CLASSPATH |
We created our variables.
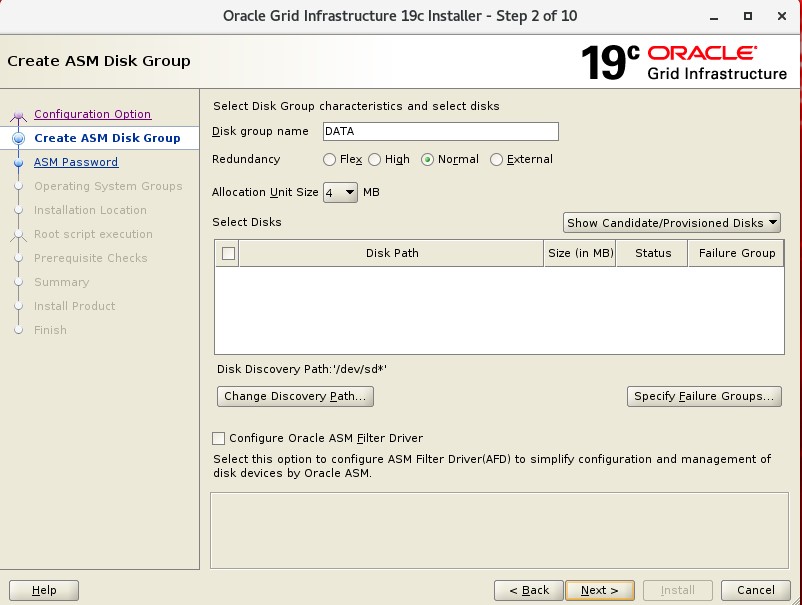
Now we will prepare our disks for ASM.
1 2 | # ls /dev/sd* # /dev/sda /dev/sda1 /dev/sdb /dev/sdc |
1 2 3 4 5 6 7 8 9 10 11 12 13 14 15 16 17 18 19 20 21 22 23 24 25 26 27 | # fdisk /dev/sdb Welcome to fdisk (util-linux 2.23.2). Changes will remain in memory only, until you decide to write them. Be careful before using the write command. Device does not contain a recognized partition table Building a new DOS disklabel with disk identifier 0xed980ecd. Command (m for help): n Partition type: p primary (0 primary, 0 extended, 4 free) e extended Select (default p): p Partition number (1-4, default 1): First sector (2048-2147483647, default 2048): Using default value 2048 Last sector, +sectors or +size{K,M,G} (2048-2147483647, default 2147483647): Using default value 2147483647 Partition 1 of type Linux and of size 1024 GiB is set Command (m for help): w The partition table has been altered! Calling ioctl() to re-read partition table. Syncing disks. |
To-do list
1.We give the “n” option in the question.
2.The question asks for its type, we give the “p” option and create it as primary.
3.We give the default option by saying “1” in the question.
4.We give the default option to the 4th and 5th questions by pressing the “enter” key.
6.We apply the changes by pressing the “w” key in the question.
1 2 3 4 5 6 7 8 9 10 11 12 13 14 15 16 17 18 19 20 21 22 23 24 25 26 27 | # fdisk /dev/sdbc Welcome to fdisk (util-linux 2.23.2). Changes will remain in memory only, until you decide to write them. Be careful before using the write command. Device does not contain a recognized partition table Building a new DOS disklabel with disk identifier 0xed980ecd. Command (m for help): n Partition type: p primary (0 primary, 0 extended, 4 free) e extended Select (default p): p Partition number (1-4, default 1): First sector (2048-2147483647, default 2048): Using default value 2048 Last sector, +sectors or +size{K,M,G} (2048-2147483647, default 2147483647): Using default value 2147483647 Partition 1 of type Linux and of size 1024 GiB is set Command (m for help): w The partition table has been altered! Calling ioctl() to re-read partition table. Syncing disks. |
To-do list
1.We give the “n” option in the question.
2.The question asks for its type, we give the “p” option and create it as primary.
3.We give the default option by saying “1” in the question.
4.We make the 4th and 5th questions the default option by pressing the “enter” key.
6.We apply the changes by pressing the “w” key in the question.
1 2 | # ls /dev/sd* /dev/sda /dev/sda1 /dev/sdb /dev/sdb1 /dev/sdc /dev/sdc1 |
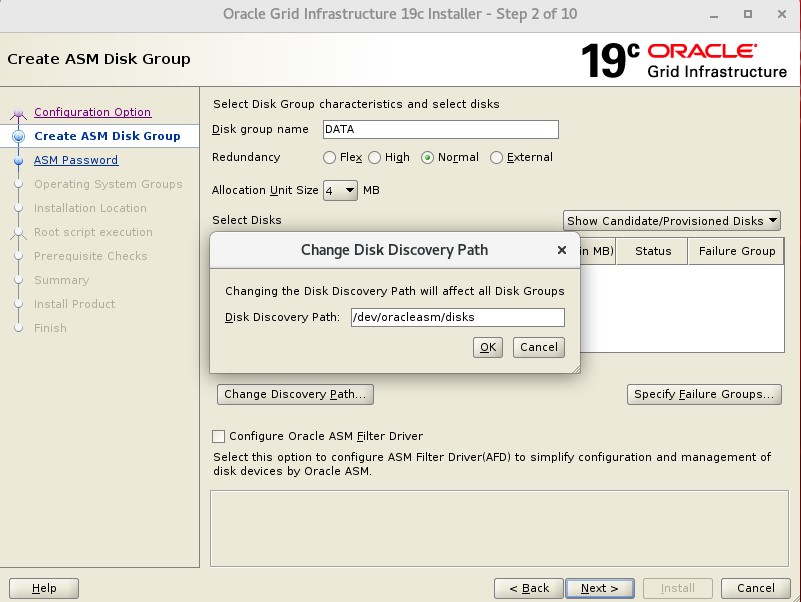
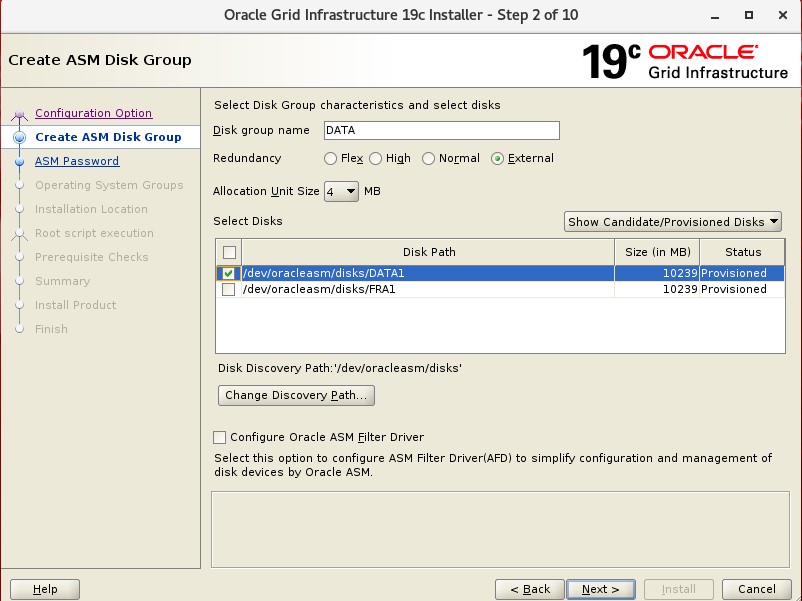
We specify the disks we configure for ASM.
1 2 3 4 5 6 7 8 9 10 11 12 13 14 15 | #oracleasm configure -i Configuring the Oracle ASM library driver. This will configure the on-boot properties of the Oracle ASM library driver. The following questions will determine whether the driver is loaded on boot and what permissions it will have. The current values will be shown in brackets ('[]'). Hitting <ENTER> without typing an answer will keep that current value. Ctrl-C will abort. Default user to own the driver interface []: oracle Default group to own the driver interface []: dba Start Oracle ASM library driver on boot (y/n) [n]: y Scan for Oracle ASM disks on boot (y/n) [y]: y Writing Oracle ASM library driver configuration: done |
1 | # oracleasm init |
1 2 | # oracleasm createdisk DATA1 /dev/sdb1 # oracleasm createdisk FRA1 /dev/sdc1 |
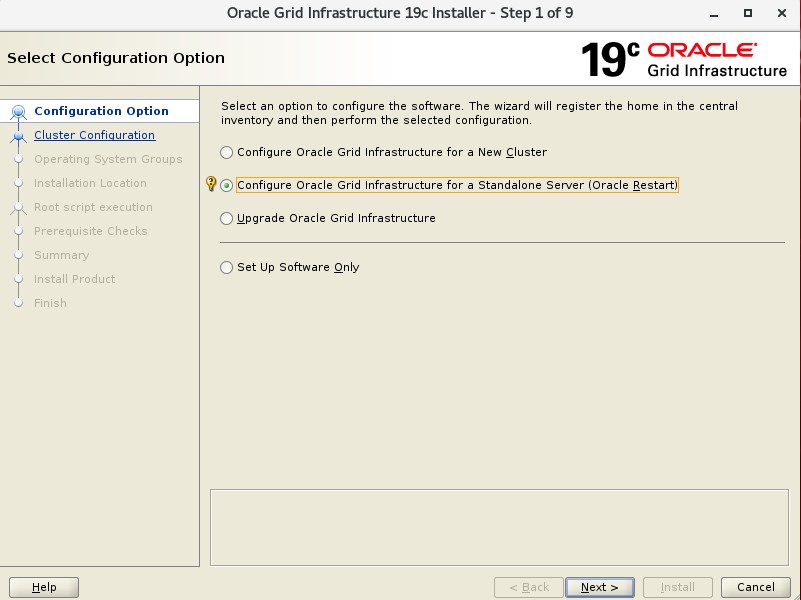
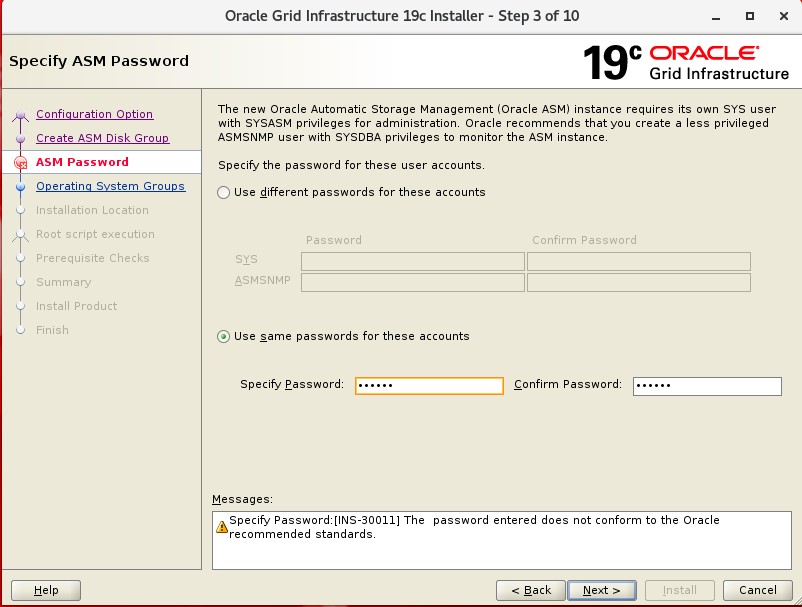
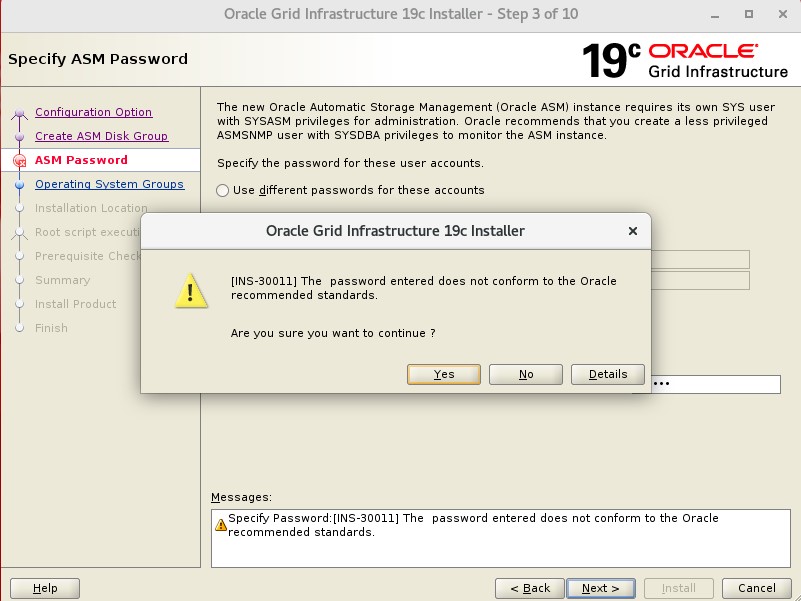
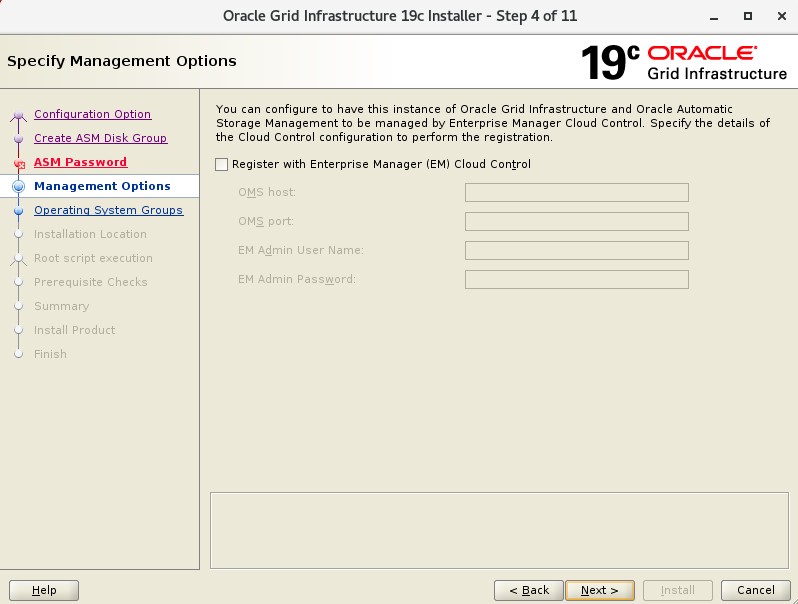
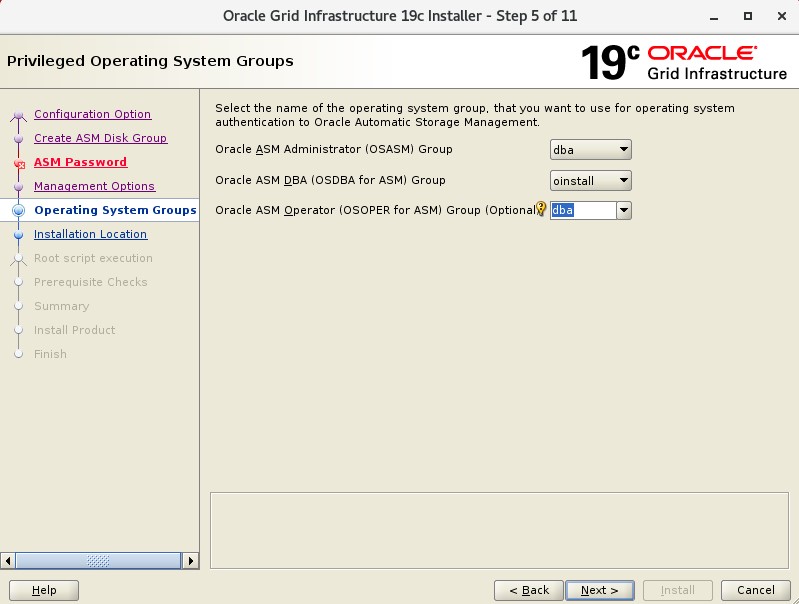
Now we can start the installation.
From now on, we will continue with our Oracle user.
1 2 3 4 5 6 7 | # su - oracle $ cd /home/oracle $ . .setEnv $ . .grid $ cd $ORACLE_HOME unzip V982068-01.zip ./gridSetup.sh |
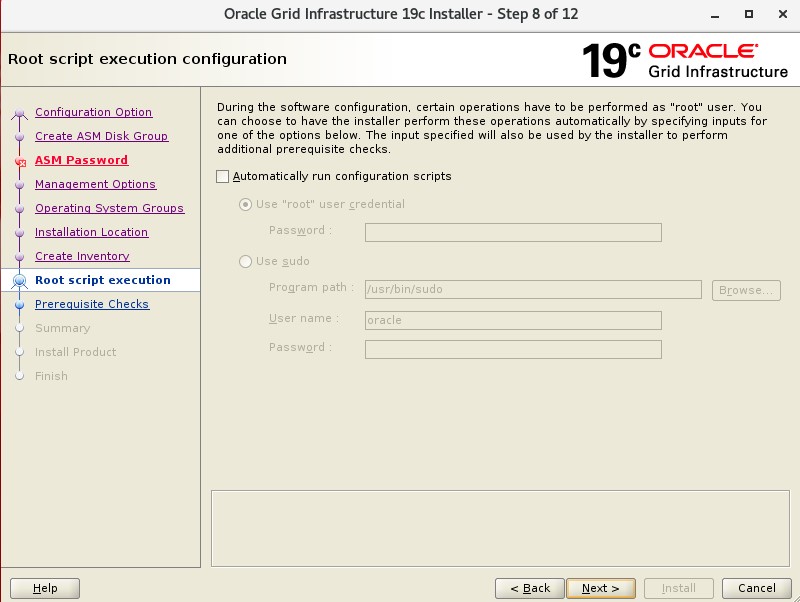
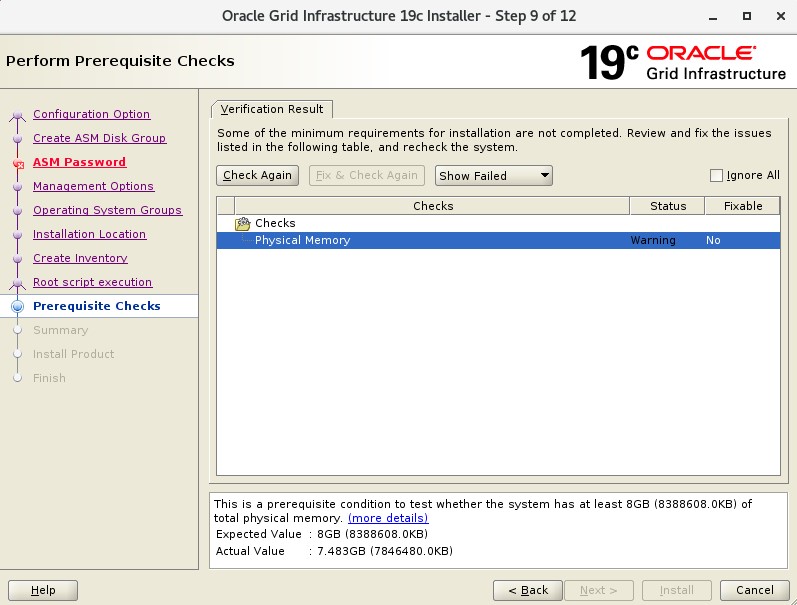
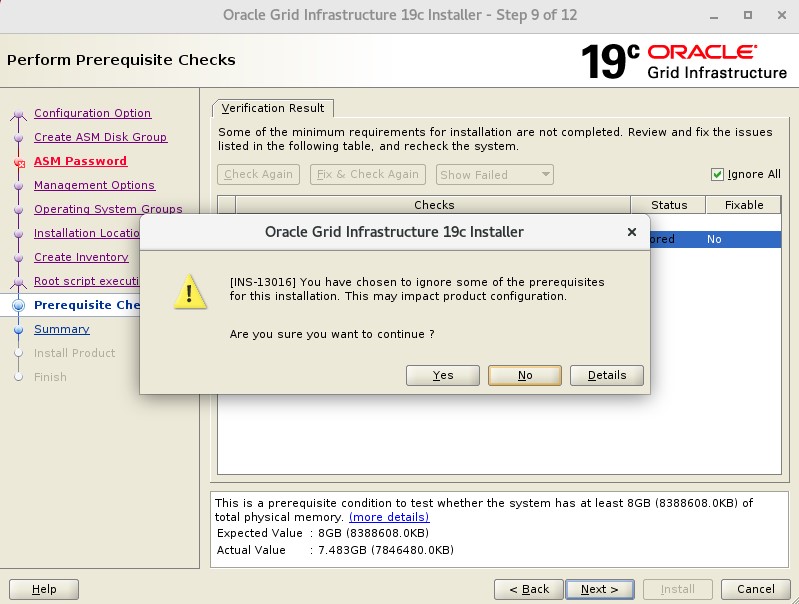
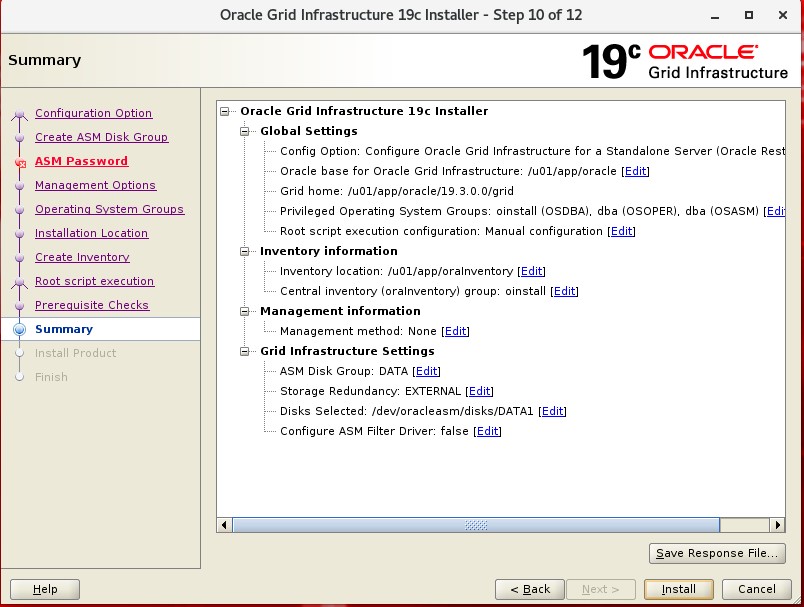
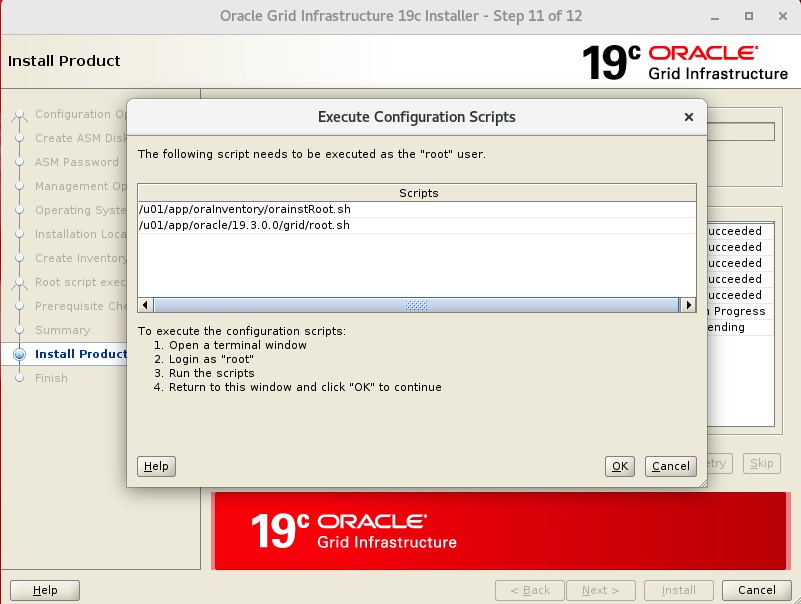
It asks us to run two scripts specified with the root user.
We run it by opening a new terminal window.
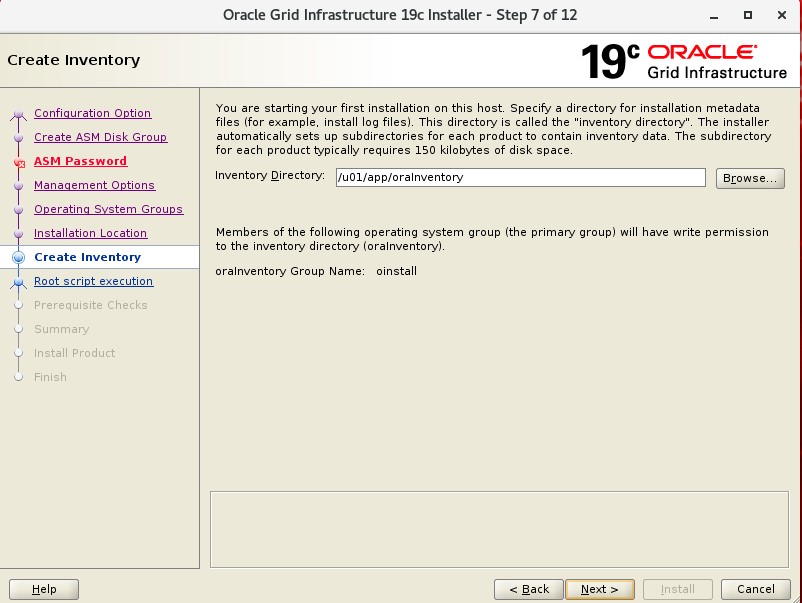
1 2 3 4 5 6 7 8 9 | # cd /u01/app/oraInventory/ # ./orainstRoot.sh Changing permissions of /u01/app/oraInventory. Adding read,write permissions for group. Removing read,write,execute permissions for world. Changing groupname of /u01/app/oraInventory to oinstall. The execution of the script is complete. |
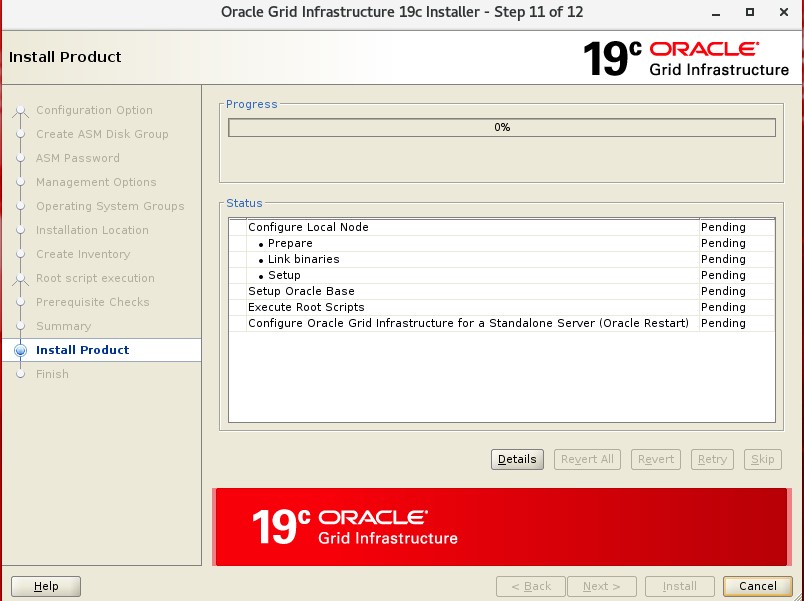
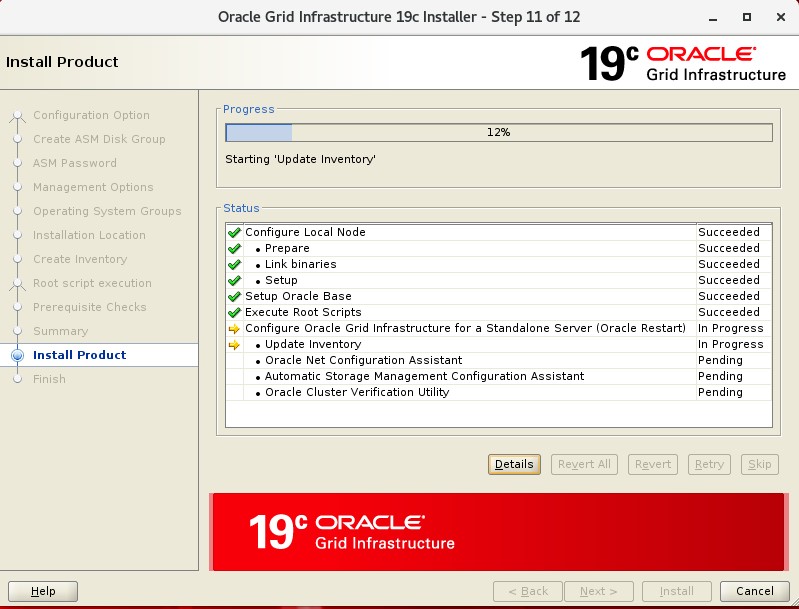
1 2 3 4 5 6 7 8 9 10 11 12 13 14 15 16 17 18 19 20 21 22 23 24 25 26 27 28 29 30 31 32 33 34 35 36 | # cd oracle/19.3.0.0/grid/ # ./root.sh Performing root user operation. The following environment variables are set as: ORACLE_OWNER= oracle ORACLE_HOME= /u01/app/oracle/19.3.0.0/grid Enter the full pathname of the local bin directory: [/usr/local/bin]: Copying dbhome to /usr/local/bin ... Copying oraenv to /usr/local/bin ... Copying coraenv to /usr/local/bin ... Creating /etc/oratab file... Entries will be added to the /etc/oratab file as needed by Database Configuration Assistant when a database is created Finished running generic part of root script. Now product-specific root actions will be performed. Using configuration parameter file: /u01/app/oracle/19.3.0.0/grid/crs/install/crsconfig_params The log of current session can be found at: /u01/app/oracle/crsdata/database/crsconfig/roothas_2020-04-17_04-05-08PM.log 2020/04/17 16:05:15 CLSRSC-363: User ignored prerequisites during installation LOCAL ADD MODE Creating OCR keys for user 'oracle', privgrp 'oinstall'.. Operation successful. LOCAL ONLY MODE Successfully accumulated necessary OCR keys. Creating OCR keys for user 'root', privgrp 'root'.. Operation successful. CRS-4664: Node database successfully pinned. 2020/04/17 16:05:25 CLSRSC-330: Adding Clusterware entries to file 'oracle-ohasd.service' Database 2020/04/17 16:06:22 /u01/app/oracle/crsdata/database/olr/backup_20200417_160622.olr 724960844 2020/04/17 16:06:23 CLSRSC-327: Successfully configured Oracle Restart for a standalone server |
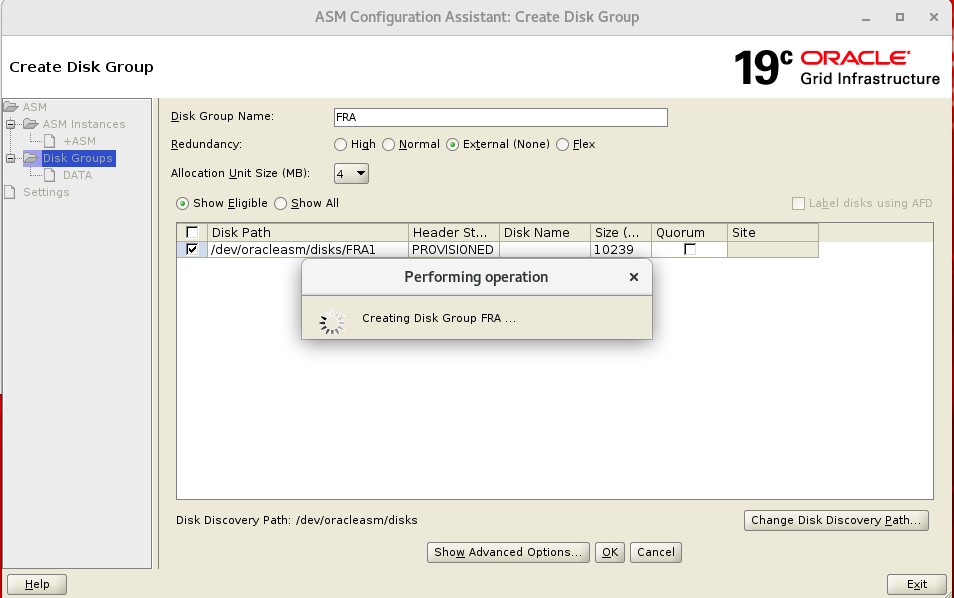
1 2 3 4 | $ cd /home/oracle $ . .setEnv $ . .grid $ asmca |
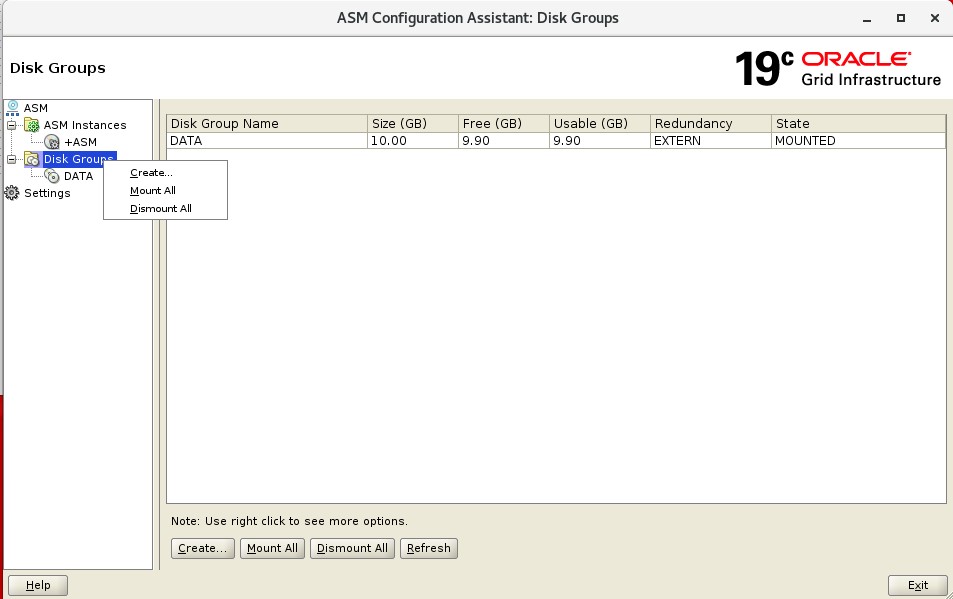
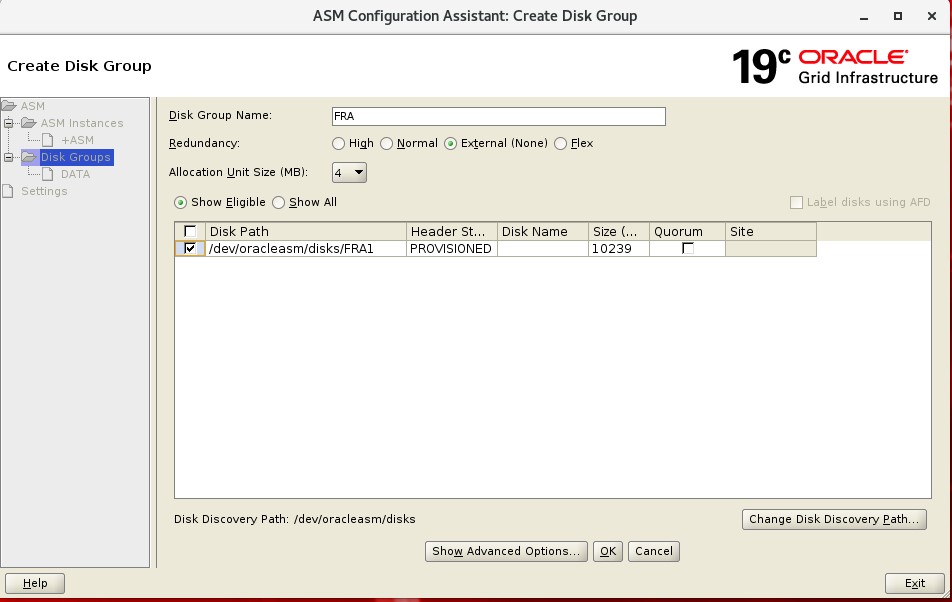
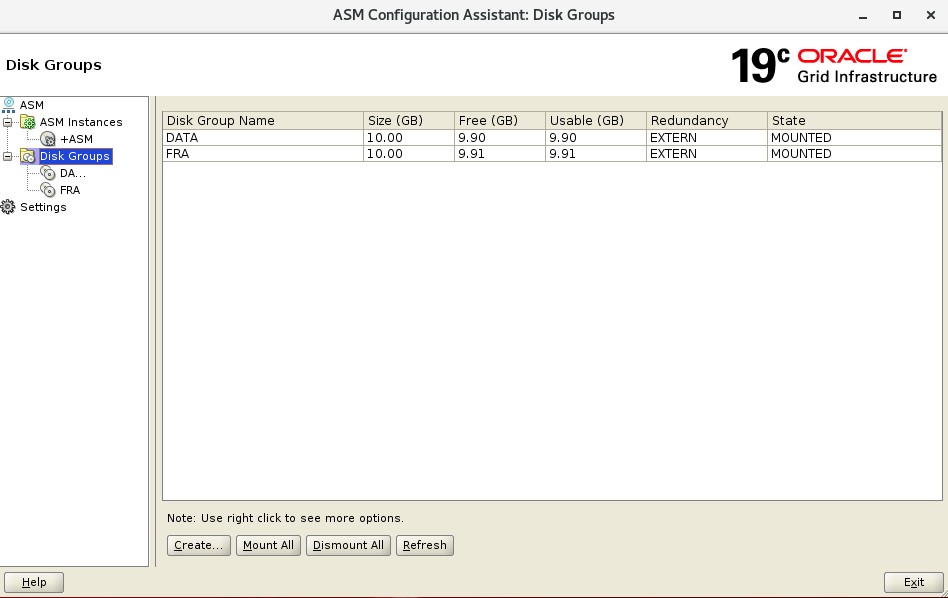
for control:
1 2 3 4 5 6 7 8 | $ . .setEnv $ . .grid $ asmca $ asmcmd ASMCMD> ls DATA/ FRA/ ASMCMD> |
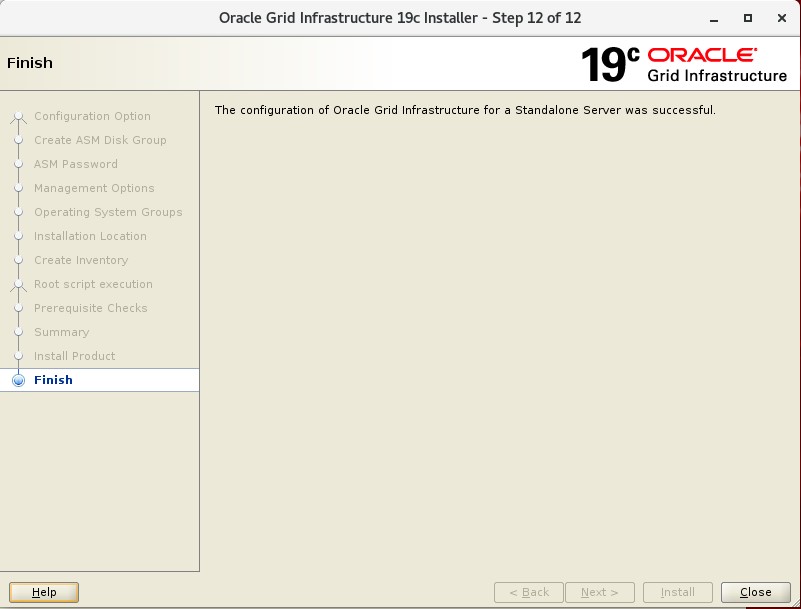
Now that our disks are visible, our Grid installation is complete.
After this, we will continue with the database installation.
![]()