 Database Tutorials MSSQL, Oracle, PostgreSQL, MySQL, MariaDB, DB2, Sybase, Teradata, Big Data, NOSQL, MongoDB, Couchbase, Cassandra, Windows, Linux
In today’s article, we will talk about Installing Oracle Grid Infrastructure 19C on Oracle Linux 7.8.
For this, we need to add three disks of the same size to our virtual machine.
First of all, we will perform the actions that need to be done before the installation. These operations are:
1.Disk partition with FDISK command
2.Configuring the ASM(Automatic Storage Management) level
3.Labekinh ASM Discs
4.Preparations before installation of Oracle Grid Infrastructure
5.Oracle Grid Infrastructure installation
1.DISK PARTITION WITH FDISK COMMAND:
First of all, we will make a disk partition using the fdisk command to use our previously added disks. We need to do this with the root user. Using the command below, we can list our three disks that we added earlier. The output will be as follows.
1 2 | ls /dev/sd* /dev/sda /dev/sda1 /dev/sda2 /dev/sdb /dev/sdc /dev/sdd |
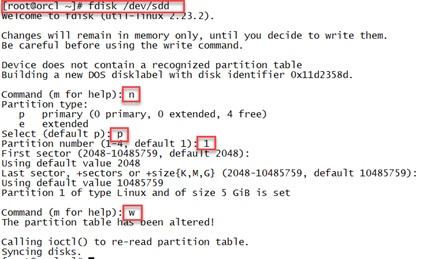
Let’s make a disk partition for the sdb disk. The same procedures should be applied for sdc and sdd disks. After typing the command and entering, it will ask questions as in the photo. These should be answered as follows. The description of the options in the photo is as follows.
n: create a new partition
p: create primary partition
1: partition number
w: writes changes to the partition table.
1 | [root@orcl ~]# fdisk /dev/sdb |
After the process is done for all three disks, we can check with the following command.
1 | [root@orcl ~]# ls -ltrh /dev/sd* |
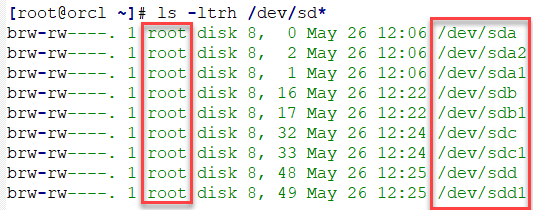
As we can see in the photo above, the root user has authority on the disks. In order for the Oracle user to write files to the disk group, we need to make the access permission and the owner an oracle user. For this we use the following commands.
1 2 3 4 5 6 | chown oracle:oinstall /dev/sdb1 chown oracle:oinstall /dev/sdc1 chown oracle:oinstall /dev/sdd1 chmod 600 /dev/sdb1 chmod 600 /dev/sdc1 chmod 600 /dev/sdd1 |
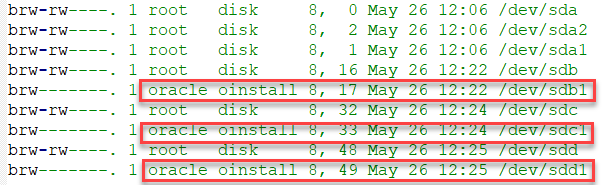
After the authorizations are given, we can list them with the following command. As we can see in the photo below, the authority of the disks has passed to the oracle user.
1 | ls -ltrh /dev/sd* |
2.Configuring ASM(Automatic Storage Management) Level:
The following two packages must be installed with the root user so that we can configure the ASM service.
1 2 | yum install -y oracleasm yum install -y oracleasm-support |
After the package installations are complete, we can configure the ASM service using the command below. The output will be as follows. It wants us to write who the authorized user is in the output.
We wrote oracle because the authorized user is oracle. Authorized group oinstall, we completed the configuration by saying y to the question of whether ASM drivers should start at boot and y to scan ASM disks at boot.
1 | [root@orcl ~]# oracleasm configure -i |

3.LABELING ASM DISCS:
We need to introduce the disks we have added to ASM. For this process, we need to run the following commands for the disks, respectively.
1 2 3 | [root@orcl ~]# oracleasm createdisk DATA1 /dev/sdb1 [root@orcl ~]# oracleasm createdisk DATA2 /dev/sdc1 [root@orcl ~]# oracleasm createdisk RECO /dev/sdd1 |

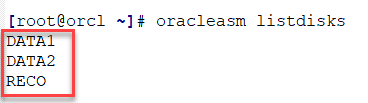
After introducing our disks, we can list them with the following command.
1 | [root@orcl ~]# oracleasm listdisks |
4.Preparations Before Oracle Grid Infrastructure Installation:
After introducing our discs, we can start making preliminary preparations. There are packages that we need to install before the Grid installation. For this, we can install it with the following command.
1 | yum install -y oracle-database-preinstall-19c |
After the package installation is completed, the directories to be used by the grid infrastructure are created and the oracle user is authorized to operate on these directories.
1 2 3 | mkdir -p /u01/app/oracle/grid chown -R oracle:oinstall /u01 chmod -R 775 /u01 |
After creating the directory and authorizing it, the environment file is created with vi for the grid and we add the following lines into it.
1 | vi .asmenv |
1 2 3 4 5 | PATH=$PATH:$HOME/.local/bin:$HOME/bin export ORACLE_SID=+ASM export ORACLE_BASE=/u01/app/oracle export ORACLE_HOME=/u01/app/oracle /grid export PATH=$GRID_HOME/bin:$ORACLE_HOME/OPatch:$PATH |
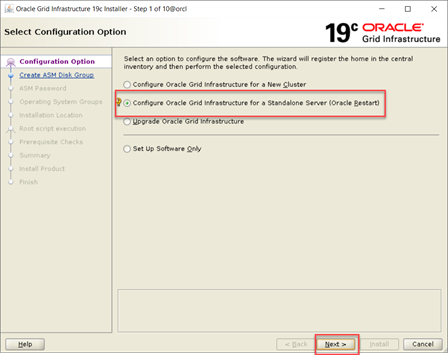
5.Oracle Grid Infrastructure 19C Installation:
We have completed the preliminary preparations. Now we will start the installation. For installation, we go to the grid directory and extract the setup file that we downloaded earlier. If you haven’t downloaded it, you can download it using the link below.
1 | https://www.oracle.com/database/technologies/oracle19c-linux-downloads.html |

1 | unzip /setup/LINUX.X64_193000_grid_home.zip |
1 2 | . .asmenv ./gridSetup.sh |
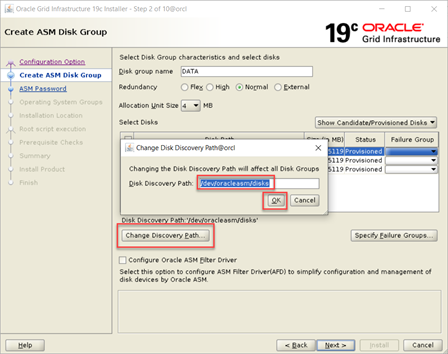
In this step, we will create an ASM disk group named DATA. The discs will not appear on first boot. For this, we select the Change Discovery Path option and write the location of the disks.
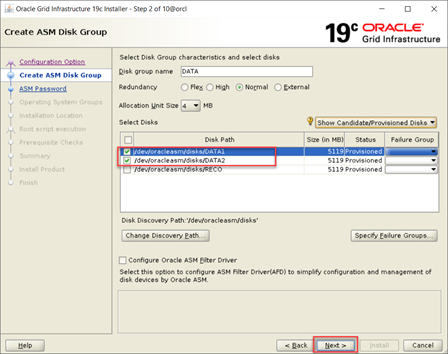
After completing the above process, our disks will now be listed. Continue by selecting DATA1 and DATA2 disks.
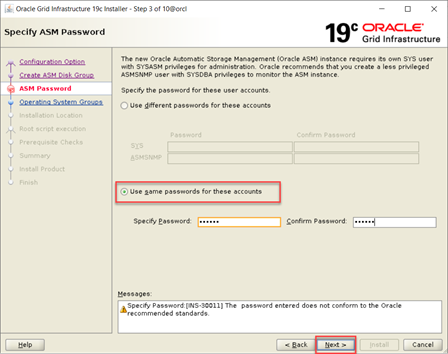
In this step, we set the password of the user responsible for managing the ASM disk group.
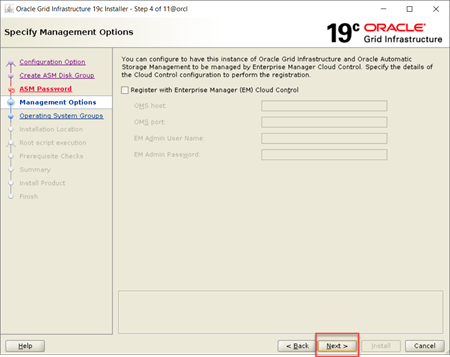
I continued without registering Enterprise Manager Cloud Control. You can register if you want.
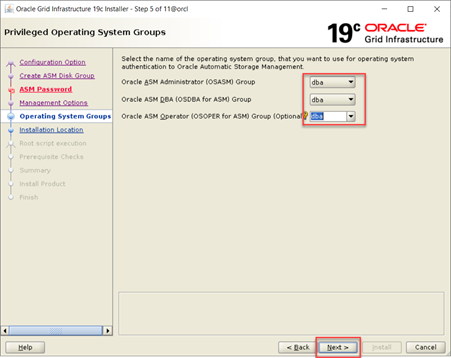
It is requested to determine the authorized group regarding ASM. We continue by selecting the previously created dba group.
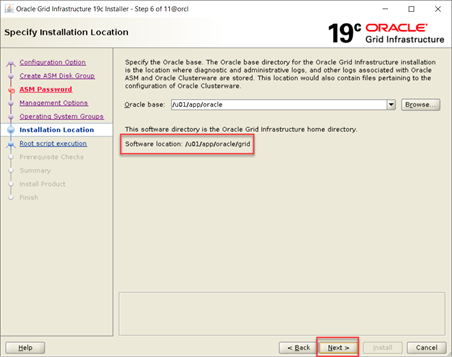
Indicates the directory where the Grid software will be installed. Since we created the environment file before, automatic locations came.
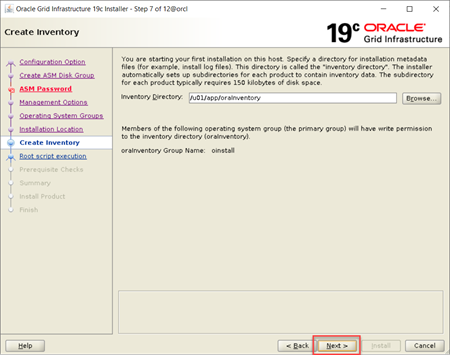
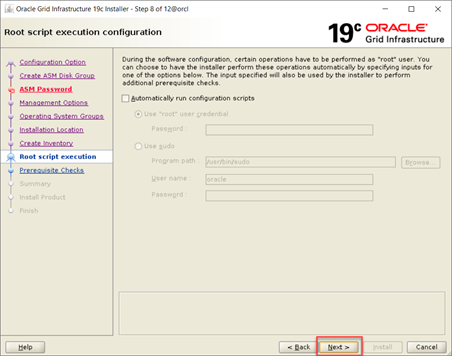
We continue by clicking next without changing anything.
We continue by saying Next.
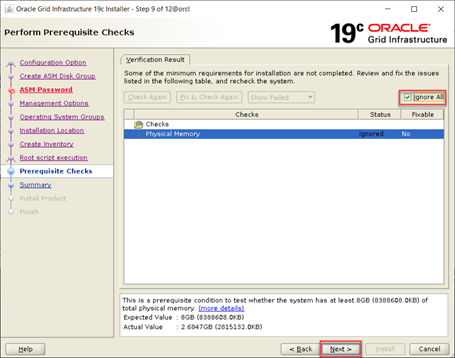
After the necessary tests for the installation are done, we continue by ticking the Ignore All option.
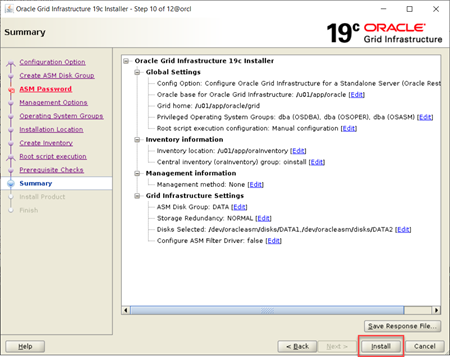
It shows the information about the installation that we will do. If we are not going to make any changes, we can start the installation by clicking Install.
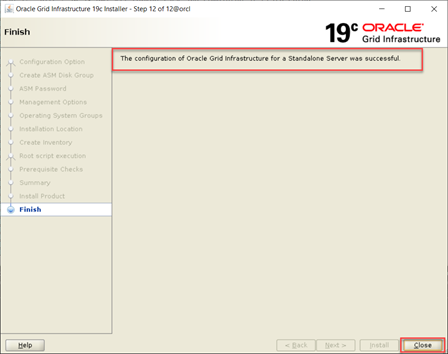
As seen below, we have successfully installed the Grid.
![]()