 Database Tutorials MSSQL, Oracle, PostgreSQL, MySQL, MariaDB, DB2, Sybase, Teradata, Big Data, NOSQL, MongoDB, Couchbase, Cassandra, Windows, Linux
In today’s article, we will answer the question of How to Install Oracle Linux 6.
The link of the Oracle operating systems preparation page is below, you can optionally pull the current version or access the .iso file from the archive.
What we need to pay attention to in this regard is that if you are going to install Database 11G after this installation, you need to install Oracle Linux 6.
Oracle Linux 7 works effectively with Database 12C. In cases where Database 11G is installed, there are problems with services and institutions.
1 | https://edelivery.oracle.com/osdc/faces/Home.jspx |
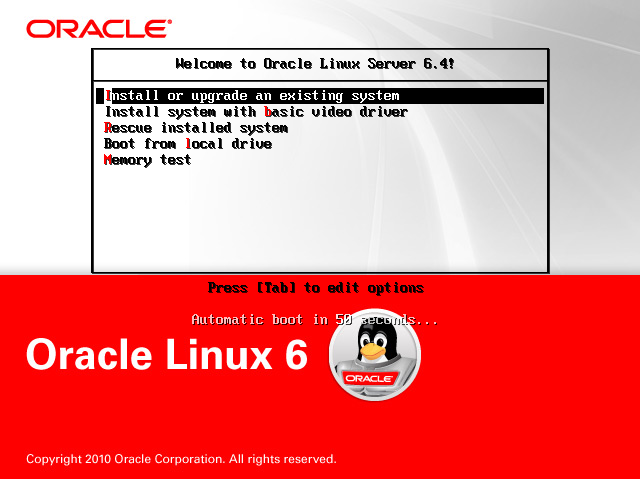
If we are using it on a dvd or virtual server, let’s boot the system from our .iso file. ( Those who use HYPER-V should install the virtual server Generic 1. ). When the boot process is completed, you will see the welcome screen of Oracle Linux. Here we will say “Install or upgrade an existing System”.
Critical Detail: We may experience difficulties with the video card in some institutions. For example, if we are using an Nvidia graphics card, you may encounter an installation error. At this point, the “Install System with basic video driver” option should be selected.
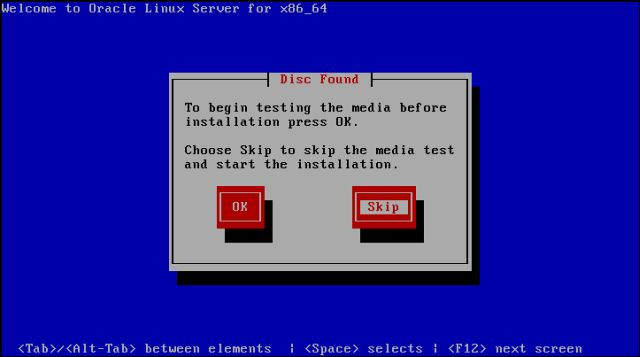
When we start the installation on the welcome screen, you will see the following screen. On this screen, Linux wants to check if there are any corrupted installation files before installation.
Here you can review by saying “OK” or skip this screen by saying “SKIP”. We will skip this screen by saying “SKIP”.
We continue by saying “NEXT” on the Welcome screen.

We choose the operating system language option, I always choose ” ENGLISH ” in institutions and say ” NEXT “. (You can make a different choice depending on the situation.)

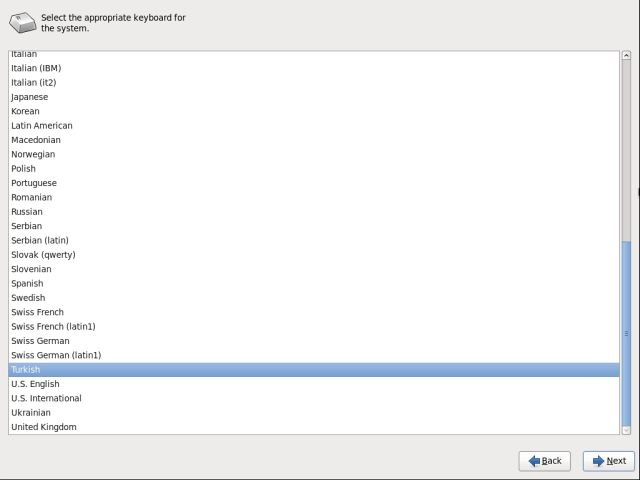
We say “NEXT” by saying “turkish” in keyboard language. (You can make a different choice depending on the situation.)
We will select the storage unit for the operating system. Since we will build our institutions on the local disk, we mark “Basic Storage Devices” and say “NEXT”.

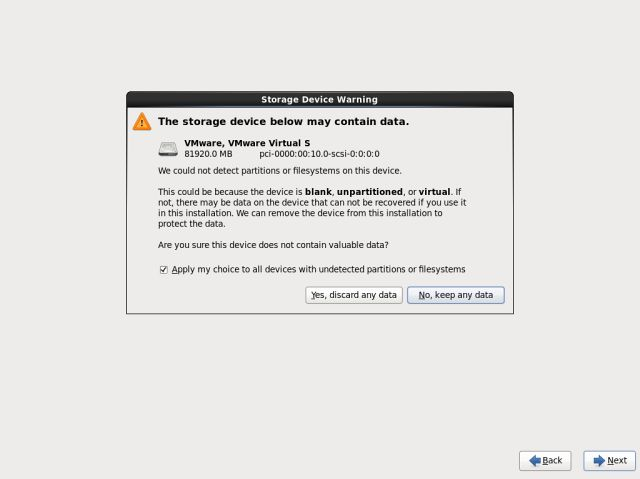
Since our installation is done on VMWARE, we will receive a warning that some edits will be made on the disk.
I continue by clicking the “Yes, discard main data” button. If the installation was done directly in the physical environment, we would not see this screen.
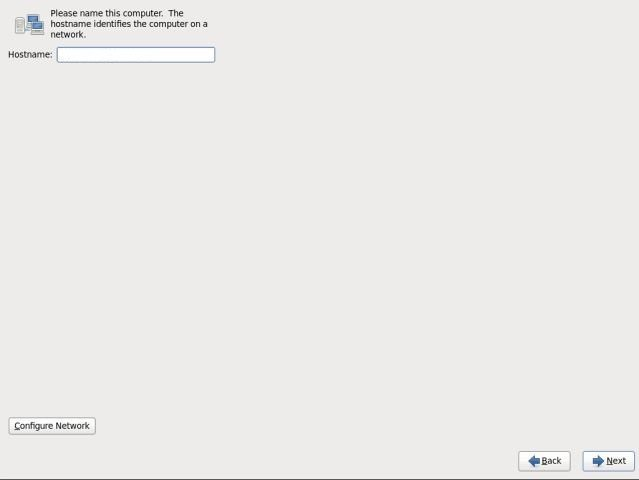
I am writing the Hostname (server name) of our operating system including the domain address. (for example: machinedi.domain.com.tr ). Then we click on the “Configure Network” button in the lower left part.
In this section, we will make our network settings. During the installation, the operating system first comes with “DHCP” enabled and gets an IP address through a DHCP server in our network. But we will give our operating system a static IP address.
“ In the last stage of the document, when the installation is finished, we will also have operations in the /etc/hosts file. “
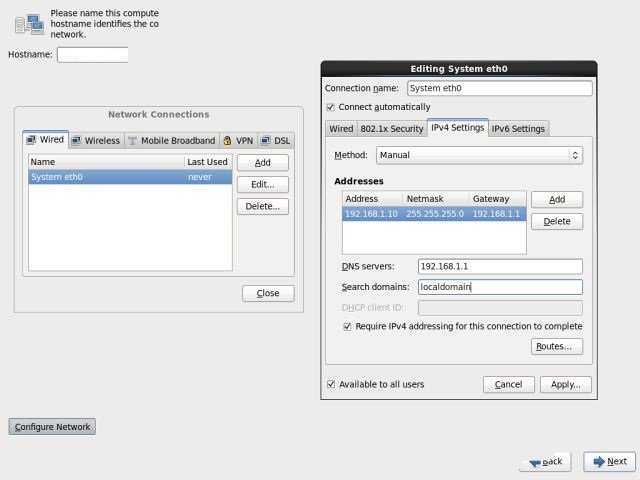
When our operating system is turned on, you need to confirm the “Connect automatically” section for the network connection to start automatically. Otherwise, since the network connection will be closed every time our operating system is turned on, we will have to activate it manually.
Since we will not use “DHCP” in our operating system, we come to the “IPv4 Settings” tab and select “Manual” in the Method field. The screen will become active and we will press the “add” button as the second step.
Here we will number according to our IP structure. Since I am using ” 192.168.1X/24 “, this is given in the example below. You can adapt it according to your own structure.
After making the network configuration, we confirm the operations by clicking the “apply” button and go to the other page by saying “NEXT”.
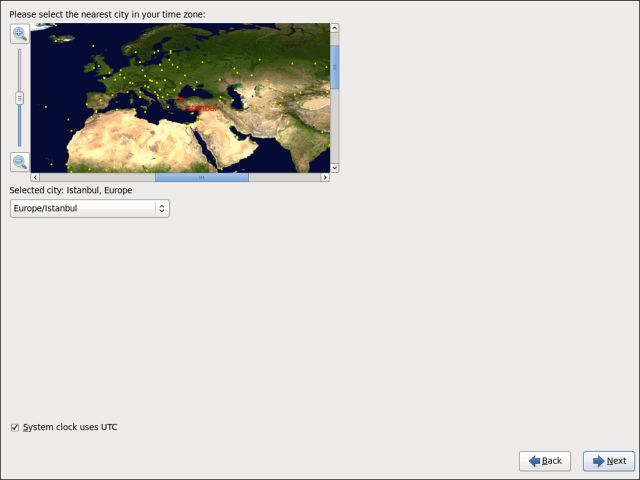
After the network settings, you will see the regional language settings, here we select the Country / City depending on your location, and continue with the “NEXT” button. (I chose Istanbul)
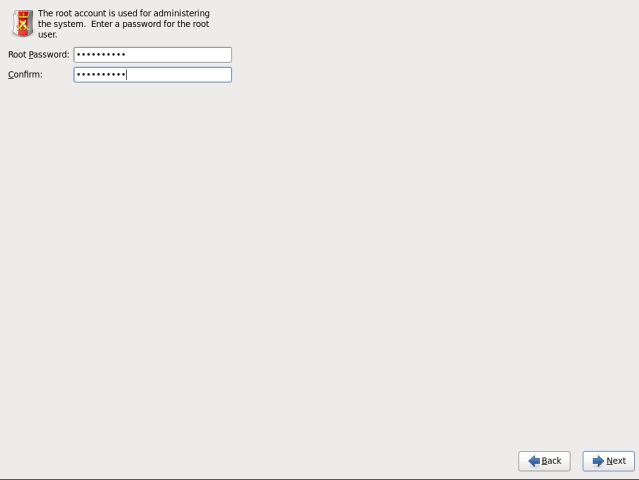
The most important part for our operating system is the “root” password. Root password should contain special characters, letters and numbers as much as possible. You can learn the current password procedure from the volume manager.
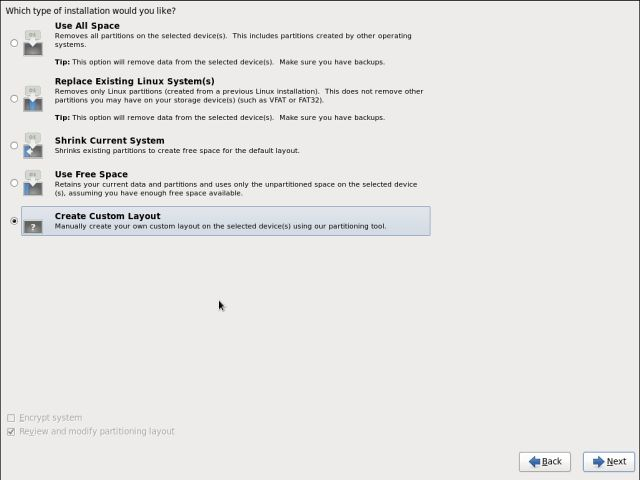
In this section, we will do hard disk partitioning. Since we are doing the first installation, we mark the “Create custom layout” section and press the “NEXT” button.
Since we reserved 80GB of space for the test installation, we can now see the entire disk.

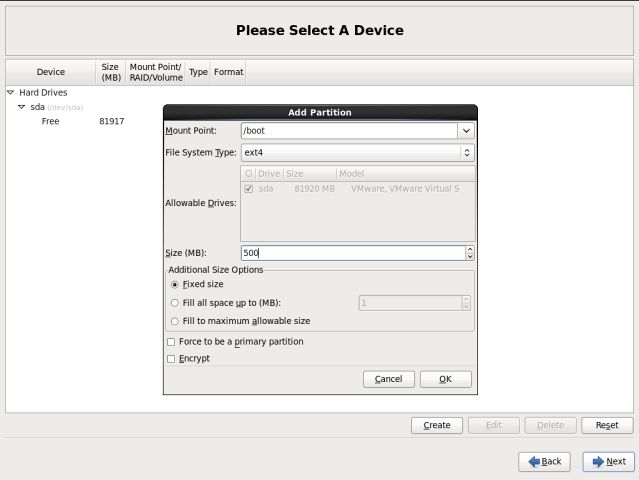
In the partition section, we will first create a 500MB space for our “boot” files. Our purpose in creating this area is to allow the operating system to independently dump the boot files there.
You can see that this area has not been established in different articles or documents, I always recommend it in terms of both habit and management.
To create the boot area, we press the “Create” button and select the “Standard Partition” and press the “OK” button.
We will get the following screen. You can fill it as you see in the picture. “You only need to type 500 as its size is in MB”
Mount Point : /boot
File System Type: ext4
Size (MB): 500
Fixed size will be selected
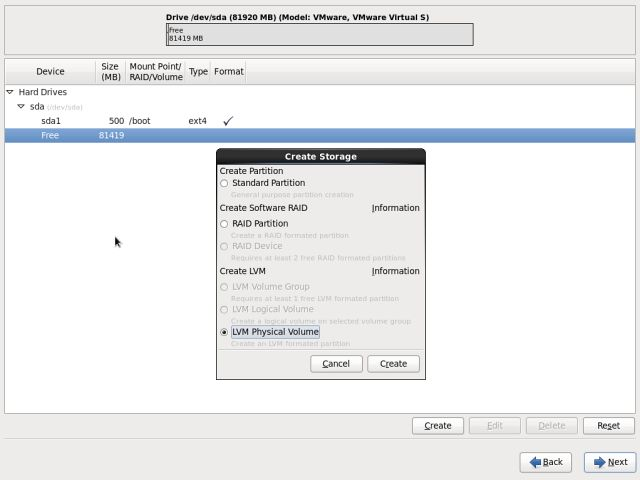
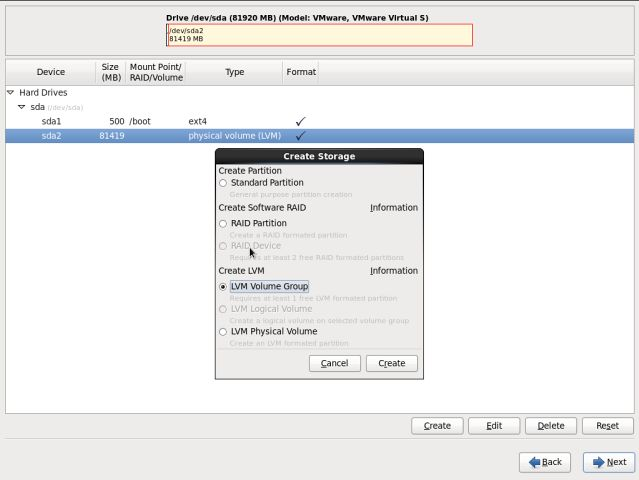
In the second step of the partitioning process, we click the “Create” button again to create the remaining disk space and select “LVM Pyhsical Volume” and click the “Create” button again.
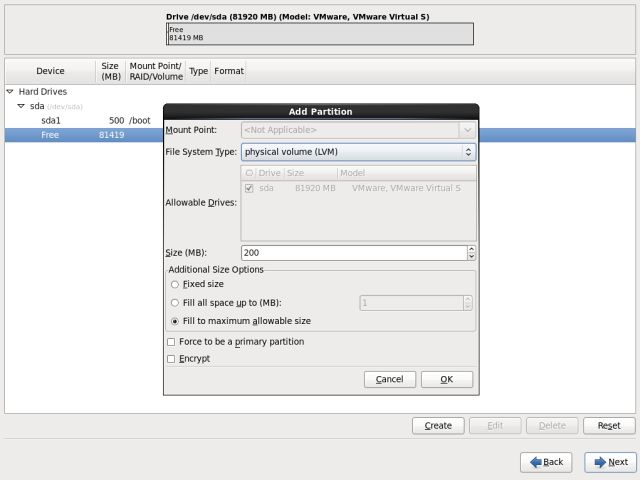
In the window that opens, we mark the “Fill to maximum allowable size” field and press the “OK” button.
As seen in the picture below, “LVM Pyhsical Volume” has been created, Now we will create “LVM Volume Group” and assign the remaining parts here. With the Physical Volume ( LVM) selected, we click the create button.

On the screen that opens, we select “LVM Volume Group” and click the “Create” button.
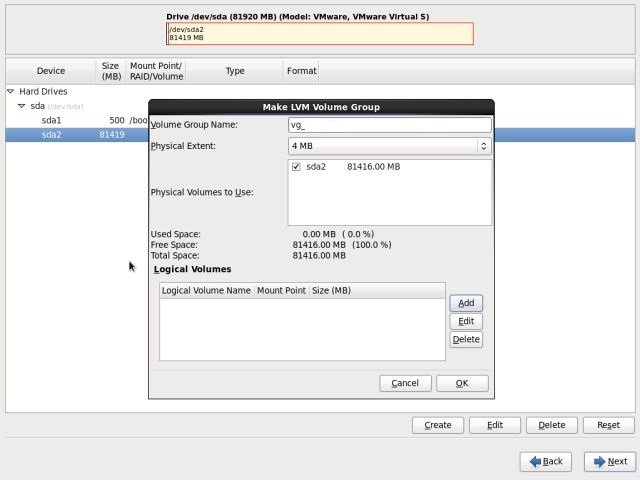
At this stage, we will create the “Volume Group” and our sections under it. You can give any name to “Volume Group Name” without using special characters or spaces.
In order to be remembered, the letters “vg”, which is the abbreviation of “volume group”, can be used. After naming, we press the “add” button and start the additions.
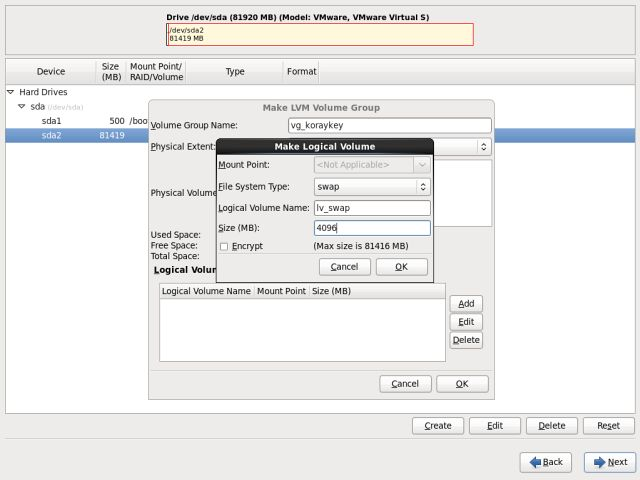
When creating a partition, we will first create a swap space. Since we will use our operating system in Oracle DB at the same time, we will need it with a certain condition.
I honestly recommend adding it anyway. Swap space varies according to the RAM capacity of the server. You can give the following capacities in accordance with Oracle recommendation.
If there is a RAM between 0 – 256 MB, 3 times the RAM size
2 times the RAM size if there is a RAM between 256MB and 512MB
If there is a RAM between 512 MB and 2GB, it is 1.5 times the RAM size.
If there is a RAM between 2GB – 16GB, as much as the RAM size.
There is more than 16GB of ram 16GB swap space should be created.
You can view the current values at the address below.
1 | http://tahiti.oracle.com. |
We will use “lv_swap” as “Logical Volume Name” while creating our swap space. Again, in accordance with the picture below, we write the swap area size in Megabytes.
When calculating the space here, for example, if we are going to assign 4GB swap space, we can specify 1024*4=4096MB. In case the swap space is low, different errors may be received while setting up the DB. After the required amount is assigned, we continue by pressing the “OK” button.
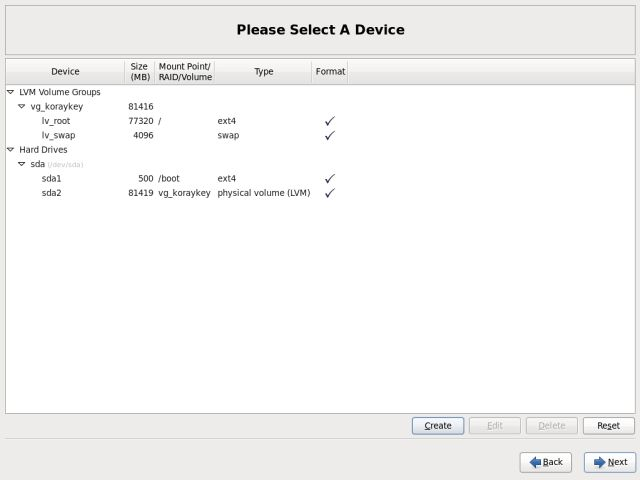
After adding the swap, it was time to create the “ / “ and temp fields. Under normal conditions, it is sufficient to write ” / ” in the “Mount Point” field to allocate the remaining disk space to Linux. Since we will connect all our space to the root disk, we act like the picture below and press the “OK” button.

If we need to create partitions such as “/u01” or “/tmp”, we can share with appropriate “SIZE ( MB ) “ sizes by following the same steps.
The only point to note here is that the root domain must be created first. In other words, after adding swap first, the “ / “ forehead should be formed, then you can make other partitions.
You will create “/tmp” for Oracle database installation and other operations, it is sufficient to allocate 10GB of space for this area. After the necessary procedures, we continue by saying “NEXT”.
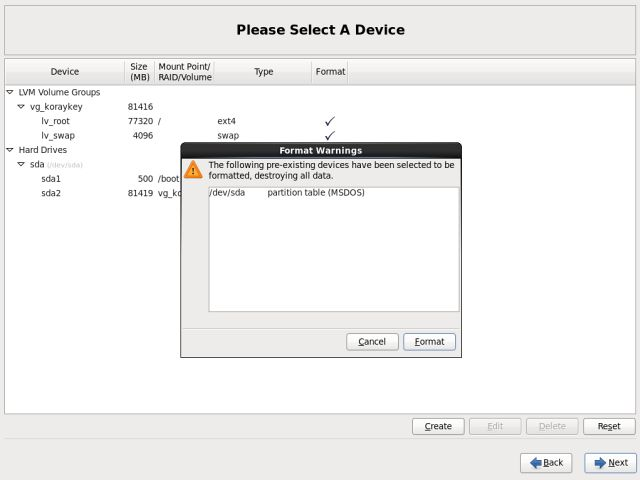
After pressing the “NEXT” button, Linux gives us the message that the raw fields are formatted. Click on the “FORMAT” button and move on to the next steps.
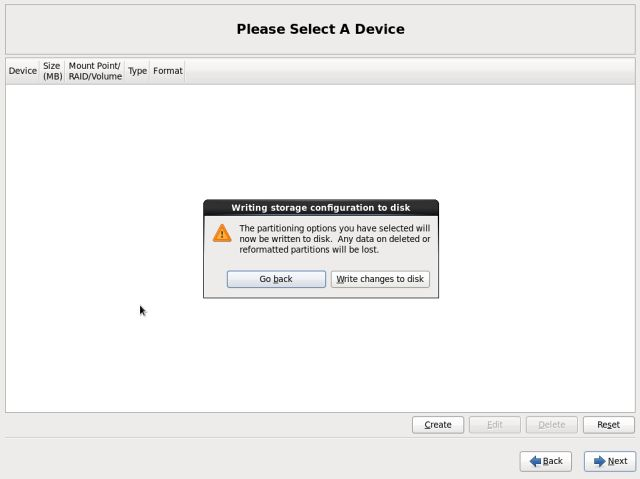
After the disk formatting process is completed, we press the “Write changes to disk” button that the change will be applied.
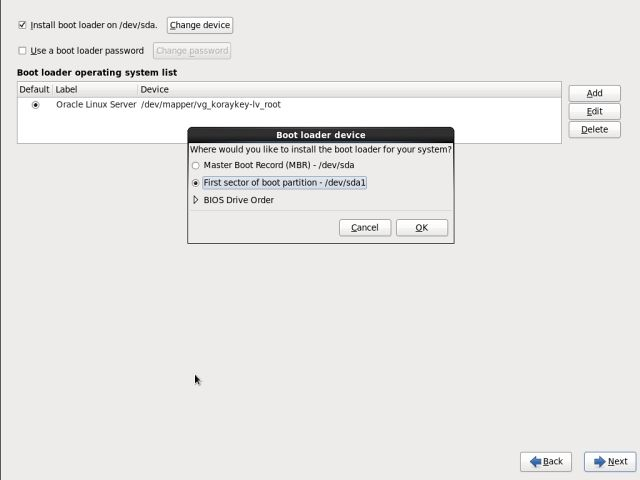
In this process of installation, we will specify where to write the Boot Loadet boot files. While sharing the disk, we have allocated 500 MB of swap space, we will choose the boot area here.
While the “Install boot loader on /dev/sda box is checked, we click on the “Chance Device” button and mark the “First sector of boot partition-/dev/sda1” part and press the “OK” button.
By clicking the “NEXT” button, we proceed to the package installations. (On this screen, the “Database Server” and the “Custumize Now” option at the bottom must be checked)
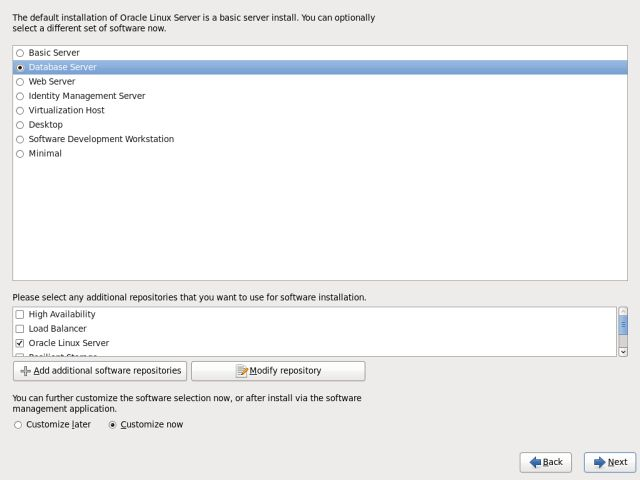
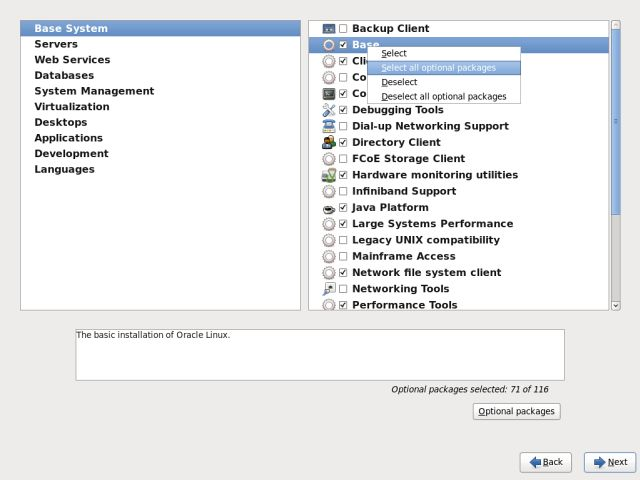
There is a list below for package installations. The point to be considered is that when choosing packages, it is not enough to just mark them. You need to right click and select with “Select all optional packages“.
The purpose of doing this is that when we select it in this way, it automatically chooses its own sub-packages, if any. After the following packages are selected, we continue by saying “NEXT”.
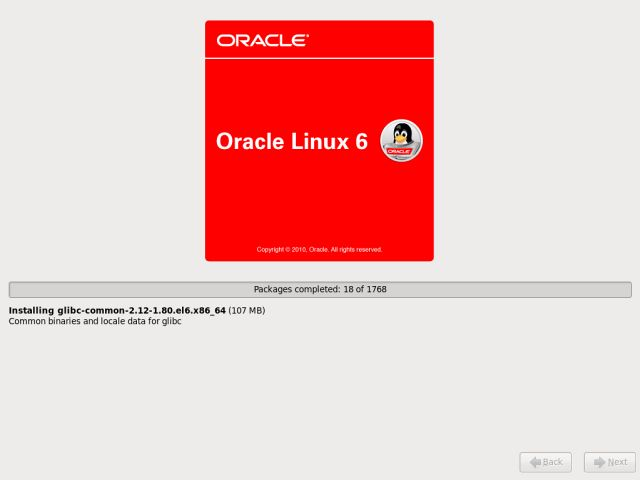
Our operating system will be installed in a time that varies according to the amount of installation package and resources.
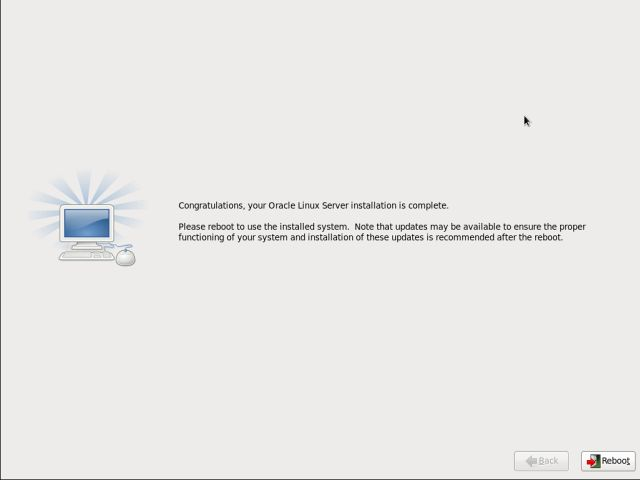
When the installation process is finished, you will be prompted to “Reboot”. We reboot for our final settings.
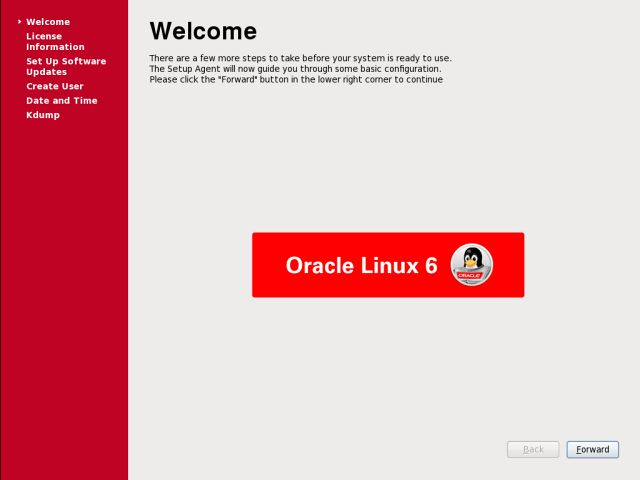
After the reboot, the screen where we will make the final adjustments will appear. We continue by clicking the “Forward” button.
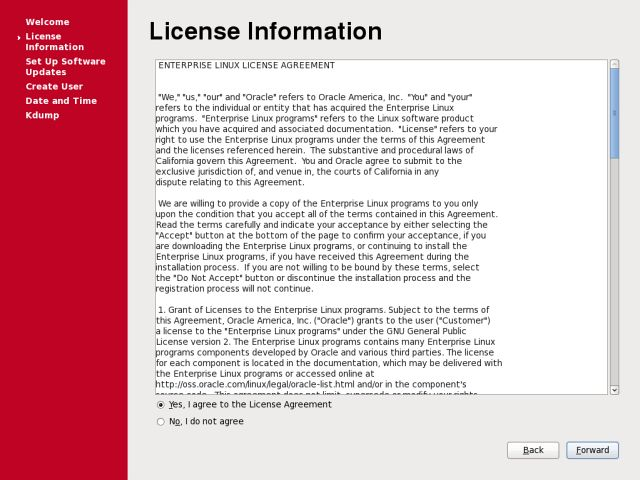
We tick the “Yes, I agree License Agreement” option and click “Forward”.
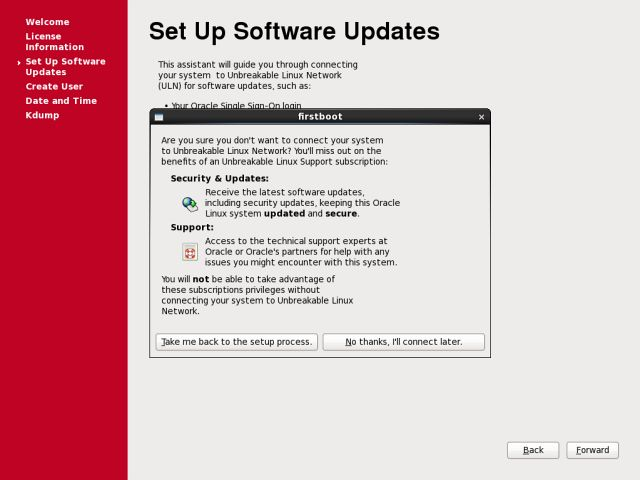
We click “No , I prefer to register at a later time” and say “Forward”.

We get a warning because we did not enter a user account, we choose “No Thanks I’II connect later” and say “Forward”.
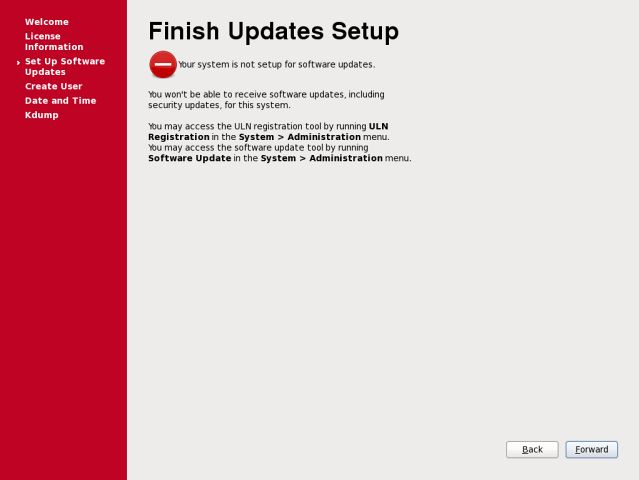
After the license and update presets are finished, we continue by saying “Forward”.
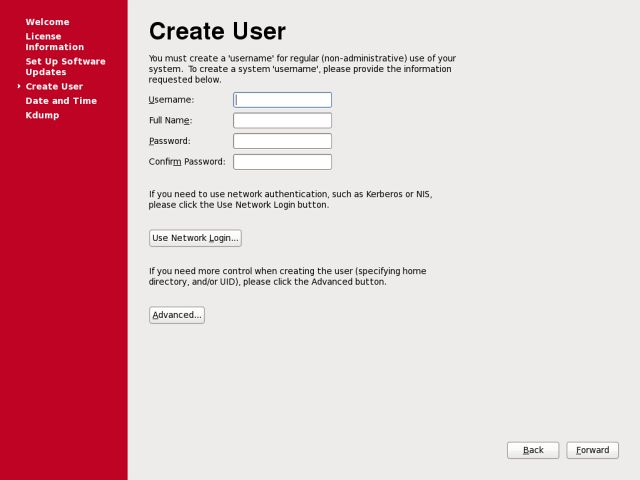
On this screen, we can create a user if necessary, but since the “Oracle” user is already there, we don’t need it, with exceptions. We say “Forward” and pass.
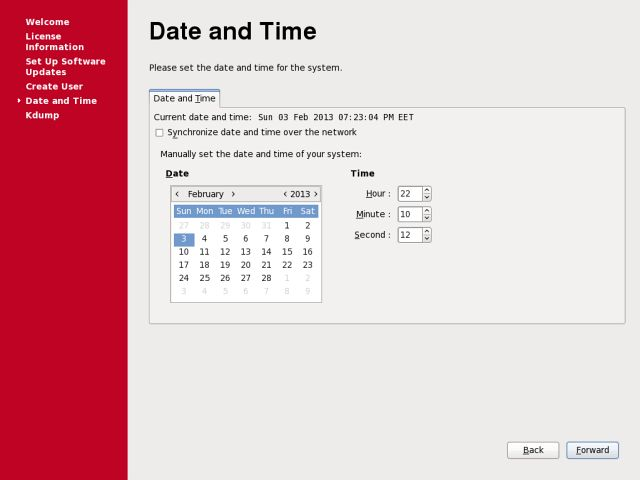
After checking the operating system time and date, we say “Forward”. ( If our structure moves to the cluster structure in the future, it is useful to synchronize it with the network later on. )
We finish the installation by clicking the “Finish” button in the Kdump area.
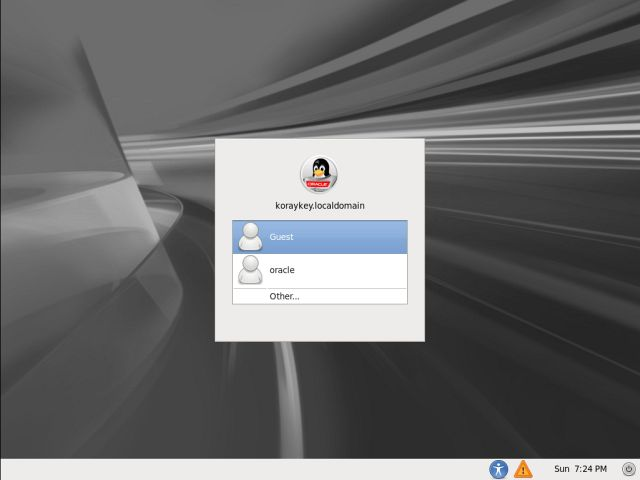
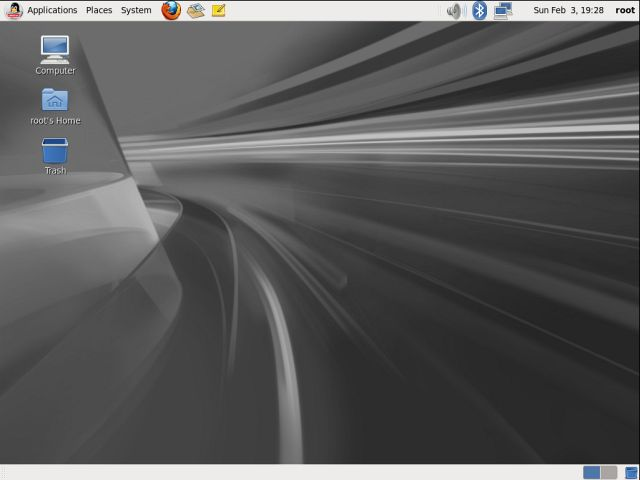
This is how the installation ends. After our operating system is opened, we will encounter the user login screen. On this screen, we will log in as the “root” user by saying “other”. Oracle password will be created later.
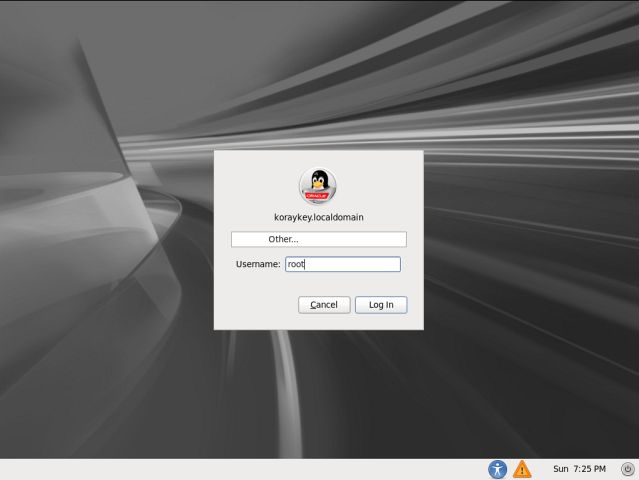
We enter the Linux world by entering the “root” password on the username and the root password that you set in the first installation.
After login, we will receive a warning, as root password is fully authorized, permanent damage may occur in the wrong hands. We click “Do not Show me this again” and click “Close” and we see the desktop.
By the way, if you do this setup during the daytime, the desktop color will be red. Linux sets the desktop color according to the time of day.
Installation finished
” If you want to operate with an oracle user, you can open a terminal window with the root user and assign an oracle password with the passwd command. ”
Sample :
$passwd oracle
![]()