 Database Tutorials MSSQL, Oracle, PostgreSQL, MySQL, MariaDB, DB2, Sybase, Teradata, Big Data, NOSQL, MongoDB, Couchbase, Cassandra, Windows, Linux
Azure Arc SQL Server is a part of Azure Arc that allows you to take advantage of Azure services in the management of your SQL Server environments in your own data center (On-Prem) or cloud environments.
We said Azure Arc SQL Server is part of Azure Arc, but what is Microsoft Azure Arc?
Azure Arc is currently supported in East US, East US 2, West US 2, Australia East, Southeast Asia, North Europe, West Europe, UK South. Also for using Azure Arc
Microsoft.HybridCompute,
Microsoft.GuestConfiguration,
Microsoft.AzureArcData
You need to Register the Resource Provider named in your Azure subscription.
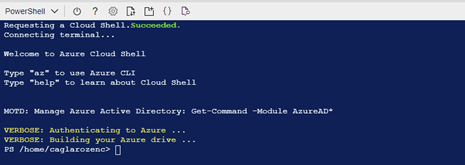
You can do the registration process through the Azure Portal or you can do it through Powershell. To do it with Powershell over Azure Cloud Shell;
1 2 3 | Register-AzResourceProvider -ProviderNamespace Microsoft.HybridCompute Register-AzResourceProvider -ProviderNamespace Microsoft.GuestConfiguration Register-AzResourceProvider -ProviderNamespace Microsoft.AzureArcData |
Operating systems supported by Azure Arc;
Windows Server 2012 R2 and higher (including Windows Server Core)
Ubuntu 16.04 and 18.04
CentOS Linux 7
SUSE Linux Enterprise Server (SLES) 15
Red Hat Enterprise Linux (RHEL) 7
Amazon Linux 2
Azure Arc data services aim to manage your cloud resources in a hybrid structure with the resource in-house.
So, how does this happen? At this point, Microsoft is expanding its Azure Resource Manager (ARM) to include these resources.
ARM made it possible to install, deploy, manage and monitor Azure resources as a single group.
We can say that Azure Arc is an extended service to organize ARM on-premises or any cloud resources. Under the umbrella of Azure Arc;
1. Azure Arc-Enabled Server (Azure Arc Servers)
2. Azure-Enabled Kubernetes (Azure Arc Kubernetes)
3. SQL Server with Azure Arc (Azure Arc SQL Server)
4. Azure-Enabled Data Services (Azure Arc Data Services)
you can use.
To start using Azure Arc SQL Server, we follow the Azure Arc route to All Services through the Azure Portal.

We select SQL Server (Preview) from the menu on the left and click the Create SQL Server – Azure Arc button in the middle of the page.

A screen showing the Azure Arc SQL Server requirements will meet you.

As a requirement on the screen, a virtual or physical server running SQL Server, an account with administrative rights to apply Azure permissions, and Azure Powershell are required.
Assuming that this environment is ready, we click on the Next: Server Details button at the bottom left and continue.
As an environment, we have a server named DMCAZUREARCSQL that we have located on AWS and has SQL Server 2019 Standard Edition installed on it.
We will also be running the powershell code blocks that are requested to be run on the following screen through this server.
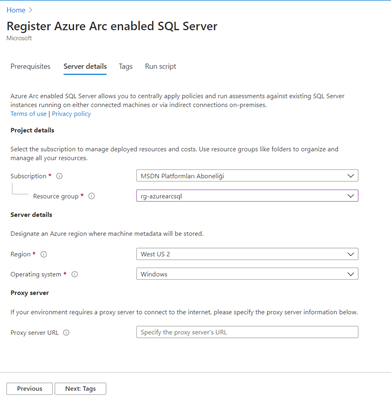
You see the Server Details image below. On this screen, it requests some information from us.

The first of the information on Picture-5 is the selection of the Subscription we are working with, and the second information is the resource group that it wants us to choose depending on this Subscription.
Since there is no defined resource group, let’s type resource group on the search screen just above and create a new resource group from the resource group section.
For our example, we created a resource group named rg-azurearcsql in West-US 2.
Region information and operating system information are requested in the server details section.
Currently, the region information accepted by Azure Arc SQL Server is as follows.

Since the resource group we created is in West US 2 and we have selected it, West US 2 will come directly in this section.
In the Operating System part, it asks us where the SQL Server, which we will include in Azure Arc, is running.
You know, now SQL Server can run on Linux.
For this reason, you can see Windows and Linux in the list. In our example, we choose Windows because our operating system is Windows Server 2019.
In the Proxy Server part, if we are using a proxy while accessing SQL Server, it asks us to write it.
Since there is no proxy in our example, we leave this field blank and move on to the next screen.
On the Tags screen, which is the next screen, it asks us to fill in some tag fields for this Azure Arc that we will create.
Of course, this screen is not mandatory.
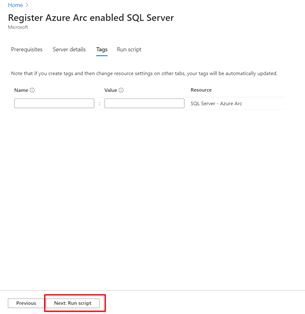
When we say Run Scripts as the last step, it gives us a powershell script that contains the definitions we have given and performs some agent installation processes.

Either copy the codes in Picture-9 or download them and transfer them to the server you will run.
We download it and transfer it to the server we want to run.
When you edit the Powershell file with Windows Powershell ISE or notepad, you will see that it primarily downloads an application named AzureConnectedMachineAgent and includes us in Azure.
In the following codes, you will see that there are code blocks that include installing the Azure Powershell module and extending SQL Server on Azure Arc.
In our example, we are running Windows Powershell ISE and it gives us a warning screen that Azure Powershell should be installed first.
Here we say Yes and allow the installation of the Azure Powershell module.

During the Azure Powershell installation, it asks for your confirmation in Nuget, and after you give this confirmation, it continues the installation process.

While the installation process is in progress, it will ask you to open a page from the browser and perform a verification process.

When you go to the Device Login page, it asks you to enter a code.
I enter the code seen in Picture-12 and on the next screen it asks me to choose my Microsoft Azure account that I want to process.
I select my required Azure account.

After choosing my Azure account, my process was completed successfully as seen in picture-13.
When I return to the Powershell screen, I see that my Azure Arc SQL Server Register operation was successful.
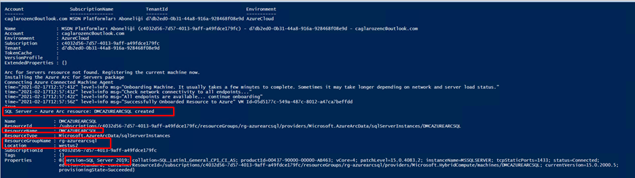
In line with the information seen in Picture 14, I confirm that I am now in a position to manage my server on AWS with Azure Arc from the Azure Portal, and I immediately come to the Azure Arc section through the Azure Portal and check it.

As you can see when registering for Azure Arc SQL Server, we have registered the server where SQL Server is running on Azure Arc.
We made both Azure Arc- Server and Azure Arc SQL Server with the only registration process you can understand.
So what features do they offer us? With the Azure Arc-Server facility,
I can manage my virtual server located in AWS from Azure according to the image below.

As you can see in the picture above, it allows me to do many features such as Update management, Log analysis, monitoring for potential security vulnerabilities.
So what’s on the Azure Arc SQL Server side?

Due to the fact that Azure Arc-SQL Server is also in preview, we see that its capabilities or features are limited for now,
but as it stands, it shows us that it will be a successful product as it evaluates the configuration of SQL Server’s health and monitors possible security vulnerabilities.
However, it seems that it will bring a new perspective to Hybrid environments with its Microsoft Azure Arc structure,
as it develops in solving difficulties such as Patch and version transitions,
Manually applied DBA tasks, Scale problems experienced in OnPrem environments.
![]()