 Database Tutorials MSSQL, Oracle, PostgreSQL, MySQL, MariaDB, DB2, Sybase, Teradata, Big Data, NOSQL, MongoDB, Couchbase, Cassandra, Windows, Linux
We need a Data Controller running on Kubernetes to be able to deploy Azure Arc-enabled data services to different cloud providers on-premises or in a hybrid cloud scenario.
With the Data Controller, you can implement Azure Arc integration and core functions such as management services into your own structure.
For this reason, Azure Arc Data Controller is of vital importance to us.
To summarize, you can use Azure Arc-enabled data services if you deploy Azure Arc Data Controller wherever you have infrastructure and can run kubernetes.
So, how to run or install the Data Controller, which is of such importance in the use of Azure Arc-enabled data services? Let me answer then…
It is very important at this point to start by knowing that Data Controller has two different connection types.
The connection type provides flexibility to choose how much data is sent to Azure and how users interact with the Arc data controller, and depending on the connection type selected, you may not be able to use some features of Azure Arc Data Services.
1. Directly Connected Mode: You can manage and use the management services through the Azure Portal.
2. Indirectly Connected Mode : It allows you to do most of the management services in your own environment without the need for Azure.
If you choose the direct connected connection type you can use the Azure Portal to use the Azure Resource Manager APIs, Azure CLI and Azure Arc data services, if you choose the Indirectly type you will need to send a minimal amount of data to Azure for inventory creation and billing purposes.

After all this theoretical knowledge, now it’s time to deploy the Data Controller to our Azure Kubernetes cluster. I can do this in two different ways.
1. Using Powershell
2. Using the Azure Portal
In the article, we will be performing our operations using both methods. For this reason, the first thing to do is open powershell and login to our azure account with little login. You can use this address to use Powershell and Azure.
1 | https://docs.microsoft.com/tr-tr/powershell/azure/install-az-ps?view=azps-5.7.0 |
Since we will use our AKS information using Azure Data Studio, we will need powershell at some point, so we do not do everything through the Azure Portal.
Az login

When you use the az login command, you will open a web page in your default browser and ask you to verify your account, after these steps you will see the screen as above.
Then we will need a resource group to do our work. I am using the following code block to create a Resource Group.
1 | az group create --name rg-dmc-k8s --location eastus |

Now that the Resource Group is OK, I’m creating the Azure Kubernetes Cluster.
For this, I log into my Azure account and create a resource group named rg-dmc-k8s and create a kubernetes cluster named dmc-aks-arc in it. Here we will be making some changes as we create the AKS.

As you can see in Picture3, I changed Availability Zone to Zone 1 and Kubernetes version information to 1.19.6.
The reason for making changes in the Zone part is that Data Controller does not support different PVC distributions for now.
For this reason, if you want to deploy the Data Controller successfully, you should choose a single zone.
I changed the Kubernetes version information to 1.19+, you can change it according to your needs, but you need to check the azure arc support. (Minimum kubernetes version is 1.16 and above.) We switch to the “Networking” tab and continue with our adjustments.

As seen in Picture4, we activate the http routing part. In the final AKS configuration, I perform the last step through the “Integrations” tab.
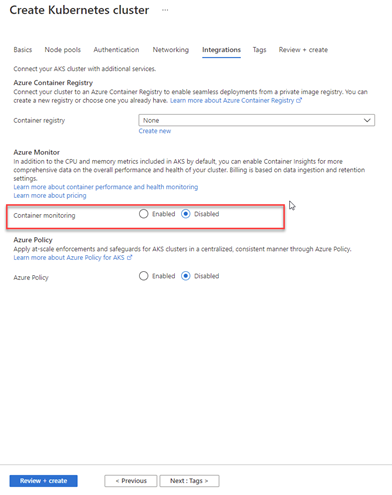
As seen in Picture 5, I turn off the Container Monitoring part. The reason is that I will monitor myself with AKS or Grafana. I will take advantage of Azure Arc blessings.
I did not make any adjustments to the other tabs such as “Node Pools”, “Authentication”. I left them as default and now it’s time to do my final checks and create my Azure Kubernetes Cluster. I get the cluster I want in an average of 10 minutes.
Then, as the first step, I get the credentials of my AKS with the help of powershell. For this process, the following code block will work for me.
1 | az aks get-credentials --resource-group rg-dmc-k8s --name dmc-aks-arc |

Second step; I am learning the name of the context with the code block below.
1 | kubectl config view -o jsonpath='{.contexts[*].name}' |
Third step; Now that I have learned the context information, I can confirm the correctness of the context I want to work with with the code block below.
You can see more than one context information and that’s why I use the following code block to see which one is active.
kubectl config current-context As seen in Picture7, I have only one config in this example. For this reason, I do not have to change the context information, but if there were more than one config, I could change the context with the command “kubectl config use-context WishContext Write”.

Now that we have migrated to the cluster we want, we will now need to learn the storage class of the cluster we are connecting to. We will need this information later.
kubectl get storageclass

If you are working in a k8s cluster with more than one storage class, you need to decide which one you want to work on.
By the way, you can host log and data files of kubernetes in different storage classes.
Publishing the Data Controller via Azure Data Studio When you open Azure Data Studio, Azure Arc Controllers is located in the Connection section of the menu on the left. Click on the “+” sign in that section.


As you can see in Figure 11, there are some pre-requisites, but we have installed these requirements while installing SQL Server in Azure Kubernetes. For this reason, we proceed quickly.

For this article, we created an Azure Kubernetes Cluster named dmc-aks-arc. For this reason, we continue by choosing this.


We log in to our Azure account with the sign in in Picture 14. Then it will be asking us for kubernetes information.
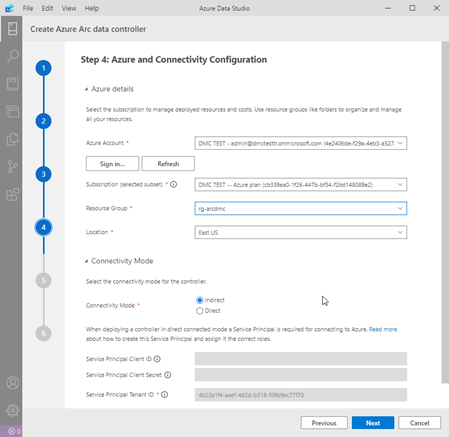
If you choose direct as the connection mode, it will ask you for an Azure service account. I’ll explain later how the Azure Service account is created.

As you can see in Picture 15, it asks us for some recognition for our data controller.


As you can see in Picture 17, we can show a final summary of the configuration we made with Azure Data Studio and take a printout from us as a notebook or deploy it. I bought a script as a notebook for our example.

We can run the notebook code blocks you see in Picture 18 separately, or we can run all of them by saying Run All above. However, one of the parts that should be noted here is that the variables defined in the Set variables section have come as i instead of the letter i.
In the code block, they are all listed as i. That’s why I change the parts that have i in the variables to i before executing the codes. If you run the codes after completing the changes, you will see Picture19.

As you can see in Picture 19, even though we performed the process using Azure Data Studio, it produces an azdata output for us and informs us about how to follow the process via powershell.
1 | kubectl get get pods -n arc |
We can observe what is going on using the above command.

We looked as shown in Picture 20, but when we looked at Picture 19 again, we saw that the process was continuing.
Instead of constantly running and checking the code in Picture20, I can add -watch to the same code and continue to observe.

The deployment of Azure Arc Data Controller took about 30 minutes. The time here will vary depending on the size of your Azure Kubernetes Cluster, the number of nodes and your internet speed.
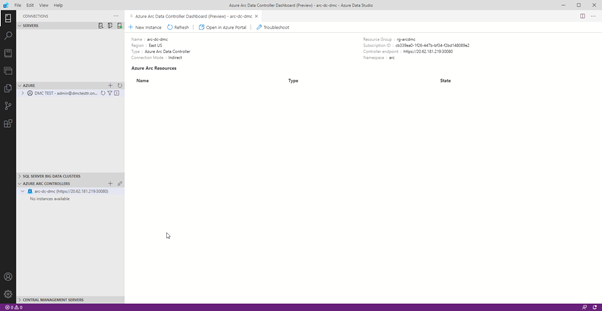
If you see the screen in Picture 22 on Azure Data Studio, you have successfully deployed Azure Arc Data Controller.

After successful deployment, you can login using the code block below. The code block will ask you for the Data Controller information you entered in ADS (Azure Data Studio).
1 | azdata login -ns arc |

If we have successfully logged into Arc, we can view our endpoints on arc using the code block below.
1 | azdata arc dc endpoint list -o table |

As you can see in Picture24, Azure gave us IP addresses for Arc Data Controler to perform different functions. Let’s connect the Endpoint address of the Cluster Management Service we obtained with ADS.

When the connection is successful, you can see it in the lower left part of the ADS as you can see in Picture26.

When you right-click on the Data Controller, the manage section will come and it’s time to use the features provided by Azure Arc-enabled data services.
In the next article, I will be explaining the Azure Arc-enabled Managed Instance setup. Next, I’ll be telling you how to create a PostgreSQL HyperScale Server Group with Azure Arc.
![]()