 Database Tutorials MSSQL, Oracle, PostgreSQL, MySQL, MariaDB, DB2, Sybase, Teradata, Big Data, NOSQL, MongoDB, Couchbase, Cassandra, Windows, Linux
HADOOP MULTI NODE INSTALLATION PROCESS
[ Note: I am creating multi node in most easiest way by creating and using everything in root mode on default users like (master, slave1, slave2…etc). Please don’t create any hadoop users like (hadoop, hduser, …etc) to configure and share hadoop installations. I am using root user in all machine to make connection for multi node.]Step 1: Update one or all packages on your system
1 | $ yum update |
Step 2: Update packages taking obsoletes into account
1 | $ yum upgrade |
Step 3: Check the hostname in master & slave systems and rename it accordingly
***check host name of master and slaves by using below command***
1 | $ hostname |
***rename hostname of your machines***
In Master machine:
1 | $ nano /etc/hostname |
***similarly for slaves***
In Slave Machines:
1 | $ nano /etc/hostname |
slave2
Step 4: Edit /etc/hosts
Now lets ssh into master, slave1, slave2 and change the /etc/hosts file, so that we can use hostname instead of IP everytime we wish to use or ping any of these machines
1 | $ vim /etc/hosts |
***Add the ip address and hostname of your master and slave machines by using below lines in master, slave1, slave2***
192.168.1.9 master
192.168.1.3 slave1
192.168.1.23 slave2
Step 5: Generate password-less Ssh key:
Install OpenSSH Server:
1 | # yum install openssh-server |
Make sure port 22 is opened:
1 | # netstat -tulpn | grep :22 |
Edit /etc/sysconfig/iptables (IPv4 firewall):
***If iptable is not installed in machine. Please follow step 6 to install iptable***
1 | # vi /etc/sysconfig/iptables |
***Add the below line and save it***
1 | -A RH-Firewall-1-INPUT -m state --state NEW -m tcp -p tcp --dport 22 -j ACCEPT |
Start OpenSSH Service:
1 | # service sshd start |
1 | # chkconfig sshd on |
1 | # service sshd restart |
If your site uses IPv6, and you are editing ip6tables, use the line:
***Add the below line and save it***
-A RH-Firewall-1-INPUT -m tcp -p tcp –dport 22 -j ACCEPT
Restart iptables:
1 | # service iptables restart |
Generate public ssh key:
In master machine
Create ssh key:
***create password-less public ssh key by using below command***
1 | [root@master ~]# ssh-keygen -t rsa -P '' -f ~/.ssh/id_rsa |
*** adding the public key to the authorized_keys file by using below command***
1 | [root@master ~]# cat ~/.ssh/id_rsa.pub >> ~/.ssh/authorized_keys |
Set right and Authorizing permission to ssh key:
1 | [root@master ~]# chmod 0600 ~/.ssh/authorized_keys |
Copy ssh key from master to slave1:
***Only the public key is copied to the server(slave1, slave2) by using below commands. The private key should never be copied to another machine***
1 | [root@master ~]# ssh-copy-id -i $HOME/.ssh/id_rsa.pub root@slave1 |
[Note: If above command shows error. Please follow step 6 to Configure and Disable firewall and iptables]
Copy ssh key from master to slave2:
1 | [root@master ~]# ssh-copy-id -i $HOME/.ssh/id_rsa.pub root@slave2 |
[Note: If above command shows error. Please follow step 6 to Configure and Disable firewall and iptables]
Test the new key:
***pinging ssh connection from master to their own ***
1 | [root@master ~]# ssh master |
***pinging ssh connection from master to slave1 machine***
1 | [root@master~]# ssh slave1 |
***pinging ssh connection from master to slave2 machine***
1 | [root@master~]# ssh slave2 |
In slave1 machine
Create ssh key:
***create password-less public ssh key by using below command***
1 | [root@slave1 ~]# ssh-keygen -t rsa -P '' -f ~/.ssh/id_rsa |
*** adding the public key to the authorized_keys file by using below command***
1 | [root@slave1 ~]# cat ~/.ssh/id_rsa.pub >> ~/.ssh/authorized_keys |
Set right and Authorizing permission to ssh key:
1 | [root@slave1 ~]# chmod 0600 ~/.ssh/authorized_keys |
Copy ssh key from slave1 to master:
***Only the public key is copied to the server(slave1, slave2) by using below commands. The private key should never be copied to another machine***
1 | [root@slave1 ~]# ssh-copy-id -i $HOME/.ssh/id_rsa.pub root@master |
[Note: If above command shows error. Please follow step 6 to Configure and Disable firewall and iptables]
Copy ssh key from slave1 to slave2:
1 | [root@slave1 ~]# ssh-copy-id -i $HOME/.ssh/id_rsa.pub root@slave2 |
[Note: If above command shows error. Please follow step 6 to Configure and Disable firewall and iptables]
Test the new keys:
***pinging ssh connection from slave1 to their own ***
1 | [root@slave1 ~]# ssh slave1 |
***pinging ssh connection from slave1 to master machine***
1 | [root@slave1 ~]# ssh master |
***pinging ssh connection from slave1 to slave2 machine***
1 | [root@slave1 ~]# ssh slave2 |
In slave2 machine
Create ssh key:
***create password-less public ssh key by using below command***
1 | [root@slave2 ~]# ssh-keygen -t rsa -P '' -f ~/.ssh/id_rsa |
*** adding the public key to the authorized_keys file by using below command***
1 | [root@slave2 ~]# cat ~/.ssh/id_rsa.pub >> ~/.ssh/authorized_keys |
Set right and Authorizing permission to ssh key:
1 | [root@slave2~]# chmod 0600 ~/.ssh/authorized_keys |
Copy ssh key from slave2 to master:
***Only the public key is copied to the server (slave1, slave2) by using below commands. The private key should never be copied to another machine***
1 | [root@slave2 ~]# ssh-copy-id -i $HOME/.ssh/id_rsa.pub root@master |
[Note: If above command shows error. Please follow step 6 to Configure and Disable firewall and iptables]
Copy ssh key from slave2 to slave 1:
1 | [root@slave2 ~]# ssh-copy-id -i $HOME/.ssh/id_rsa.pub root@slave1 |
[Note: If above command shows error. Please follow step 6 to Configure and Disable firewall and iptables]
Test the new keys:
***pinging ssh connection from master to their own ***
1 | [root@slave2 ~]# ssh slave2 |
***pinging ssh connection from slave2 to master machine***
1 | [root@slave2 ~]# ssh master |
***pinging ssh connection from slave2 to slave1 machine***
1 | [root@slave2 ~]# ssh slave1 |
Step 6: Disable Firewall and Iptable
[Note : Follow this steps only if you’re facing problem in ssh connection or pinging between master and slave machines]Disable firewalld:
1 | $ systemctl disable firewalld |
Stop firewalld:
1 | $ systemctl stop firewalld |
Check the status of firewalld:
1 | $ systemctl status firewalld |
***since the firewalld service should not be started manually while the iptables services are running hence to prevent the firewallservice from starting automatically at boot***
1 | $ systemctl mask firewalld |
Install iptable:
1 | $ yum install iptables-services |
Enable iptable:
1 | $ systemctl enable iptables |
Start iptable:
1 | $ systemctl start iptables |
Stop iptables:
1 | $ service iptables stop |
Stop ip6table:
1 | $ service ip6tables stop |
Step 7: Installing Java 1.8
[ Note: Install java individually on master machine and slave machines]***Download jdk 1.8 from oracle website***
1 | http://www.oracle.com/technetwork/pt/java/javase/downloads/jdk8-downloads-2133151.html |
***Extract jdk-1.8 rpm file by using below command***
1 | $ rpm -ivh /home/Download/jdk-8u181-linux-x64.rpm |
***move the extracted java file from /home/Download to /usr/local ***
1 | $ mv /home/Download/jdk1.8.0_181 /usr/local/ |
Step 8 : Installing Hadoop
[ Note: Download and Install hadoop in master machine alone and share the hadoop installed folder to slave machines]***Use the below command to download hadoop-3.1.0 in master system***
1 | $ wget https://archive.apache.org/dist/hadoop/core/hadoop-3.1.0/hadoop-3.1.0.tar.gz |
***move the hadoop-3.1.0.tar.gz file from /home/Download to /usr/local in master system***
1 | $ mv /home/Download/hadoop-3.1.0.tar.gz /usr/local |
***To extract or untar the hadoop-3.1.0 file***
1 | $ tar -xzvf /usr/local/hadoop-3.1.0.tar.gz |
Step 9: Edit Hadoop Configuration Files
1. Edit ~/.bash_profile
1 | $ nano ~/.bash_profile |
****Add the below lines*****
1 2 3 4 5 6 7 8 9 10 11 12 13 14 15 16 | #Set Java-related environmental variables export JAVA_HOME=/usr/local/jdk1.8.0_181-amd64 export PATH=$PATH:$JAVA_HOME/bin # Set Hadoop-related environment variables export HADOOP_HOME=/usr/local/hadoop-3.1.0 export HADOOP_MAPRED_HOME=$HADOOP_HOME export HADOOP_COMMON_HOME=$HADOOP_HOME export HADOOP_HDFS_HOME=$HADOOP_HOME export YARN_HOME=$HADOOP_HOME export HADOOP_COMMON_LIB_NATIVE_DIR=$HADOOP_HOME/lib/native export PATH=$PATH:$HADOOP_HOME/sbin:$HADOOP_HOME/bin export HADOOP_INSTALL=$HADOOP_HOME # Add Hadoop bin/ directory to PATH export PATH=$PATH:$HADOOP_HOME/sbin:$HADOOP_HOME/bin |
***source it to reflect changes***
1 | $ . ~/.bash_profile |
***Now Check the JAVA VERSION using below command***
1 | $ java –version |
***Now Check the HADOOP VERSION using below command***
1 | $ hadoop version |
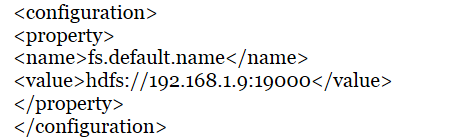
2. Edit core-site.xml
1 | $ vim core-site.xml |
****Add the below lines*****
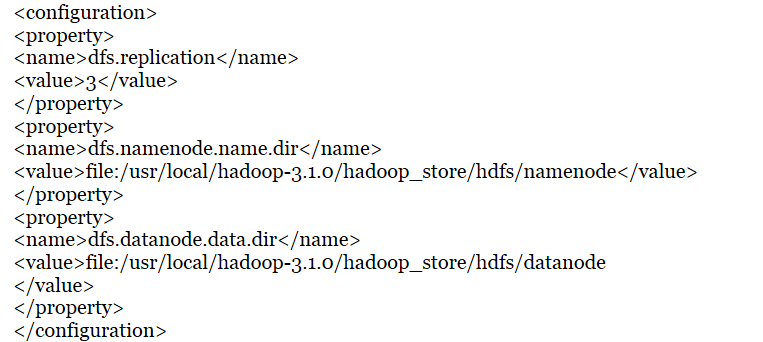
3. Edit hdfs-site.xml
1 | $ vim hdfs-site.xml |
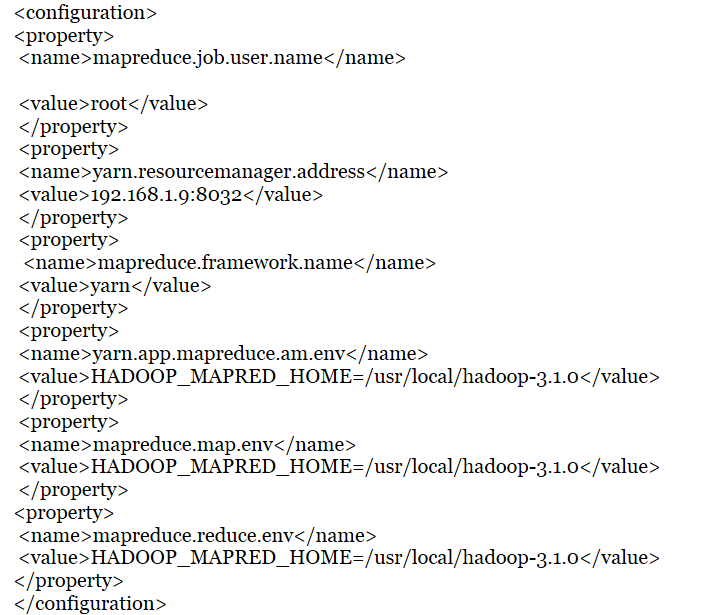
4. Edit mapred-site.xml
1 | $ vim mapred-site.xml |
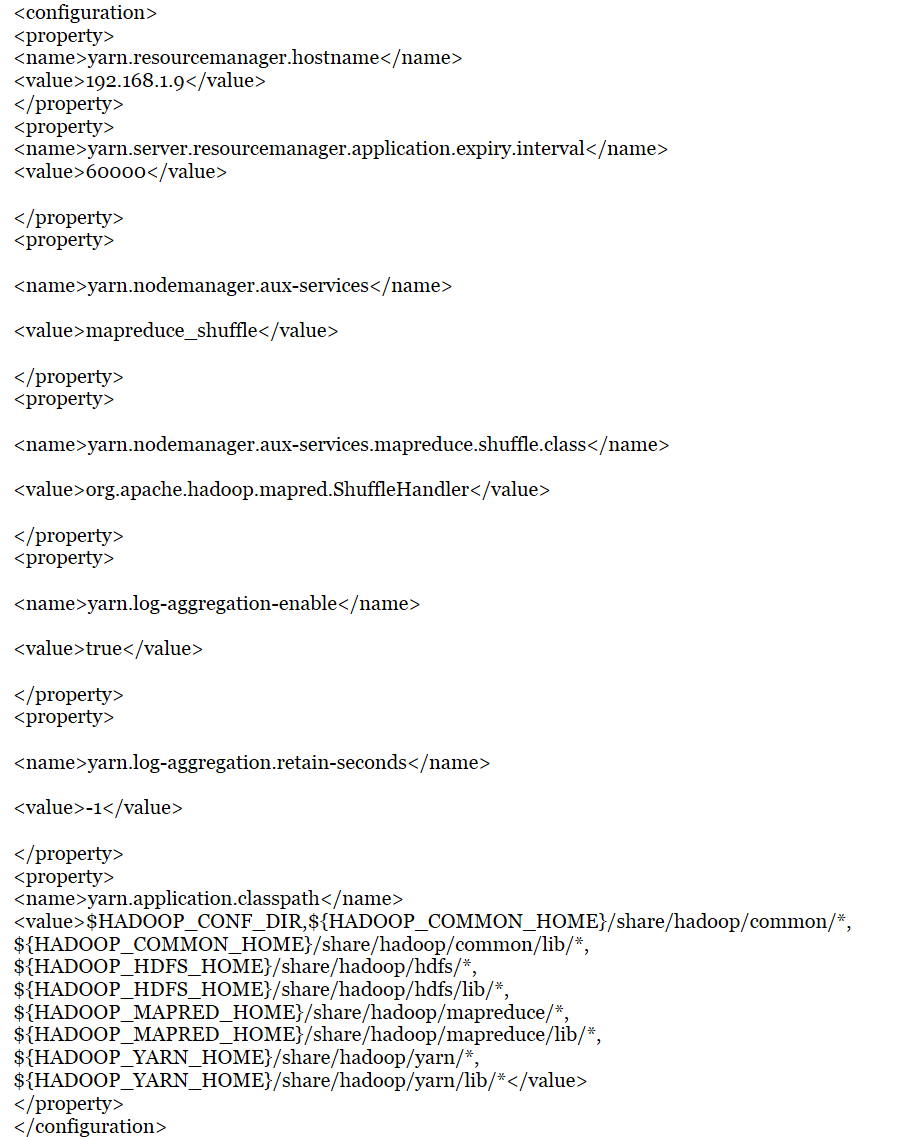
5. Edit yarn-site.xml
1 | $ vim yarn-site.xml |
6. Edit hadoop-env.sh
1 | $ vim hadoop-env.sh |
1 2 3 | export JAVA_HOME=/usr/local/jdk1.8.0_181-amd64 export HADOOP_CONF_DIR="${HADOOP_HOME}/etc/hadoop" export PATH="${PATH}:${HADOOP_HOME}/bin" |
Step 10: Create namenode directory in master machine
1 | $ mkdir -p /home/hadoop/hadoop-3.1.0/hadoop_store/hdfs/namenode |
Step 11: Modify Masters file and add ip address of namenode in master system
***create a masters file in master machine***
1 | $ vim masters |
***add ip address of master machine in masters file****
1 | 192.168.1.9 |
Step 12: Modify Slaves file and add ip address of datanode’s in master system
***create slaves file in master machine***
1 | $ vim slaves |
***add ip address of slave machine’s in slaves file***
1 2 | 192.168.1.23 192.168.1.3 |
To view contents of masters file:
1 | $ cat masters |
***it will show master ip address***
1 | 192.168.1.9 |
To view contents of Slaves file:
1 | $ cat slaves |
***it will show list of slaves ip address***
1 2 | 192.168.1.23 192.168.1.3 |
Step 13: Copy hadoop-3.1.0 file to slaves
To Secure copy hadoop file from Master machine /usr/local/hadoop-3.1.0 to Slave machines
***Type the below command in master machine and copy the file from Master to Slave1***
1 | $ scp -r /usr/local/hadoop-3.1.0 root@slave1:~/ |
***Type the below command in master machine and copy the file from Master to Slave2***
1 | $ scp -r /usr/local/hadoop-3.1.0 root@slave2:~/ |
Step 14: Make datanode’s directory on both Slave1 and Slave2 machines
***make a directory in hadoop-3.1.0 for datanode in slave machines***
1 2 3 | $ mkdir –p /home/hadoop/hadoop-3.1.0/hadoop_store/hdfs/datanode chmod 777 /home/hadoop/hadoop-3.1.0/hadoop_store/hdfs/datanode |
Step 15: Format namenode on master machine
1 | $ hdfs namenode -format |
Step 16: Start Namenode and Datanode
1 | $ start-dfs.sh |
Step 17: Start Nodemanager and Resourcemanager
1 | $ start-yarn.sh |
Step 18: Start Hadoop Daemons on Master and Slaves
***Type the below command in master machine***
1 | $ jps |
***It will show output daemons of master machine***
10307 Jps
7961 ResourceManager
7105 NameNode
7352 SecondaryNameNode
***Type the below command in slave1 machine’s***
1 | $ jps |
***It will show output daemons of slave1 machine***
2780 Jps
2181 NodeManager
1996 DataNode
***Type the below command in slave2 machine***
1 | $ jps |
***It will show output daemons of slave2 machine ***
1735 Jps
2328 NodeManager
1983 DataNode
Step 19: Check Hadoop Web Interfaces (HADOOP WEB UI)
***web url for DFS health reports of master machine***
http://192.168.1.9:9870/dfshealth.html#tab-overview
***web url for DFS health reports of slave1 machine***
http://192.168.1.23:9864
***web url for DFS health reports of slave2 machine***
http://192.168.1.3:9864
***to verify through command line***
root@master: /usr/local/hadoop-3.1.0/etc/hadoop > hdfs dfsadmin -report
***web url for resource manager***
http://192.168.1.9:8088/cluster
Congrats! Now we’ve successfully installed hadoop in multi node using yarn mode.
——–
For any doubts/clarifications
contact me in email : [email protected]
whats app: +91 7401256086
![]()
Its awesome consolidation of all prerequisites. But i have one doubt over here?
May i kkow why are you using ip addresses inside masters and slaves files?
I hope it is better to user hostnames everywhere that is the reason we configured /etc/hots across all hosts.
Please clarify.
Yes, you are right. We can use hostname also instead of ipaddress. Only when you configure… etc/hostname… file.
For better understanding I am using ipaddress instead of hostname for beginners to understand easily. you can also try by hostname and check whether it is pinging or not.
Reason to configure /etc/hosts:
we need to mention the ipaddress as well as hostname of desired machine to connect with the machine in which we’re configuring.. /etc/hosts…..
Then we can ping by (ssh hostname/ssh ipaddress).. It is a flavour we can use any of this..
See for example if you are adding hostname alone and not ipaddress in your master machine /etc/hosts.
After that you’re trying to ping by (ssh hostname) it will ping/connect or not!!???
Answer is… Obviously it will not connect.
Only when you add ipaddress of that hostname in that line… Then only master machine will know this hostname machine belongs to this ipaddress machine… So only by ipaddress the master machine know how to connect that hostname machine.
So we’re using ipadreess for more accuracy between connections
Really OSM, Good work!
anyone can learn hadoop multinode installation. this site is explaining each and every line.
very usefull ji.. Thanks!
good thing you did…
I really appreciate you Prabhu Sundarraj
share knowledge as much as you can…
Great work bro!