 Database Tutorials MSSQL, Oracle, PostgreSQL, MySQL, MariaDB, DB2, Sybase, Teradata, Big Data, NOSQL, MongoDB, Couchbase, Cassandra, Windows, Linux
In this article I will tell the installation of Elasticsearch on Centos 7. We will perform the installation with an example scenario. Before reading this article, I suggest you read the following article on Elasticsearch.
We will use 5 servers for installation. 3 of these 5 servers will be the data node. The other 2 servers will be the master node. And we will install kibana on one of the master nodes.
Example Scenario
As you can see in the screenshot below, we have 5 servers.
We will install two servers as master nodes. we will install three servers as data nodes. We will also install Kibana on the second master node. If you want you can install Kibana on another server.

Installation Steps
Java Installation
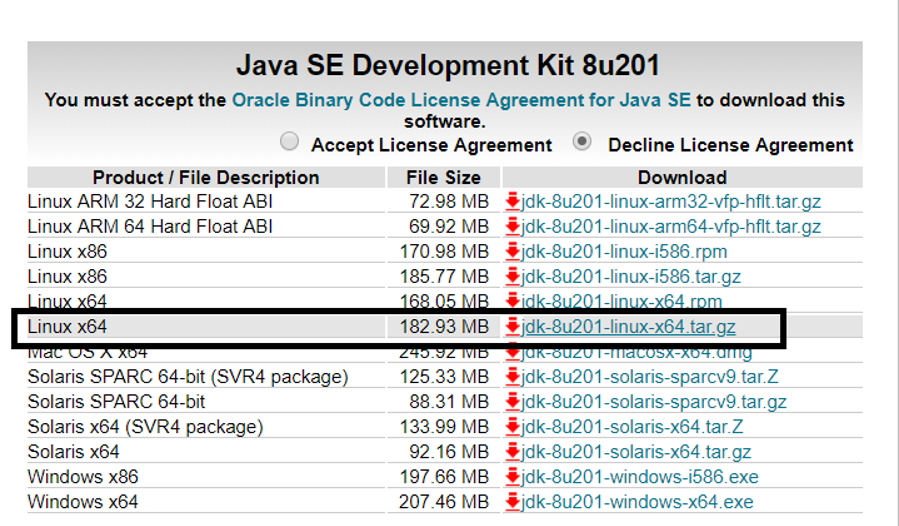
First, we are installing java. To install Java you must download the file that is compatible with your system from the link below.
https://www.oracle.com/technetwork/java/javase/downloads/jdk8-downloads-2133151.html
Since we are going to install on 64 bit linux system, we are downloading the file below.
Then we create a folder like below to install java. The Java installation is done under the usr/bin folder by default. I’ll make installation in the folder I’ll create below for easier use.
as root:
1 | mkdir /opt/jdk |
We extract the downloaded java files into the /opt/jdk directory and ensure that the java works from this directory.
1 | tar -zxf /home/elastic/jdk-8u201-linux-x64.tar.gz -C /opt/jdk |

1 2 | update-alternatives --install /usr/bin/java java /opt/jdk/jdk1.8.0_201/bin/java 100 update-alternatives --install /usr/bin/javac javac /opt/jdk/jdk1.8.0_201/bin/javac 100 |
![]()
We set JAVA_HOME using the following commands.
1 2 | export JAVA_HOME=/opt/jdk/jdk1.8.0_201/ export PATH=$JAVA_HOME/bin:$PATH |
![]()
Elasticsearch Installation
You can download the installation file from the link below.
https://www.elastic.co/downloads/elasticsearch
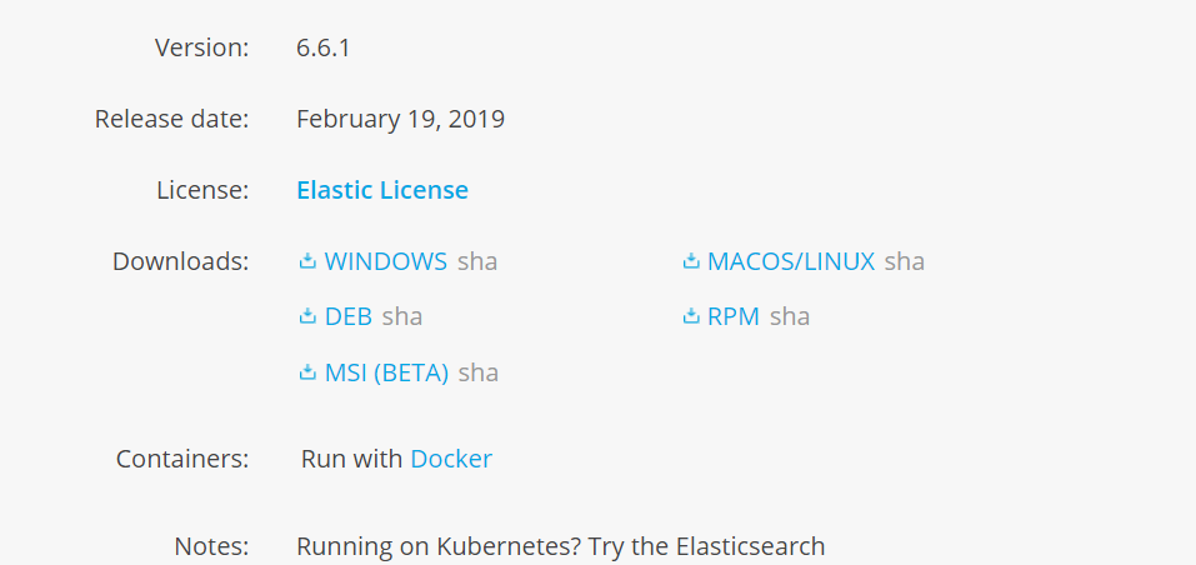
Since we will install on CENTOS, we download the RPM package and copy it to the server.
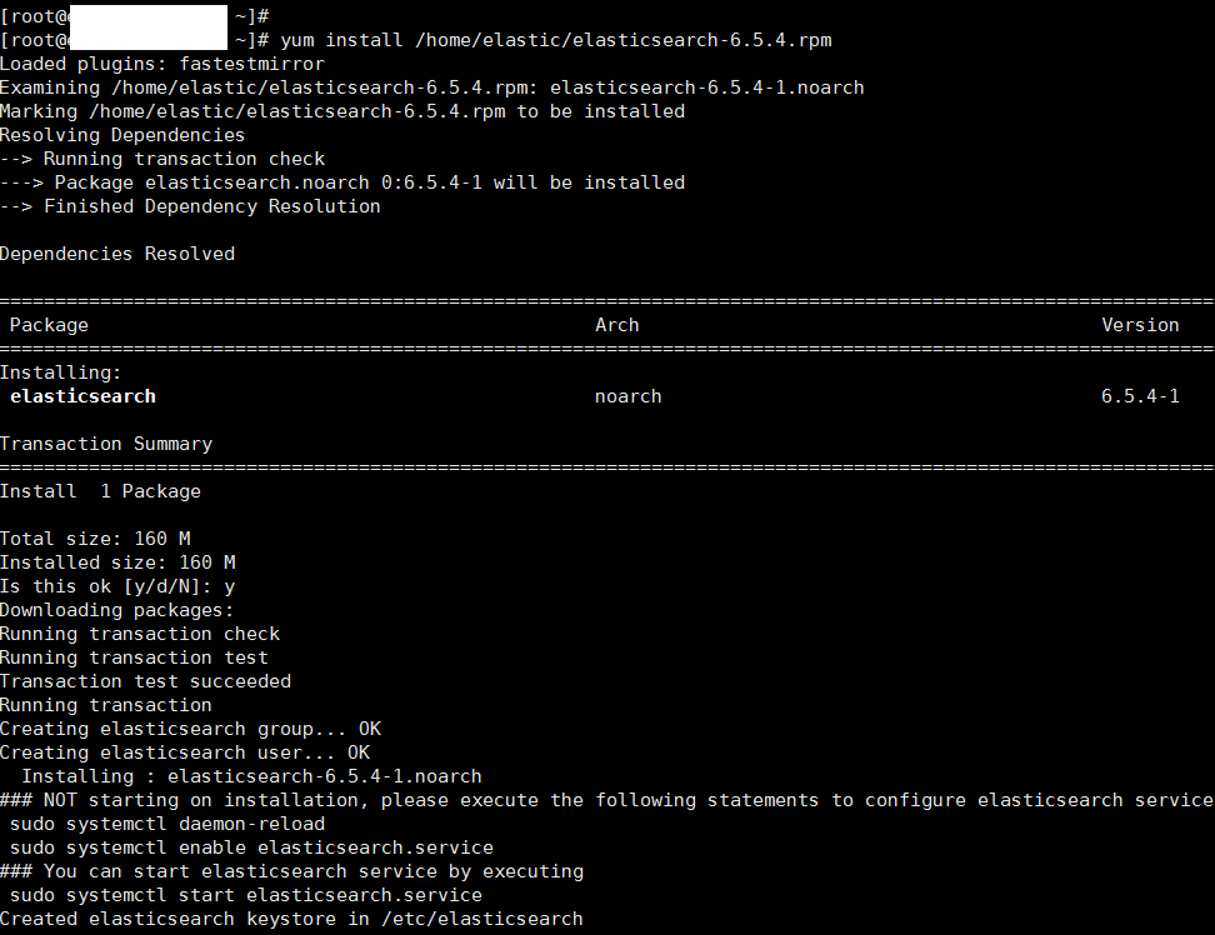
You can go to the directory where you copied the RPM package on the server and install elascticsearch using the following command.
as root:
1 | yum install /home/elastic/elasticsearch-6.5.4.rpm |
It will ask a question. Type “y” and click enter.
If you have internet access via the server, you can perform elasticsearch installation as below.
yum install https://artifacts.elastic.co/downloads/elasticsearch/elasticsearch-6.5.4.rpm
Necessary Configurations After Installation
SET JAVA_HOME For Elasticsearch
After the installation is completed, we open the following file with the command “vi” and we show the path of JAVA to elasticsearch.
as root:
1 | vi /etc/sysconfig/elasticsearch |

After the file is opened, we set JAVA HOME as follows. you must press the Insert key to make changes.
1 | JAVA_HOME=/opt/jdk/jdk1.8.0_161 |

Press ESC and save with “wq” command as follows and press enter.
1 | :wq |

Enable elasticsearch service
We enable elasticsearch service using the command below.
1 | systemctl enable elasticsearch |
![]()
The path of the service is as follows.
1 | /usr/lib/systemd/system/elasticsearch.service |
Elasticsearch Configurations
Before configuring, we create two directories to store elasticsearch’s data files and error log files.
Note: You should do this with elasticsearch. You can switch to the elasticsearch user using the “su elasticsearch” command.
as root:
1 2 | mkdir -p /data/elasticsearch/master1/ mkdir -p /data/elasticsearch/master1_log/ |
![]()
Assign the elasticsearch user as the owner for the data folder and for all directories under it.
1 | chown -R elasticsearch:elasticsearch /data/ |

We’re changing the privileges of elasticsearch.
1 | chmod -R 700 /data/ |

We are editing the elasticsearch.yml file which is the elasticsearch configuration file using the command below.
1 | vi /etc/elasticsearch/elasticsearch.yml |
After opening the file, we configure it as follows. If there is # at the beginning of the line, this line is a comment line or contains an inactive configuration information.
Note: I recommend that you read the lines beginning with #. Because I’ve written some notes.
Do not copy the below yml file. Just change the necessary parameters according to your system.
1 2 3 4 5 6 7 8 9 10 11 12 13 14 15 16 17 18 19 20 21 22 23 24 25 26 27 28 29 30 31 32 33 34 35 36 37 38 39 40 41 42 43 44 45 46 47 48 | # ---------------------------------- Cluster ----------------------------------- # # Use a descriptive name for your cluster: #This is my note->This must be the same on each node of cluster cluster.name: elasticsearch # # Set node name node.name: master-1 # # Add custom attributes to the node: # #node.attr.rack: r1 # # ----------------------------------- Paths ------------------------------------ # # Path to directory where to store the data (separate multiple locations by comma): #This is my note->The directory where Elasticsearch's data files are stored path.data: /data/elasticsearch/master1/ # # Path to log files: #This is my note->The folder where Elasticsearch's error log files are stored path.logs: /data/elasticsearch/master1_log/ # # ---------------------------------- Network ----------------------------------- # # Set the bind address to a specific IP (IPv4 or IPv6): # network.host: write_your_masterip_here # # Set a custom port for HTTP: #This is my note->If you want you can change port information in here. http.port: 9200 # # For more information, consult the network module documentation. # # --------------------------------- Discovery ---------------------------------- # # Pass an initial list of hosts to perform discovery when new node is started: # The default list of hosts is ["127.0.0.1", "[::1]"] #This is my note->You must add all master's and data node's IPs in cluster as follows. discovery.zen.ping.unicast.hosts: ["master1_IP","master2_IP","data_node1_IP","data_node2_IP","data_node3_IP"] # This is my note->If you do not change anything, a node will be both a master and a data node #as a default. Since we configure this node as master node, we are setting the node.data=false. #Thus, this node will be only master node. #node.master: true node.data: false #This is my note->If you are not going to use xpack, you should set it to false as follows. xpack.security.enabled: false xpack.spaces.enabled: false |
If you are going to use the searchguard, you should copy the searchguard’s keystore information to the elasticsearch.yml file. For detailed information, please read the following article.
“How To Install Searchguard For Elasticsearch and Kibana(Managing Multiple Indice In Elasticsearch Seperately and Password Protection on Elasticsearch)”
Start Elasticsearch Service
After the necessary configurations are done as above, we start the service as below.
1 | systemctl start elasticsearch |
We do the same for all master and data nodes. The only different step in the installation is the following parameters in the yml file.
If we set the “node.data:” parameter as follows, that node becomes the master.
1 | node.data: false |
If we set the “node.master:” parameter as follows, that node becomes the data node.
1 | node.master: false |
After Elastic 6.0 we can use xpack for authentication instead of search guard. If you set xpack.security.enabled: true, this means that you will use xpack’s authentication when connecting elasticsearch. After this you must set passwords for specific users with below command.
1 | /usr/share/elasticsearch/bin/elasticsearch-setup-passwords interactive |
Check Everything is Correct
All installations and configurations have been completed.
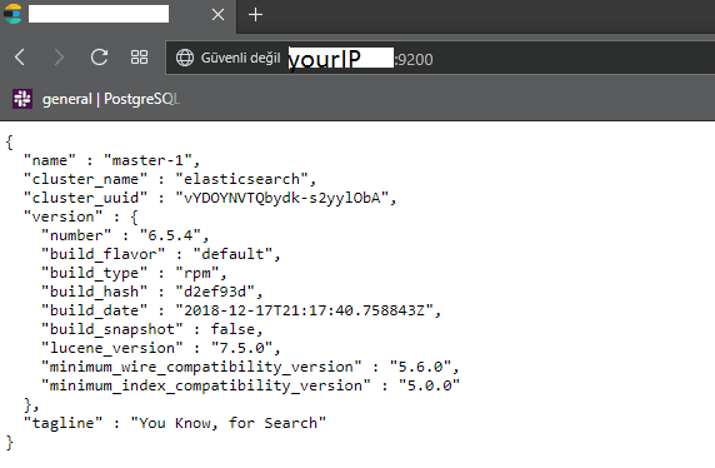
Open a browser and write your IP:port to the browser.
If everything is succesfull, everything should be as follows.
![]()